CLI Integrated Development Tool
Overview
This chapter introduces the integrated development tool ameba.py based on the CLI environment, and how to use the tool for development.
ameba.py encapsulates common development functions. With this tool, users can easily create, configure, and build projects.
The encapsulated tools primarily include:
tools/scripts/build.py, provides build functions, invoked by theameba.py buildcommand. Users can check supported parameters viaameba.py build -h.
tools/scripts/menuconfig.py, provides configuration functions, invoked by theameba.py menuconfigcommand. Users can check supported parameters viaameba.py menuconfig -h.
tools/scripts/jlink_script/jlink.py, provides J-Link debugging functions, invoked by theameba.py jlinkcommand. Users can check supported parameters viaameba.py jlink -h.
ameba.py supports development for all Ameba series chips in the SDK. Before the first build, a chip must be selected, for example RTLxxx.
If an SoC has already been selected in the current directory, user do not need to select it again. Subsequent configuration and build operations are based on that chip.
After starting a build or configuration, a build_RTLxxx directory is automatically generated in the current directory, where RTLxxx is the selected chip. This directory contains build outputs (firmware files and the build folder) and configuration outputs (the menuconfig folder).
The following sections will be introduced:
Development Flow using
ameba.pyHow to create an External Project
Frequently Used Commands of
ameba.py
Development Flow
Step 1: Environment Setup
Execute the following command in the terminal:
source {sdk}/env.sh
{sdk}\env.bat
source {sdk}/env.sh
After the environment is successfully setup, the terminal will output the following information:
PIP CHECK... All packages are installed correctly!
================================================================================
|  Setup complete. The Ameba SDK is now ready for use.
|  Go to the project root directory and run ameba.py
|  Usage:      ameba.py [COMMAND] [ARGS]
|  Build:      ameba.py build
|  Select SoC: ameba.py soc
|  Help:       ameba.py help
================================================================================
Note
Replace
{sdk}with your own Ameba SDK path.Execute the above command to configure the environment every time you open a new terminal. Since putting this script into bashrc will configure the Ameba environment in every terminal, affecting the user’s original software environment, it is recommended to configure manually in each terminal.
Step 2: Select an SoC
Enter the target directory (e.g., /home/demo/test), after completing the environment setup, execute the following command:
ameba.py soc [RTLxxx]
After selection, the SoC will be recorded in the soc_info.json file in the current directory.
For example, to specify RTL8713E:
$ ameba.py soc RTL8713E
Current SoC is set to: RTL8713E. Saved as /home/demo/test/soc_info.json
If no chip is specified, it will enter the interactive selection interface. For example:
$ ameba.py soc

Available SoCs:
----------------------------------------

1. RTL8713E
2. RTL8720E
3. RTL8721Dx
4. RTL8721F
5. RTL8726E
6. RTL8730E

----------------------------------------
Enter an SoC number (1-6): 1
Current SoC is set to: RTL8713E. Saved as /home/demo/test/soc_info.json
Note
Use
ameba.py listto query all available chips.Use
ameba.py showto view the current chip after selection.Multiple chips can share the same working directory — each chip’s build and configuration artifacts are stored in its own dedicated
build_RTLxxxfolder. Note thatsoc_info.jsononly records one active chip at a time, so confirm the current selection withameba.py showbefore building to avoid targeting the wrong chip.
Step 3: Configuration
If you do not need to modify the configuration, you can skip this step and use the Ameba SDK default configuration for compilation.
To modify the configuration of the current SoC, use the following command:
ameba.py menuconfig [args]
The [args] part is optional, representing arguments passed to the underlying tools/scripts/menuconfig.py script. You can check supported arguments via the ameba.py menuconfig -h command, or refer to the Configuration (menuconfig) section.
Configuration content will be saved in the build_RTLxxx/menuconfig directory.
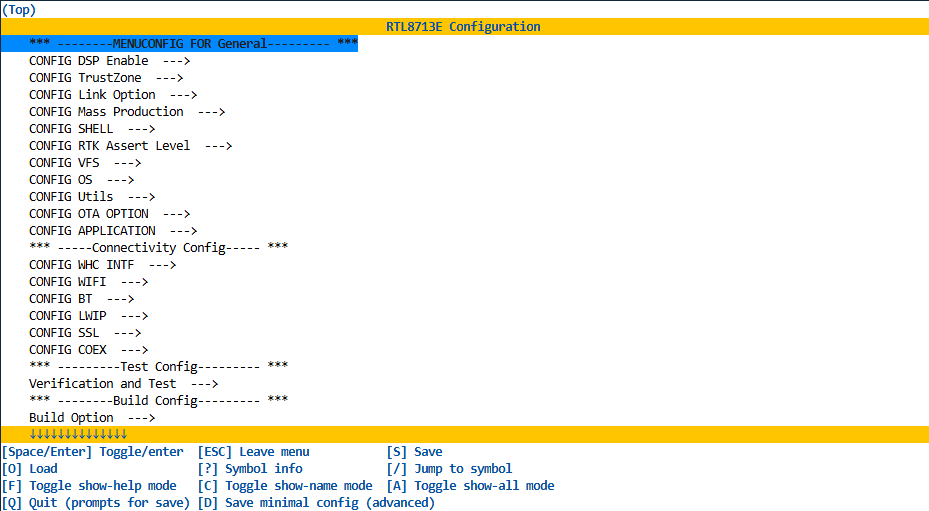
For example, execute ameba.py menuconfig in the /home/demo/test directory to enter the graphical interface to modify the configuration.
Since the current chip was set to RTL8713E in previous steps, RTL8713E will be configured here:
After saving the configuration successfully, the terminal will output the following information:
$ ameba.py menuconfig
Start to menuconfig RTL8713E ...
Loaded configuration '/home/demo/test/build_RTL8713E/menuconfig/.config'
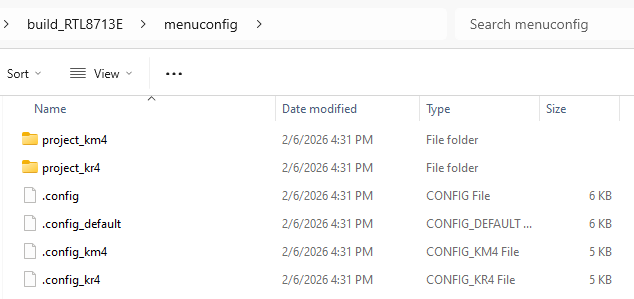
Configuration saved to '/home/demo/test/build_RTL8713E/menuconfig/.config'
The build_RTL8713E/menuconfig directory will be generated in the current directory, as shown in the figure:
Step 4: Build
Use the following command to build the current SoC:
ameba.py build [args]
The [args] part is optional, representing arguments passed to the underlying tools/scripts/build.py script. You can check supported arguments via the ameba.py build -h command, or refer to the Build Commands section.
Intermediate build artifacts are located in the build_RTLxxx/build directory, and the final firmware is located in the build_RTLxxx directory.
For example, execute ameba.py build in the /home/demo/test directory. Since the current chip was set to RTL8713E in previous steps, RTL8713E will be compiled here.
After successful completion, the following information will be output:
$ ameba.py build
Start to build RTL8713E ...
ccache found
Default toolchain path: /home/user_name/rtk-toolchain
Toolchain Version Matched
......
-- Configuring done (1.6s)
-- Generating done (0.3s)
-- Build files have been written to: /home/demo/test/build_RTL8713E/build
[1216/1219] Linking C executable project_km4/make/image1/target_loader_km4.axf
[1219/1219] cd /home/demo/test/build_RTL8713E/build && .../component/soc/amebalite/project/postbuild.cmake
========== Image app generate start ==========
========== Image manipulating end ==========
Build done
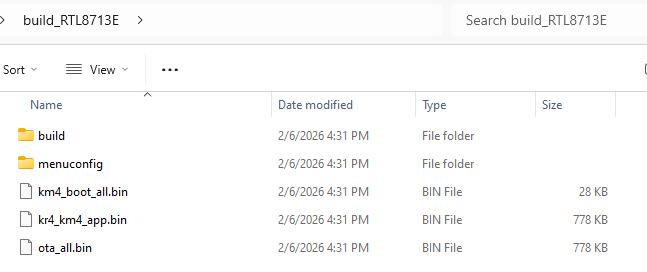
After compilation is complete, the final outputs app.bin and boot.bin are located in the build_RTL8713E directory, as shown below:
Note
To build other SoCs, execute
ameba.py socagain, and then build with thebuildcommand. You can also build a specified SoC directly via thebuildcommand, for example,ameba.py build RTL8721Dx.To clean artifacts for a specific SoC, use the
cleanorcleansoccommand. For usage details, please refer to Common Commands.
Create External Project
In some scenarios, users may want to create a project directory independent of the Realtek SDK to facilitate independent maintenance or updates, or to develop different projects based on the same SoC.
Users can create a separate external project based on a specific application example, and then perform development within that project directory.
In this way, users can extend the functionality and configuration of their applications, maintain the project directory independently, and easily update the files in the Realtek SDK.
The following describes the development method based on external projects.
Create External Project
First, configure the Ameba SDK environment according to Step 1 of the Development Flow.
Execute the following command in the terminal:
ameba.py new-project path/to/target [-a app_name]
Note
Replace
path/to/targetwith the path of the new project. It must be outside the SDK and can be a relative or absolute path.-a app_nameis optional, indicating the application example to be included in the new project. If this parameter is omitted, an empty application example will be created.
After creation, a new external project directory will be generated at the specified path. This directory contains:
env.batenv.sh: Scripts for users to configure the environment. You can also configure the environment as described in Step 1.
<app_name>folder: The files from the specified application example directory will be copied here. If not specified, anapp_examplefolder will be created containing an empty application example.
CMakeLists.txt: The entry file for building this new project.
Kconfig: Users can add their own configuration items here.
prj.conf: Used to record the default configuration of the project.
For example, create an external project named my_project at the same level as the current directory (/home/demo/test), including the http_client application example. Upon successful creation, the following information will be output:
$ ameba.py new-project ../my_project -a http_client
A new project based on app 'http_client' is created in '/home/demo/my_project'.
Developing in the External Project Directory
Enter the external project directory:
cd path/to/targetConfigure environment:
source env.sh(runenv.baton Windows); or configure the environment as described in Step 1.Use
ameba.pyfor build, configuration, etc. Refer to Step 2 ~ Step 4 of the Development Flow.
Frequently Used Commands
The usage of ameba.py is as follows:
ameba.py <COMMAND> [ARGS]
Where <COMMAND> is the specific command and [ARGS] are optional arguments.
Common commands are listed in the following table:
Feature |
Command |
Description |
|---|---|---|
Help |
|
List supported commands |
Query available chips |
|
List all available chip models |
Select chip |
|
Set the current chip to RTLxxx |
Show current chip |
|
Show the current chip model |
Build |
|
Build the currently selected chip |
Configure |
|
Configure the currently selected chip |
Clean build artifacts |
|
Clean build artifacts of the current chip |
Clean chip |
|
Clean all artifacts of the current chip |
Create external project |
|
Create a new project outside the SDK |
J-Link debug tool |
|
Debug the current chip via J-Link |
Tip
In Linux and macOS systems, pressing the TAB key to autocomplete commands is supported. In addition, the soc command supports autocompletion of chip models.
Help Command
If you are using the ameba.py script for the first time, you can learn how to use it with the following command, which lists all supported commands:
ameba.py help
$ ameba.py help
Ameba CLI Development Tool
Usage: ameba.py [COMMAND] [ARGS]

Available commands:
build        : Build on the current or given SoC. e.g. ameba.py build [soc_name] [args]
clean        : Clean build products of the given or current SoC. e.g. ameba.py clean [soc_name]
cleansoc     : Clean all products of the given or current SoC. e.g. ameba.py cleansoc [soc_name]
flash        : Firmware flashing.
help         : Display this help information.
jlink        : J-Link tool.
list         : List all available SoC names.
menuconfig   : Run menuconfig tool for the current or given SoC. e.g. ameba.py menuconfig [soc_name] [args]
monitor      : Serial monitor.
new-project  : Create a new empty project in the given path. e.g. ameba.py new-project path/to/your/project [-a app_name]
show         : Show the current selected SoC name.
soc          : Select an SoC to build. If no SoC name given, enter the interactive selection.

Run 'ameba.py <COMMAND> -h' for more information of command build/menuconfig/flash/monitor/jlink.
Query Available Chips
When the ameba.py script is called, it automatically detects all available chip models in the current SDK.
Use the list command to list all available chip models:
ameba.py list
Select Chip
Use the soc command to select the target chip model, which can be specified as an argument, for example:
ameba.py soc RTL8721Dx
The selected SoC information will be saved in the soc_info.json file in the current directory. Subsequent operations such as compilation and configuration are based on the currently selected chip. Only one chip can be selected at a time.
To change the target chip, you can use the ameba.py soc [RTLxxx] command again to select a new chip.
Tip
If no chip model is specified, the
soccommand will enter the interactive selection mode, where the user can select the desired chip model from the list.To view the currently selected chip, use the
ameba.py showcommand.
Show Current Chip
Use the show command to view the current chip model:
ameba.py show
This command queries the soc_info.json file to read the currently selected chip model.
Build
Use the build command to build the current chip:
ameba.py build [args]
The [args] part is optional, representing arguments passed to the underlying tools/scripts/build.py script. Supported arguments can be found in the Build Commands section, or viewed via the ameba.py build -h command.
For example, to perform a clean build, use the following command:
ameba.py build -p
The build artifacts are located in the build_RTLxxx directory, where RTLxxx is the compiled chip model. The build_RTLxxx/build directory stores the intermediate files generated by the compilation, and the final firmware (image file) is located in the build_RTLxxx directory.
Tip
If no chip is currently selected, the
ameba.py buildcommand will prompt the user for interactive selection and then start building.To build a specific chip, you can specify the chip model directly after the
buildcommand, for example,ameba.py build RTL8721Dx. The chip selected in this way will be updated in thesoc_info.jsonfile.
Configure
Use the menuconfig command to configure the current chip:
ameba.py menuconfig [args]
The [args] part is optional, representing arguments passed to the underlying tools/scripts/menuconfig.py script. Supported arguments can be found in the Configuration (menuconfig) section, or viewed via the ameba.py menuconfig -h command.
The configuration artifacts are located in the build_RTLxxx/menuconfig directory, where RTLxxx is the configured chip model.
Tip
If no chip is currently selected, the
ameba.py menuconfigcommand will prompt the user for interactive selection and then enter the configuration interface.To configure a specific chip, you can specify the chip model directly after the
menuconfigcommand, for example,ameba.py menuconfig RTL8721Dx. The chip selected in this way will be updated in thesoc_info.jsonfile.
Debug
Use the jlink command to debug the current chip:
ameba.py jlink [args]
The [args] part is optional, representing arguments passed to the underlying tools/scripts/jlink_script/jlink.py script. Supported arguments can be viewed via the ameba.py jlink -h command.
This command will automatically generate a J-Link script based on the architecture of the current chip, located in the build_RTLxxx/jlink_script directory, where RTLxxx is the configured chip model. After the script is generated, the corresponding J-Link program will be automatically called for connection.
Clean Build Artifacts
Use the clean command to clean the build artifacts of the current chip:
ameba.py clean
The build_RTLxxx/build folder and firmware (build_RTLxxx/*.bin) will be deleted, but the build_RTLxxx/menuconfig directory and soc_info.json file will be retained.
You can specify the chip model, for example, ameba.py clean RTL8721Dx will clean the build artifacts of RTL8721Dx.
Clean Chip
Use the cleansoc command to clean all artifacts of the current chip:
ameba.py cleansoc
This will clean build artifacts and configuration artifacts. The build_RTLxxx folder and the soc_info.json file will be deleted. You need to re-select the chip model for the next build.
You can specify the chip model, for example, ameba.py cleansoc RTL8721Dx will clean all artifacts of RTL8721Dx.
Create External Project
Use the new-project command to create a new external project outside the SDK:
ameba.py new-project path/to/your/project [-a app_name]
Where path/to/your/project is the path of the new project, which must be outside the SDK and can be a relative or absolute path; -a app_name is optional, indicating the name of the application example to be included in the new project. If this parameter is omitted, an empty application example will be created.
For example, to create a new project named my_project containing the http_client example, execute the following command in the SDK root directory:
ameba.py new-project ../my_project -a http_client
This command will create the my_project folder in the parent directory of the SDK root directory and copy the http_client example code into that folder.
After creation, enter the new project directory, and you can use ameba.py for development directly. Select the chip model via ameba.py soc, and then perform configuration and compilation via ameba.py menuconfig and ameba.py build.
If you need to open the external project directory in a new terminal, you need to execute the following command first to configure the development environment:
source env.sh
Then you can use ameba.py for development.
