CLI Build and Download
Introduction
This chapter illustrates how to build Realtek’s SDK under CLI environment, then download the image to the chip.
Build Flow
Configuring and building need to be carried out under the SoC project directory, where the required Python scripts are located. The script build.py is used for building.
Enter the GCC project directory:
{SDK}/amebadplus_gcc_project.
Note
Replace the {SDK} with your own SDK directory.
Run the python script:
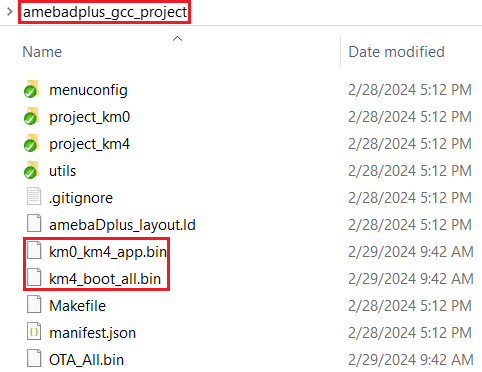
build.py, then the building begins.After the building is completed, the image files will be copied to the
/amebadplus_gcc_projectpath. Users can also find the image files in the following folders:/amebadplus_gcc_project/project_km0/asdk/image/amebadplus_gcc_project/project_km4/asdk/image
Intermediate files generated by CMake will be stored in the
buildfolder.If the generation fails, try running
build.py -cand then recompile.

Building log for KM0 & KM4 projects

KM4 & KM0 image generation
Note
If you want to obtain the .map files for debugging, please look in the following paths:
/amebadplus_gcc_project/project_km0/asdk/image/amebadplus_gcc_project/project_km4/asdk/image.
Enter the GCC project directory:
{SDK}/amebalite_gcc_project.
Note
Replace the {SDK} with your own SDK directory.
Run the python script:
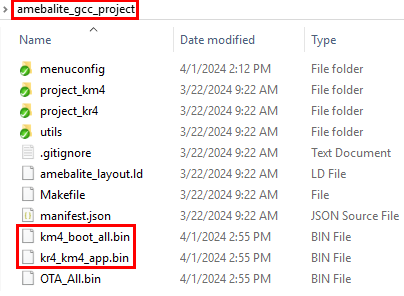
build.py, then the building begins.After the building is completed, the image files will be copied to the
/amebalite_gcc_projectpath. Users can also find the image files in the following folders:/amebalite_gcc_project/project_km0/asdk/image/amebalite_gcc_project/project_km4/asdk/image
Intermediate files generated by CMake will be stored in the
buildfolder.If the generation fails, try running
build.py -cand then recompile.

Building log for KM4 & KR4 projects

Image generation for KM4 & KR4
Note
If you want to obtain the .map files for debugging, please look in the following paths:
amebalite_gcc_project/project_kr4/vsdk/imageamebalite_gcc_project/project_km4/asdk/image
Enter the GCC project directory:
{SDK}/amebalite_gcc_project.
Note
Replace the {SDK} with your own SDK directory.
Run the python script:
build.py, then the building begins.After the building is completed, the image files will be copied to the
/amebalite_gcc_projectpath. Users can also find the image files in the following folders:/amebalite_gcc_project/project_km0/asdk/image/amebalite_gcc_project/project_km4/asdk/image
Intermediate files generated by CMake will be stored in the
buildfolder.If the generation fails, try running
build.py -cand then recompile.

Building log for KM4 & KR4 projects

Image generation for KM4 & KR4
Note
If you want to obtain the .map files for debugging, please look in the following paths:
amebalite_gcc_project/project_kr4/vsdk/imageamebalite_gcc_project/project_km4/asdk/image
Enter the GCC project directory:
{SDK}/amebalite_gcc_project.
Note
Replace the {SDK} with your own SDK directory.
Run the python script:
build.py, then the building begins.After the building is completed, the image files will be copied to the
/amebalite_gcc_projectpath. Users can also find the image files in the following folders:/amebalite_gcc_project/project_km0/asdk/image/amebalite_gcc_project/project_km4/asdk/image
Intermediate files generated by CMake will be stored in the
buildfolder.If the generation fails, try running
build.py -cand then recompile.

Building log for KM4 & KR4 projects

Image generation for KM4 & KR4
Note
If you want to obtain the .map files for debugging, please look in the following paths:
amebalite_gcc_project/project_kr4/vsdk/imageamebalite_gcc_project/project_km4/asdk/image
Enter the GCC project directory:
{SDK}/amebalite_gcc_project.
Note
Replace the {SDK} with your own SDK directory.
Run the python script:
build.py, then the building begins.After the building is completed, the image files will be copied to the
/amebalite_gcc_projectpath. Users can also find the image files in the following folders:/amebalite_gcc_project/project_km0/asdk/image/amebalite_gcc_project/project_km4/asdk/image
Intermediate files generated by CMake will be stored in the
buildfolder.If the generation fails, try running
build.py -cand then recompile.

Building log for KM4 & KR4 projects

Image generation for KM4 & KR4
Note
If you want to obtain the .map files for debugging, please look in the following paths:
amebalite_gcc_project/project_kr4/vsdk/imageamebalite_gcc_project/project_km4/asdk/image
Enter the GCC project directory:
{SDK}/amebasmart_gcc_project.
Note
Replace the {SDK} with your own SDK directory.
Run the python script:
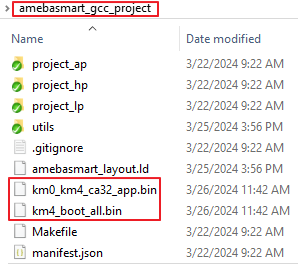
build.py, then the building begins.After the building is completed, the image files will be copied to the
/amebasmart_gcc_projectpath. Users can also find the image files in the following folders:/amebasmart_gcc_project/project_hp/asdk/image/amebasmart_gcc_project/project_lp/asdk/image/amebasmart_gcc_project/project_ap/asdk/image
Intermediate files generated by CMake will be stored in the
buildfolder.If the generation fails, try running
build.py -cand then recompile.

Compilation log for KM4 & KM0 & CA32

Image generation for KM4 & KM0 & CA32
Note
If you want to obtain the .map files for debugging, please look in the following paths:
/amebasmart_gcc_project/project_hp/asdk/image/amebasmart_gcc_project/project_lp/asdk/image/amebasmart_gcc_project/project_ap/asdk/image
The final build product is the image files, which users need to download into the chip.
Build Commands
Realtek provides a build.py script to simplify the build command of projects. Common commands are listed below:
Function |
Command |
Description |
|---|---|---|
Help |
|
List supported commands |
Build |
|
Incremental build of project |
Pristine Build |
|
Remove all products and build |
Specify Example |
|
Build example named ‘APP’ |
Specify Target |
|
Build specified target |
Cleanup |
|
Clean compilation products |
Debug |
|
Enter debug mode |
Help Command
If you are using the build.py script for the first time, use the following command to understand its usage.
build.py -h
With the -h or --help option, all supported commands will be listed.
build.py -h
usage: build.py [-h] [-a APP] [-c] [-p]
               [-g {flashloader,imgtool_flashloader,gen_imgtool_floader}]
               [-gdb] [-debug] [-D DEFINED [DEFINED ...]] [--new NEW [NEW ...]]

options:
-h, --help            show this help message and exit
-a APP, --app APP     application path
-c, --clean           clean
-p, --pristine        pristine build
-g {flashloader,imgtool_flashloader,gen_imgtool_floader}, --target {flashloader,imgtool_flashloader,gen_imgtool_floader}
                        custom target
-gdb, --gdb           gdb
-debug, --debug       debug
-D DEFINED [DEFINED ...], --Defined DEFINED [DEFINED ...]
                        user defined variables
--new NEW [NEW ...]   build.py --new-prj <target_dir> [-a <APP>]
Pristine Build
Pristine build means that there are no previous residual products affecting this build. All previously products and configurations will be removed before this build. The -p option is equivalent to the --pristine option.
build.py -p
Note
A clean build will also remove the
menuconfigfolder, and any previous configurations will be discarded. This build process will use initial configurations.If you only need to clean up the build artifacts but want to retain the previous configurations, use the
build.py -ccommand for cleanup.
Incremental Build
Without any arguments, the project will undergo incremental build, which significantly saves time compared to full build.
build.py
Build Specified Example
Some application examples are provided under the ${SDK}/component/example directory. To build one of these examples, pass the application name or path to build.py using the -a or --app options.
build.py -a <APP>
For instance, to build the ${SDK}/component/example/network_protocol/http_client example, you can input the following command:
build.py -a ${SDK}/component/example/network_protocol/http_client
//or
build.py -a http_client
If you do not pass an app name or path through -a, it will build a default application, which only enables wireless connection.
Note
The examples provide file named
prj.conf. When you have not configured the project, runningbuild.py -a <APP>will combineamebaxxx_gcc_project/default.confwithexample/.../<APP>/prj.confto use initial configuration.If
menuconfigfolder already exists in the current project, you can runmenuconfig.py -f /.../prj.conffirst or reconfigure manually, then build it usingbuild.py -a <APP>. Alternatively, you can directly usebuild.py -a <APP> -pto delete previous configuration files.
Build Specified Target
By default, all necessary targets will be built together. Specific targets can be built individually using the -g or --target options. Use the -h option to view all available targets.
build.py -g <TARGET>
For example, to regenerate imgtool flashloader, enter the following command:
build.py -g gen_imgtool_floader
Project Cleanup
Both -c and --clean clean up the current project’s products and intermediate files. But .config files will be retained.
build.py -c
Pass CMake Cache Variables
CMake cache variables’ initial values can be set using the -D option. To inherit this functionality, build.py also supports the -D option. Predefined values by CMake and user-defined values can both follow after -D.
build.py -D CACHE_VAL1=VALUE1 CACHE_VAL2=VALUE2 …
More details about cache variables for this project can be found in the CMakeLists.txt file under the ${SDK}/amebaxxx_gcc_project directory.
Note
Native CMake command requires each variable definition to have a
-Dprefix, e.g.,-DCACHE_VAL1=VALUE1 -DCACHE_VAL2=VALUE2However,
build.pyrequires all variables to follow a single-Dwith spaces, e.g.,-D CACHE_VAL1=VALUE1 CACHE_VAL2=VALUE2
Download Image
We provide ImageTool specifically for firmware download. Please refer to Image Tool .

