Even if you only develop DSP applications, you need to set up the MCU development environment. The MCU firmware is responsible for loading the DSP firmware into memory, initializing hardware resources, and ultimately generating the complete flashable firmware.
Please choose one of the following methods based on your development preferences:
Patch files are used to resolve compiler crash issues in very rare cases. They can be obtained through Xplorer GUI updates, or by contacting Realtek.
HiFi 5 DSP Configuration Package
Build Configuration is a configuration file that describes all parameters and necessary build components required for Tensilica processor implementation.
The configuration files are located in the configurations directory of the DSP SDK:
The two ABIs have different function calling conventions. It is recommended to understand the differences between them before installing the configuration package. For more information, please refer to:
ABI Selection Guide
Xtensa Xplorer License
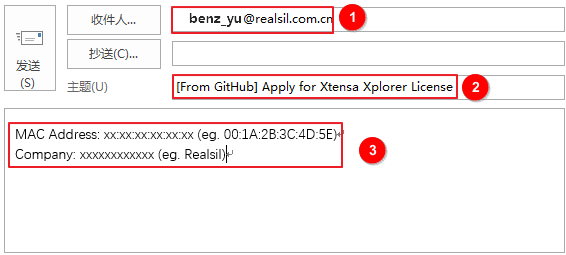
Xplorer IDE requires a valid license to function properly. Contact benz_yu@realsil.com.cn to apply for a temporary license. When applying for a license, the email must include the following information:
MAC address: Used to bind the license to a specific machine
Work unit: Used to confirm application eligibility
School/College (students only): Need to provide proof of student status
Note
One person can only apply for one license
The temporary license is valid for 3 months
Please keep the license file safe and avoid leakage
Please select the corresponding installation guide based on your operating system:
Windows:
Step 1: Install Xtensa Xplorer IDE
Double-click the installer and follow the prompts to complete the installation. Installation notes:
During the Select Components step of the installation process, you only need to install Xtensa Tools. Other sub-items such as General Sample Configs and Xtensa Fusion F1 DSP do not need to be selected.
Record the installation path as it will be needed in subsequent steps. This document uses the default installation path C:\usr for Windows environments.
When launching the GUI for the first time after installation, you will usually be prompted for software updates. Please make sure to perform the update, as new patches fix issues that may cause compiler crashes.
Step 2: Install HiFi 5 DSP Configuration Package
The Build Configuration describes all parameters and compilation components required for the Tensilica processor implementation. Before starting DSP development, you must install the corresponding build configuration.
2.1 Launch Xplorer and Set Workspace
2.1.1 Double-click the desktop shortcut Xplorer9.0.18 to launch Xplorer
2.1.2 Click Browse on the launcher screen to set the Workspace to <dsp_sdk>\project
2.1.3 Click Launch to enter the Xplorer main interface
2.2 Open System Overview Panel
By default, the System Overview panel is located in the lower-left corner of the interface and is used to manage build configurations.
If the panel is not displayed, you can open it via: Window > Show View > System Overview
2.3 Install Build Configuration
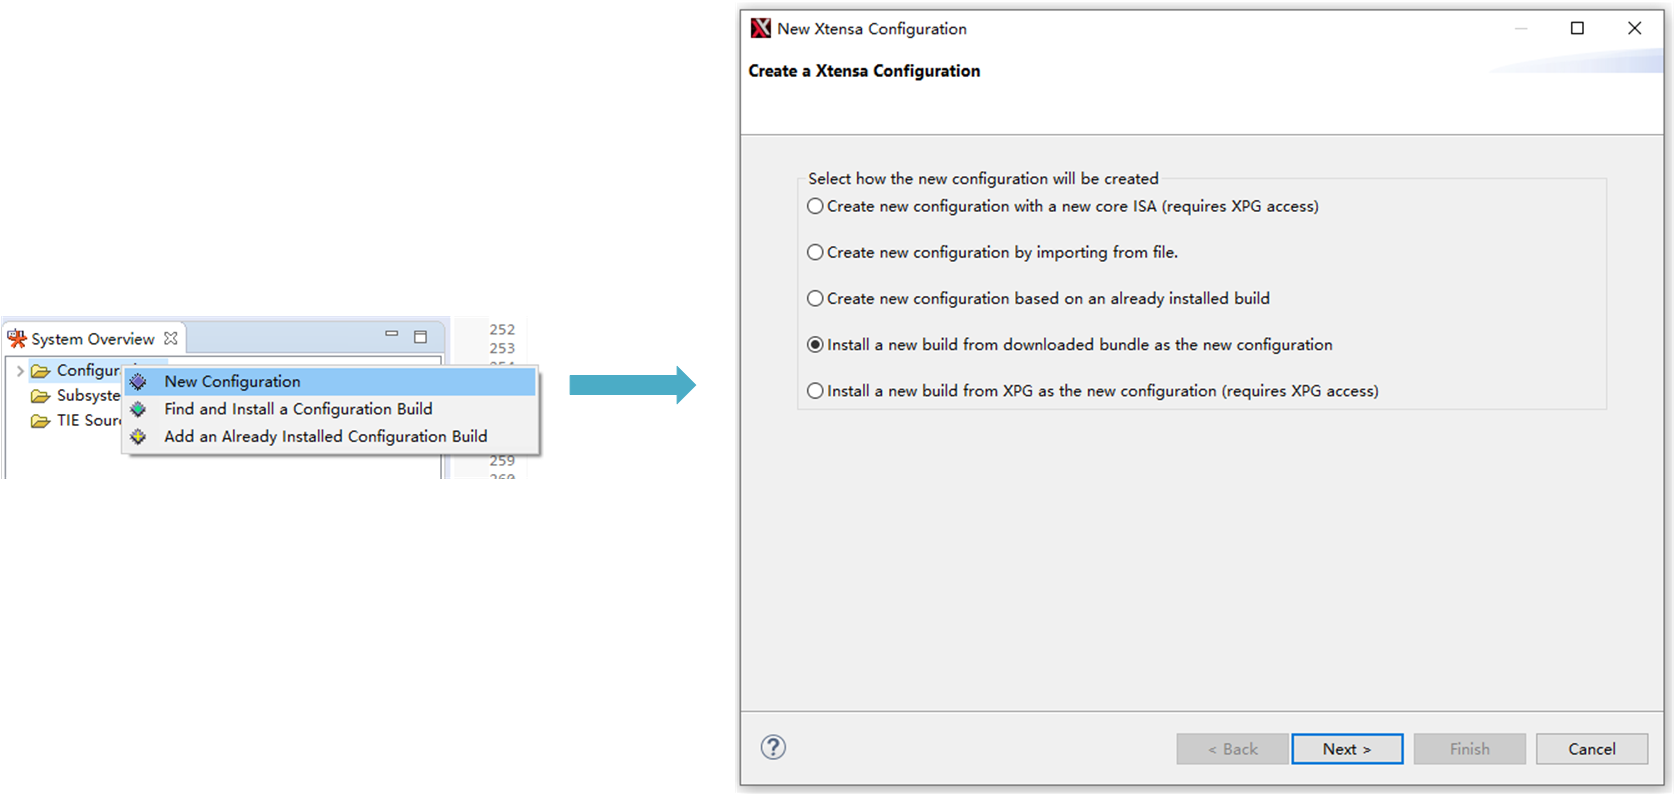
2.3.1 In the System Overview panel, right-click on Configuration and select New Configuration
2.3.2 In the pop-up window, select the fourth item and click Next
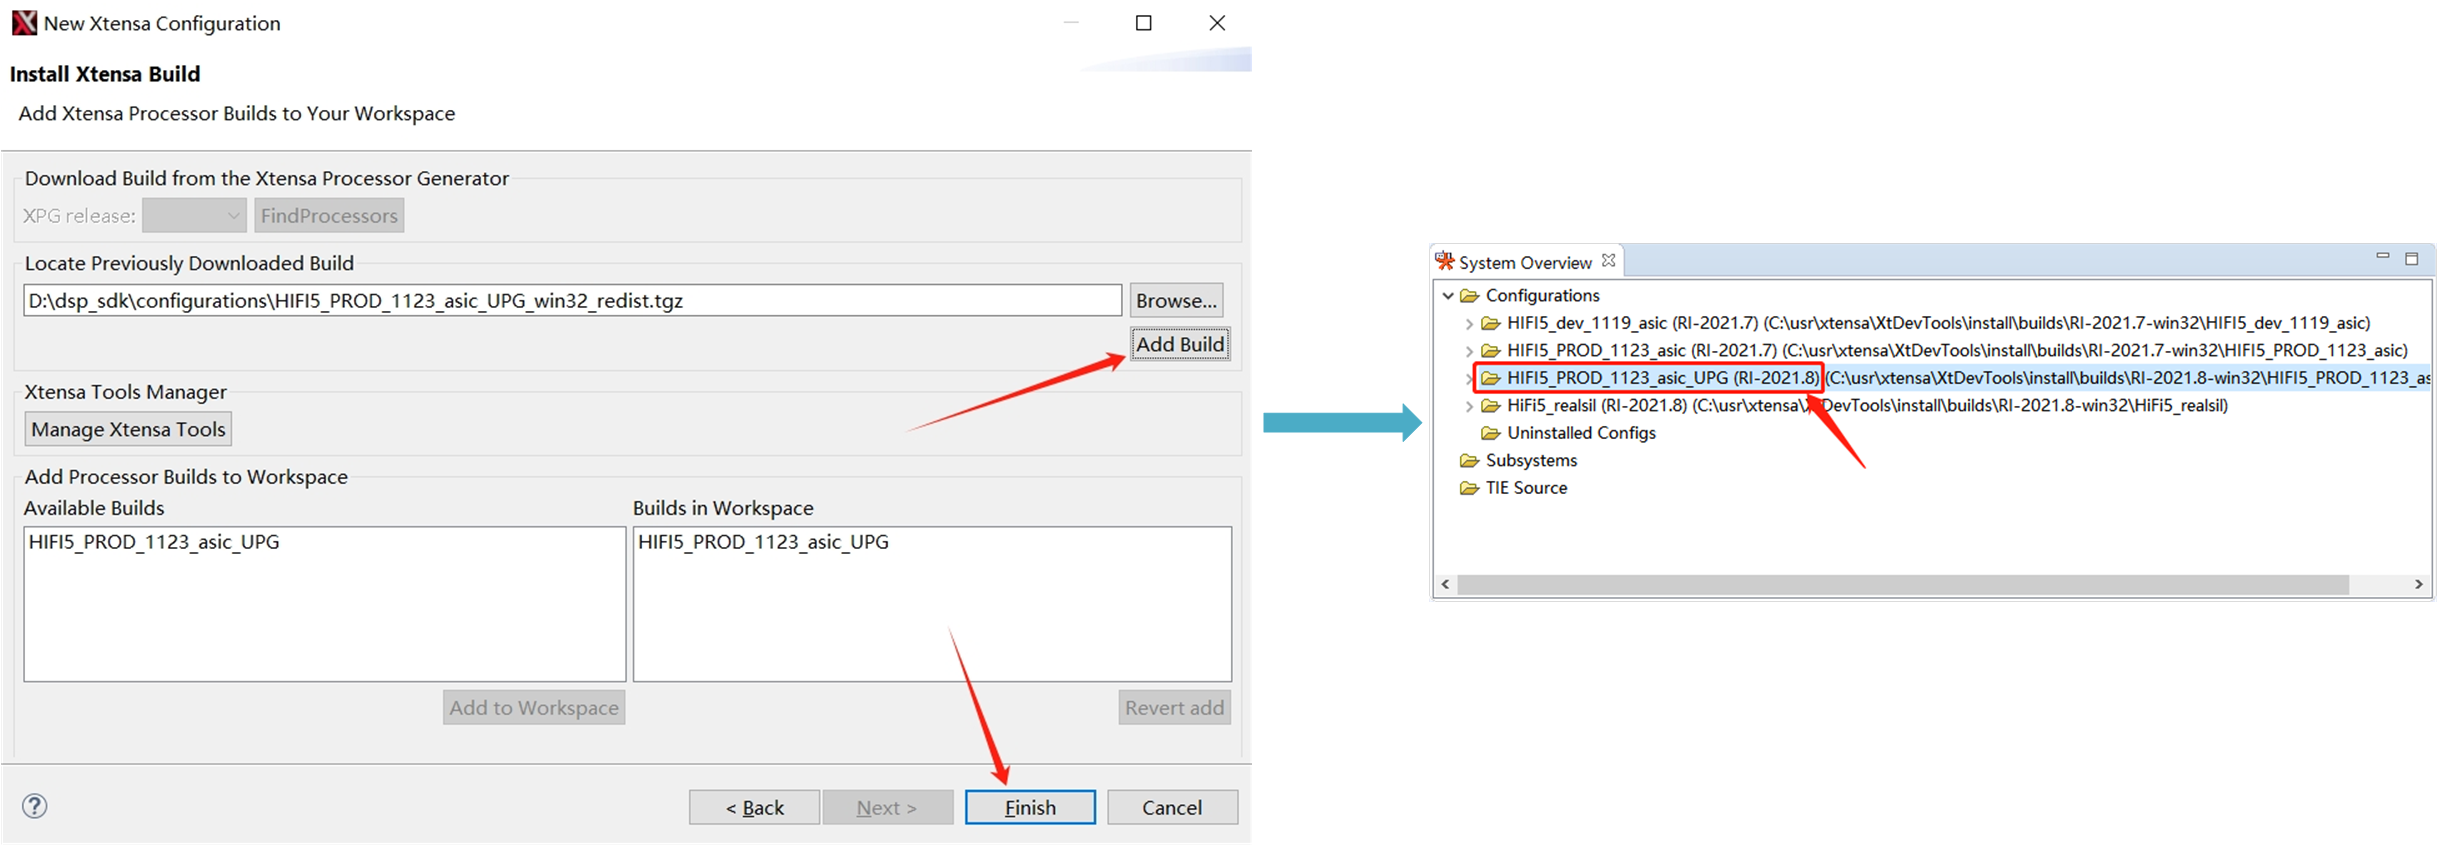
2.3.3 Click Browse to locate the configuration file (located in the <dsp_sdk>\configurations directory)
2.3.4 Click Add Build, then click Finish
Configuration file descriptions:
HIFI5_PROD_1123_asic_UPG_win32_redist.tgz → Call0 ABI configuration
HIFI5_PROD_1123_asic_wUPG_win32_redist.tgz → Window ABI configuration
The following diagram uses installing the Call0 ABI configuration as an example. If the entry marked by the red box in the following diagram appears in the System Overview panel, the configuration has been successfully installed:
2.3.5 Repeat the above steps to install the other ABI configuration (installing both is recommended)
2.4 Configure Environment Variables
Add the Xtensa tools bin directory to the system PATH environment variable, otherwise some auxiliary scripts may not be able to locate executable files.
The default path for Windows systems is: C:\usr\xtensa\XtDevTools\install\tools\RI-2021.8-win32\XtensaTools\bin
Step 3: Install License
Xplorer IDE requires a valid license to function properly. There are two types of licenses:
Floating License: Purchased from Cadence, requires configuring the license server address and port
Node-locked License: Applied from Realtek, bound to a specific machine
Steps to install the license:
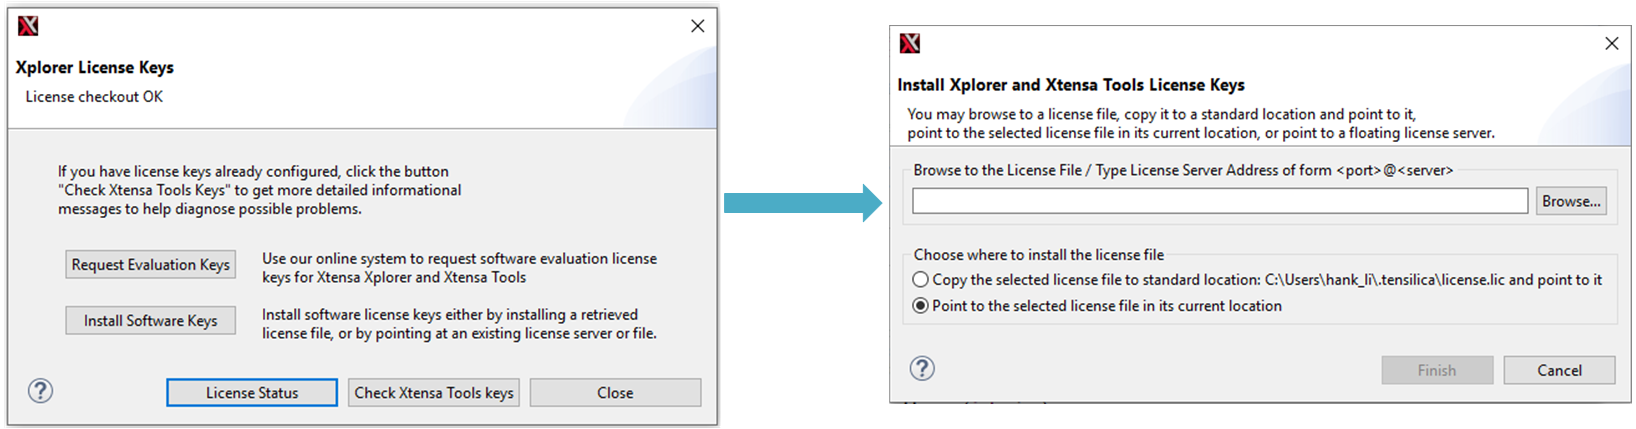
3.1 In Xplorer, click the menu Help > Xplorer License Keys
3.2 Click Install Software Keys
3.3 Select based on license type:
Floating License: Fill in the server port and IP address in the dialog box
Node-locked License: Click the browse button on the right and select the xxx.lic license file
When installing the DSP development environment on Linux systems, it is recommended to use the sudo command rather than using the root account directly.
Step 1: Install System Dependency Packages
1.1 Install Xplorer Basic Dependencies
sudoapt-getinstalllibxi6libxtst6libxrender1
1.2 Install X11 Forwarding Support (Optional)
If you are installing Xplorer on a Linux server (such as Ubuntu Server 20.04 LTS) but need to display the graphical interface through a local PC (X11 forwarding), it is recommended to install GTK support packages.
Although Xplorer supports pure command-line compilation, using the GUI to modify project configurations is more intuitive and convenient.
The default installation path is /opt/xtensa. During the installation process, you can choose to install all other components (select yes).
2.2 Install Toolchain Patch: After installation, when you launch Xplorer for the first time, you will usually be prompted for software updates. Please make sure to perform the update, as new patches fix issues that may cause compiler crashes.
If you cannot update through the graphical interface, you can manually install the patch:
The patch package provided by Realtek may not be the latest version. For the latest patches, it is recommended to consult Cadence or download through XPG.
Set the LM_LICENSE_FILE or XTENSAD_LICENSE_FILE environment variable to point to the license file or license server.
For Node-locked License: Point to the full path of the license file:
exportLM_LICENSE_FILE=/path/to/your/license.lic
For Floating License: Format is <port>@<address>:
exportLM_LICENSE_FILE=port@server_address
4.2 Configure Environment Variables: Add the above environment variables to ~/.bashrc or /etc/profile:
# Add to ~/.bashrcecho'export LM_LICENSE_FILE=/path/to/your/license.lic'>>~/.bashrc
# Make environment variables take effectsource~/.bashrc
If you need to use debuggers such as J-Link for DSP online debugging, you need to install the xt-ocd debugging plugin.
The Xtensa On-Chip Debugger Daemon (xt-ocd) is a powerful GDB-based debugging tool. This tool is not installed by default with Xplorer IDE. Xplorer includes a self-extracting executable installer.
Below is a brief installation method for xt-ocd. For more xt-ocd usage guidelines, please refer to Xtensa Documentation.
Windows:
The recommended installation path for Xplorer is C:\usr\xtensa\XtDevTools\downloads\RI-2021.8\tools\xt-ocd-14.08-windows64-installer,
Due to differences in installation paths and software versions, the actual path and installer name may vary.
Linux:
The recommended installation path for Xplorer is /opt/xtensa:
The Linux J-Link driver is installed by default in the /opt/SEGGER/ path. In the example, the J-Link version is V6.44.
Users need to modify the following command according to the actual J-Link version and path:
After completing both environment setups, it is recommended to perform the following verification steps to ensure the environment configuration is correct.
1. Verify MCU Development Environment
pythonameba.pybuild-h
If the help information is displayed, the MCU development environment has been configured correctly.
2. Verify DSP Development Environment
Launch Xplorer IDE, import <dsp_sdk>/project as a workspace, and try to build the project_dsp project.
The DSP SDK requires Python3 environment support, but users may not want to change the system’s default Python version.
If another version of Xplorer is installed on the system and the bin directory of the other version has been added to the system PATH, when using xt-clang and xt-ar directly (e.g., through Cmake, Makefile, or Python) for compilation and linking instead of through Xplorer, the linking process may encounter registry value errors: the current Xtensa configuration is not properly installed, or the Xtensa tools used are inconsistent with the path specified during configuration installation.
Xplorer can compile the SDK normally, but custom compilation methods (such as using Cmake with third-party libs) encounter the above path inconsistency errors.
Root Cause Analysis:
The DSP SDK’s post-processing depends on Python3, but the user’s system may already have a different default Python version set, causing a runtime environment mismatch.
Multiple Xplorer version bin paths exist in the system PATH, causing different versions of toolchains to be used, leading to path errors during system compilation.
Custom compilation methods may use different PATH settings. If other toolchain version directories are added to the system PATH, the compilation tools cannot correctly identify the required version.
Solutions:
Python issue: Refer to
Building DSP Projects
, modify the post-build command (right-click Xtensa Xplorer > Tasks > Building your Project > Building multiple projects), then specify Python3 in the post-build command.
Users need to carefully manage and adjust the system PATH variable, only adding the required Xtensa tool version path, and clear redundant toolchain paths to prevent path confusion.
Check the PATH setting, for example, confirm in the profile file to ensure there is no interference from other versions. Reopen the Terminal after modification to update the PATH.
The current dsp_batch.xml imports and builds the project_dsp project by default. Users need to modify the build configuration.
The default Xplorer IDE path is /opt/xtensa/Xplorer-9.0.18/xplorer. Users need to modify the IDE path according to the actual installation location.
Solutions:
Modify the dsp_batch.xml file, or use Xplorer batch build to generate the target xml file (refer to Xplorer help documentation Xtensa Xplorer > Tasks > Building your Project > Building multiple projects).
Update the Xplorer IDE path in auto_build.sh according to the actual environment and version to match the actual installation location, ensuring the path configuration is correct.
Problem Description: Modifying project configuration (such as modifying compilation options, adding/deleting files, etc.) requires using the Xplorer GUI integrated development environment, but Linux Server does not have a GUI.
Root Cause Analysis: For Cadence Xplorer projects, manually modifying project configuration source files is not recommended; using the GUI for modification is more stable and reliable.
Solution: On a Linux server, the Xplorer GUI window can be remotely displayed to the local terminal through the X11 protocol. The method is as follows:
Set the X11Forwarding flag to yes in the /etc/ssh/sshd_config file.
The Xplorer GUI window will pop up on the local computer. If the user’s SSH terminal does not support remote display, MobaXterm can be used.
If the server does not support x11 remote display, you can use the
manually modifying project files
method to add compilation projects.