DSP Project Configuration
Overview
This section introduces the configuration methods for DSP projects, divided into two parts: basic configuration and advanced configuration:
Basic Configuration: Configuration that must be completed before building the DSP project (adding files, configuring search paths)
Advanced Configuration: Optional performance optimization configurations based on actual requirements
Note
This section is based on the Xplorer GUI operation interface. If you need to use the command line to modify project configuration, you can directly edit the <dsp_sdk>/project/project_dsp/.project file.
Basic Configuration
Basic configuration includes project settings that must be completed before building: adding source code files and configuring search paths.
Add Project Folders or Files
The SDK uses virtual folders to manage project files. When using virtual folders, removing files from the project does not affect the original files on disk, and files are not copied to the project folder.
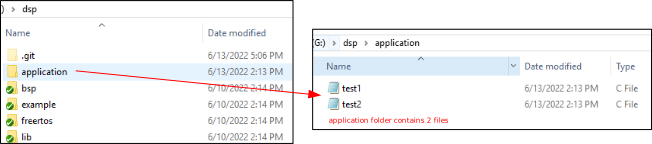
Assume our application files test1.c and test2.c are stored in a folder named application. Now add these files to the current project:
Right-click on project_dsp, select , enter
applicationas the folder name, check Folder is not located in the file system, and click Finish.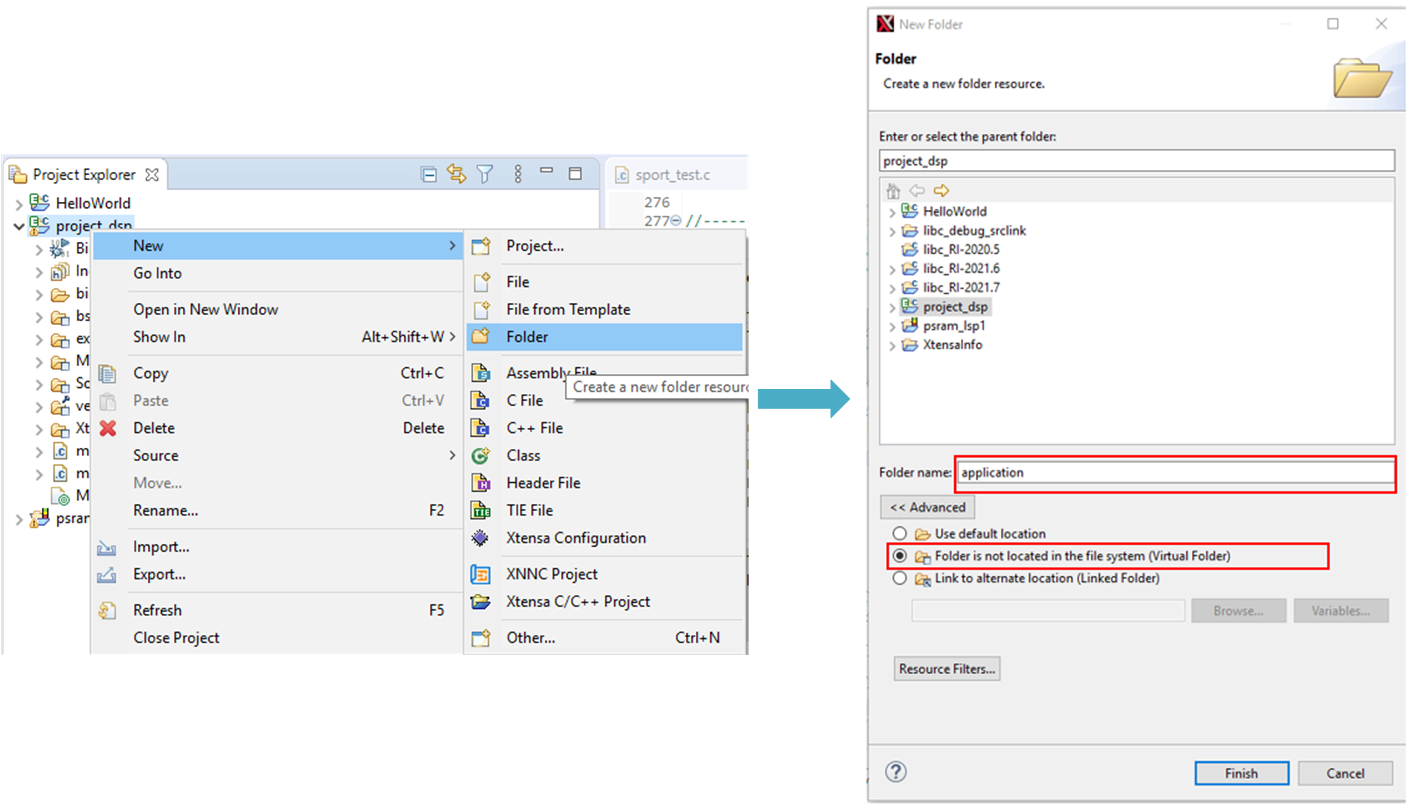
Right-click on the
applicationfolder, select Import, then click in sequence.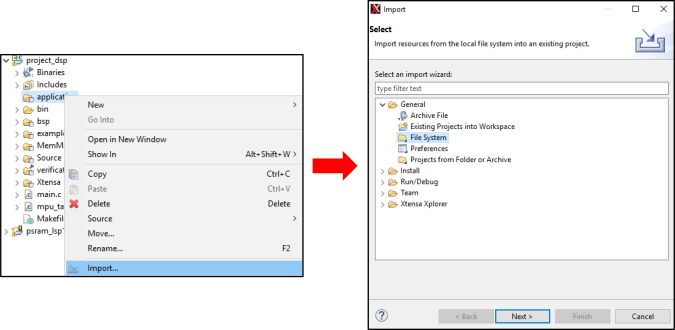
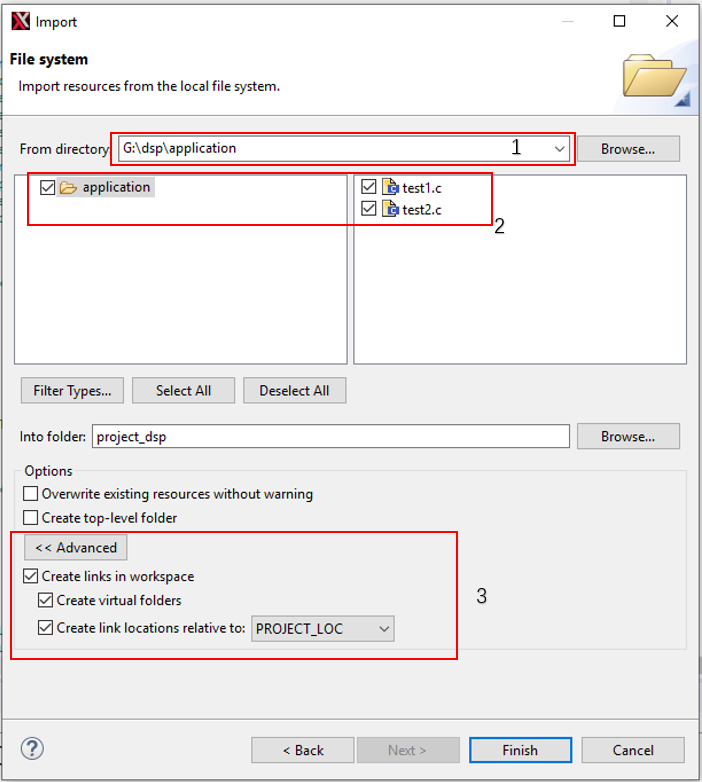
Browse to the folder path at location 1, select the files to include at location 2, click Advanced and check the option at location 3.
Caution
When adding project files, please be sure to use relative paths. As shown in the figure above, check Create link locations relative to: and set it to PROJECT_LOC.
Command-line configuration method:
If the Xplorer GUI is unavailable (e.g. headless / SSH / AI-agent environments), you can directly edit the DSP project files to complete the configuration. The relevant project files are all under <dsp_sdk>/project/project_dsp/:
File |
What it controls |
When to edit manually |
|---|---|---|
|
Which source files the project includes ( |
Add / remove |
|
Build settings: |
Switch LSP, add include paths, add macros / libraries |
Caution
Editing the project files directly is format-sensitive, and Xplorer may reorder or overwrite your manual edits the next time it opens the project. Please use the Xplorer GUI for these changes whenever possible; after a manual edit, always run one build with auto_build.sh to verify.
The SDK supports only the Release target by default (see targetName in project/auto_build/dsp_batch.xml), so build settings only need to be changed in .settings/targets/xtensa/Release.bts.
1. Add / Remove Source Files (.project)
Which source files the project compiles is determined by the <link> entries in .project, not by which .c files happen to sit in the directory.
Create a new virtual folder (type=2):
<link>
  <name>TestFolder</name>
  <type>2</type>
  <locationURI>virtual:/virtual</locationURI>
</link>
Add a source file to a virtual folder (type=1):
<link>
  <name>TestFolder/test_file.c</name>
  <type>1</type>
  <locationURI>PARENT-2-PROJECT_LOC/testfolder/test_file.c</locationURI>
</link>
<name>: the path shown in the project tree (virtual_folder/file_name).<type>:1= file,2= virtual folder (in which caselocationURIisvirtual:/virtual).<locationURI>: the real location.PARENT-2-PROJECT_LOCmeans going up 2 levels from the project directory (project/project_dsp→heap/source), followed by a relative path.
To add a file: copy an existing <link> under the same virtual folder and change <name> and <locationURI> to point to the new file. To remove a file: delete the entire corresponding <link> block.
Files under the same virtual folder are ordered by file name alphabetical order.
2. Switch LSP (Run Location PSRAM / XIP / SRAM)
In the <LinkerSupport> line at the end of Release.bts, change the -mlsp= path to the target LSP (both the intermediate directory and the trailing name must be changed):
Run location |
|
|---|---|
PSRAM (default) |
|
PSRAM, code XIP |
|
SRAM |
|
Switching the run location is not just about changing -mlsp= — you also need to regenerate a matching LSP from the MCU layout and synchronize the DSP MPU table (all three must describe the same form). For the complete flow, refer to
ABI Selection Guide
and the layout synchronization instructions on the MCU side.
3. Include Paths / Macros / Libraries (Release.bts)
Include paths: the
Includessection (-I); add one<ListEntry>new_path</ListEntry>.${workspace_loc}points to the project location in the workspace, and${workspace_loc}/../isproject/.Macros: the
Definessection (-D),<ListEntry key="macro_name" value="value"/>.Libraries: the
Librariessection (-l), e.g.<ListEntry>freertos</ListEntry>; the library search path is in theLibrarySearchPathsection (-L). It is recommended to use the$(TARGET_CONFIG)variable to configure library paths for different ABIs.
Must Do After Editing: Build Verification
cd <dsp_sdk>/project/auto_build && env -u DISPLAY sh auto_build.sh
Success criterion: both dsp.bin and dsp_all.bin under ../image/ are regenerated. If it reports a missing X display, just install xvfb (the script automatically wraps with xvfb-run).
Add Search Paths
Configure search paths for header files and library files to ensure the compiler can find required dependency files.
Add Header File Search Paths
Go to Build Properties:
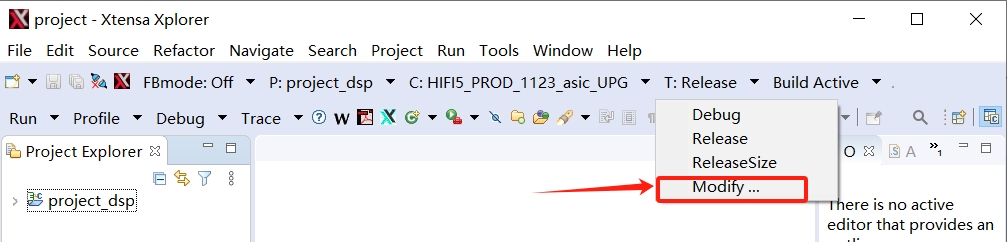
In the tab, click the
Addbutton in the upper right corner, then enter the path. It is recommended to use the relative path${workspace_loc}, which refers to<dsp_sdk>/project.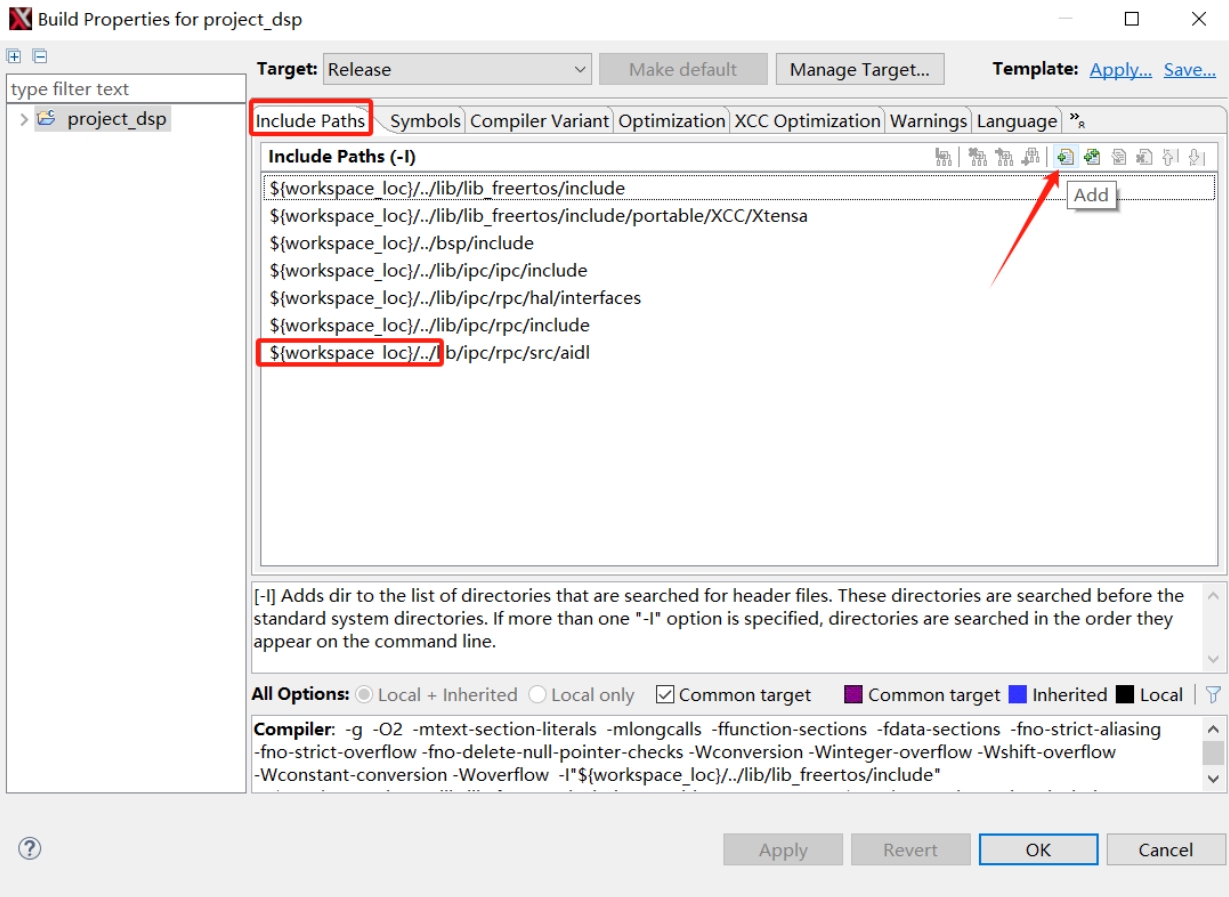
Click the
ApplyandOKbuttons to complete the modification.
Note
Try to avoid header files with the same name. If unavoidable, please use different paths.
Add Library File Search Paths
In Build Properties, select the Libraries tab:
Click the Add icon in the upper right corner. Then enter the path. It is recommended to use the relative path ${workspace_loc}, which refers to
<dsp_sdk>/project. It is recommended to use the $(TARGET_CONFIG) variable to configure library paths for different ABIs.
Click the
ApplyandOKbuttons to complete the modification.
Advanced Configuration
Advanced configuration includes optional performance optimization settings based on actual requirements. After completing the basic configuration, if you need to further optimize the build results, refer to the following content.
Compilation Optimization
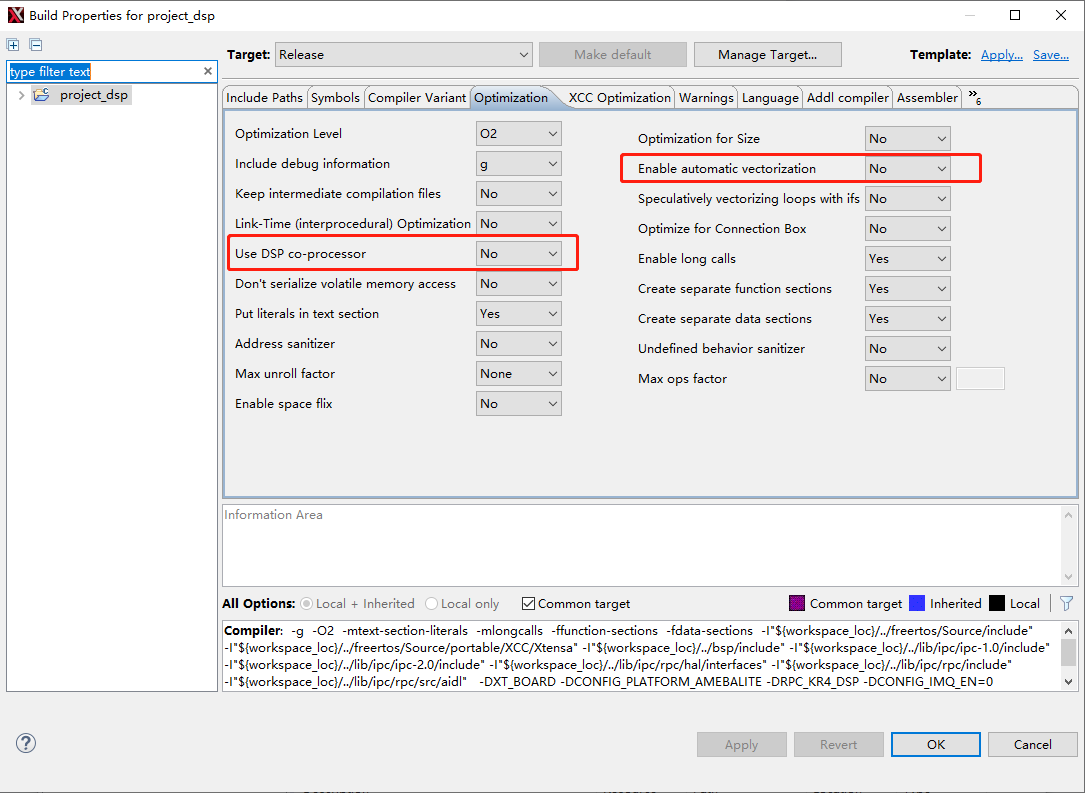
Co-processor, -O3, and SIMD compilation options can significantly improve DSP hardware resource utilization. Under high-level optimization, the compiler may adjust code execution order and CPU behavior, so these options are not suitable for all code.
For example, FreeRTOS source files and other ISR handlers cannot use Co-processor or SIMD vector optimization (-LNO:simd and -mcoproc).
Library Linking Order
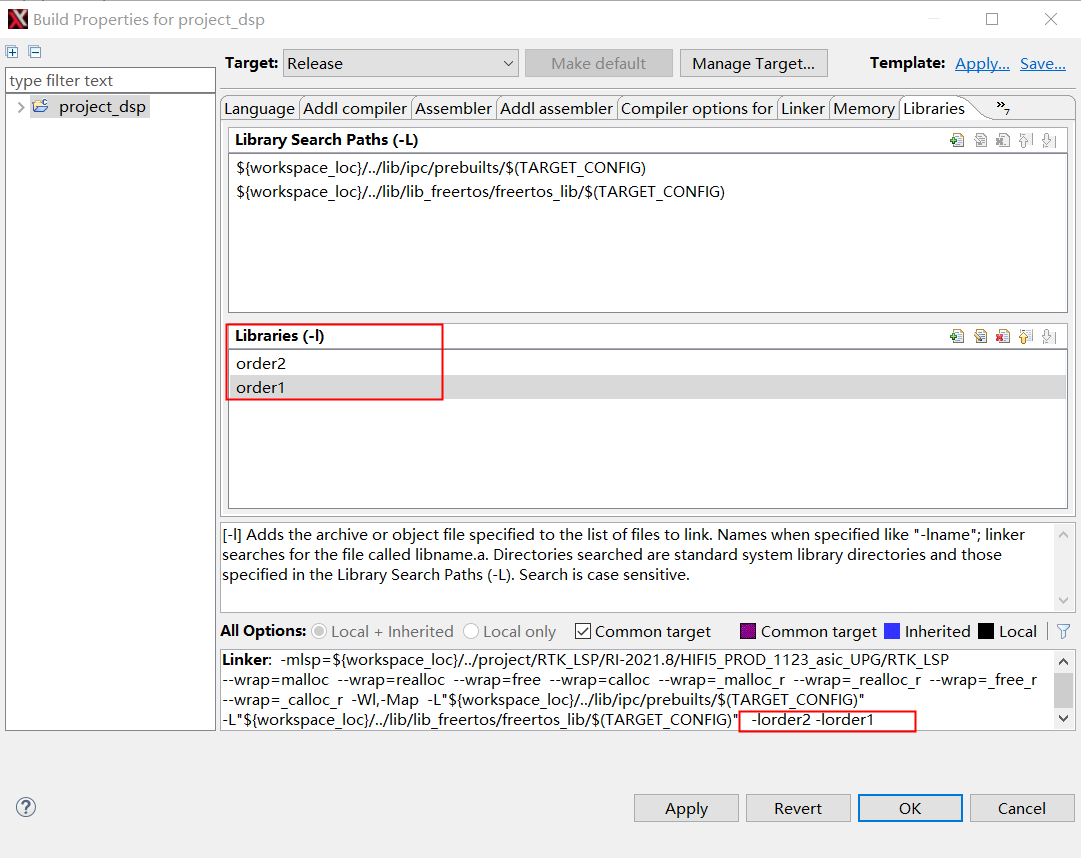
When linking static libraries, if there are dependencies between multiple static libraries, you need to pay attention to the linking order of the dependent static libraries, otherwise the symbol cannot be found errors will occur.
For example: liborder2.a depends on liborder1.a, and the final executable test depends on liborder2.a,
then the linking option should be: -lorder2 -lorder1, otherwise some symbols in liborder1.a will be reported as undefined.
Building Example Projects
Building Example Projects
The DSP SDK provides multiple basic examples located in the <dsp_sdk>/example/ directory. The steps to build examples are as follows:
Refer to the Adding Project Folders or Files section to add the entire
<dsp_sdk>/example/example_xxxfolder to the projectUse the above command-line build or Xplorer GUI build method to build the project
Note
For the complete list of DSP SDK basic examples (example_gdma, example_idma, example_idma_nn, etc.), please refer to: DSP SDK Introduction - Example List
Example Build Mechanism
The SDK uses a weak/strong symbol mechanism to switch between different example code:
A weak symbol function
app_example()is defined inproject/project_dsp/main.cEach example folder contains a strong symbol function with the same name
example_xxx/app_example.cDuring compilation, the strong symbol overrides the weak symbol, thereby jumping to the corresponding example code