Method 1: In the VS Code Marketplace, search for Ameba-aiot and click Install.
Method 2: Download the Ameba extension’s VSIX file, and in VS Code, click Extensions > Install from VSIX…, then select the downloaded VSIX file to install.
Note
Steps for manually updating the plugin:
Uninstall the current old version of the plugin
Reload the window Ctrl+Shift+P > Developer: Reload Window
Install the new version of the plugin, then reload the window again to avoid plugin conflict issues
Get the SDK
The Ameba SDK can be obtained in either of the following ways:
Method 1 (recommended): Download and configure the SDK directly through the extension’s built-in Setup Wizard. Suitable for users setting up the development environment for the first time.
This plugin supports SDK v1.1 and higher only. The v1.0 branch is not supported.
Ameba Feature Area
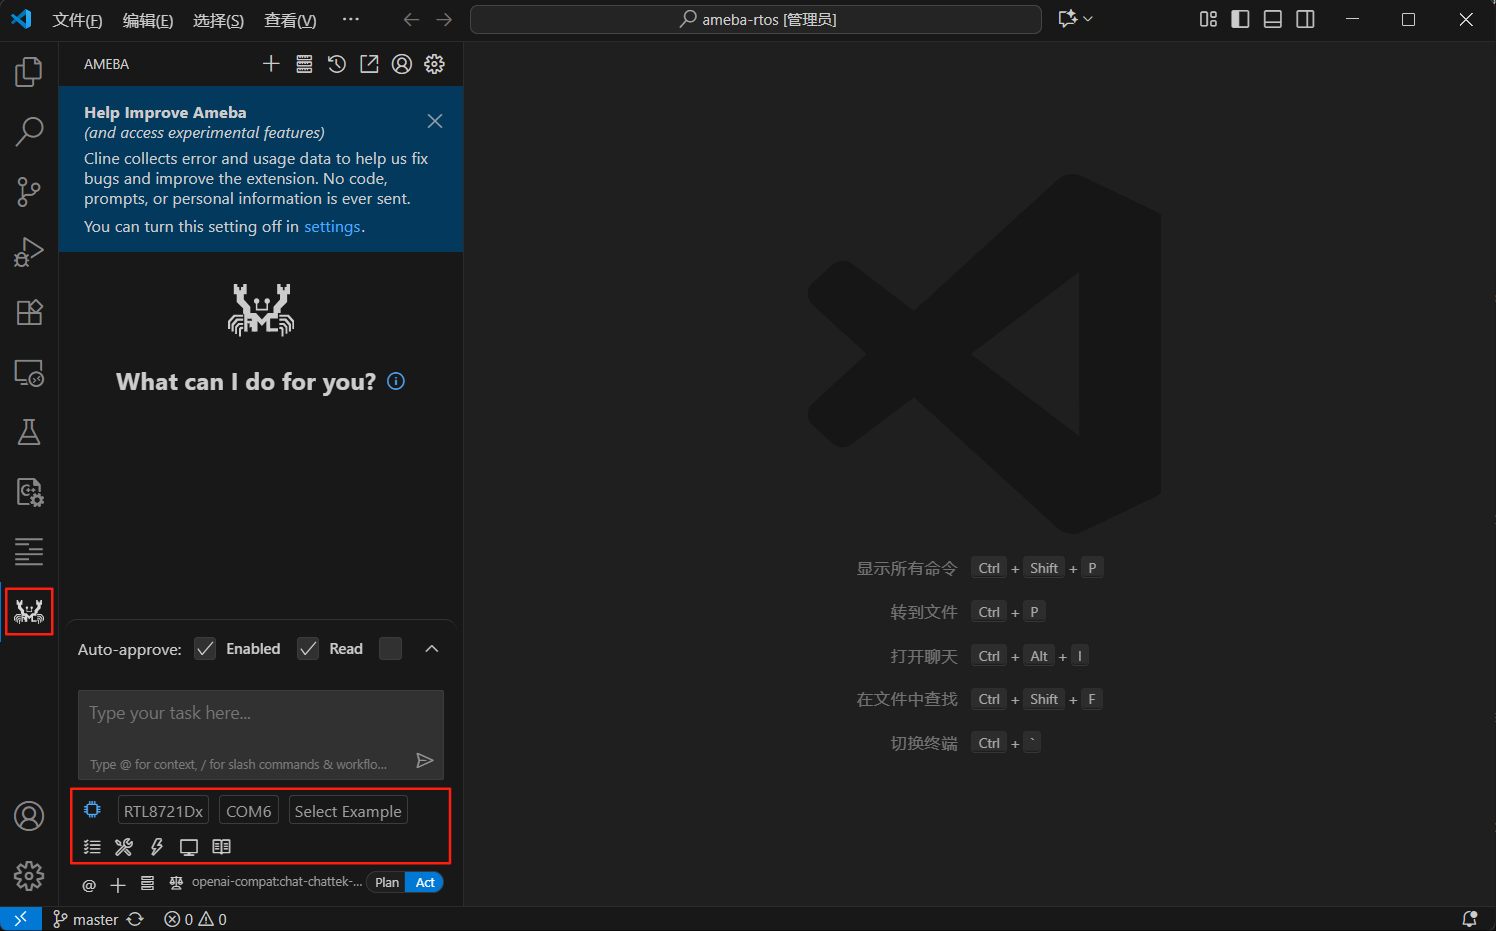
Click the Ameba icon in the VS Code activity bar on the left to open the extension panel. The red boxes in the figure below mark the four main Ameba-related areas:
AI Q&A area: The main area of the panel. It sits at the top and fills all the space above Commands. It has no title and cannot be collapsed. Use it to ask questions against the Ameba documentation knowledge base. See AI Q&A Assistant.
Commands area: Lists the common commands. Checking a command shows its button in the bottom status bar.
Selection / action area: Selects the chip, serial port and example.
Bottom status bar: Shows the current selection and provides icon buttons for the checked commands.
The gear ⚙ icon at the top right of the panel title bar is the entry to the extension settings. Click it to open the Ameba settings page. See Optional Plugin Settings.
Environment Check and Auto-Installation
When VS Code starts or the workspace folder changes, the extension checks and configures the development environment as follows:
Step 1: Identify the project type and SDK path
Starting from the current workspace directory, the extension searches downward level by level for the Ameba SDK root directory. Depending on the result, one of two paths is taken:
SDK Root project: The SDK root directory is found and used directly.
External project: No SDK root directory is found, so the extension treats the current directory as an external project and checks the following prerequisites in order:
Whether .vscode/settings.json exists
Whether ameba.rootSDKPath is configured in settings.json
Whether the directory that ameba.rootSDKPath points to is a valid SDK
If any of these conditions is not met, the feature buttons stay disabled, and hovering over them shows the reason. The panel also shows the SDK environment not ready. notice; click the Setup Wizard button next to it to download and configure the SDK through the Setup Wizard.
Step 2: Development environment software package check
Once the SDK path is determined, the extension reads the environment script in the SDK root directory to resolve the toolchain directory, in the following order of priority:
The system environment variable RTK_TOOLCHAIN_DIR
The default path in the environment script
The prebuilt package of the development environment software is located in the prebuilts-<platform>-<version> subdirectory under that directory. If the environment script does not exist, the path of the development environment software package cannot be determined and the feature buttons stay disabled.
Step 3: Python virtual environment check
The extension checks whether a .venv directory exists in the SDK root directory:
If .venv exists, the environment is ready.
If .venv does not exist, a notification appears in the bottom-right corner. Click the Setup Now button, and the extension opens the Ameba terminal and runs the environment script, which downloads the prebuilt toolchain package, creates .venv and installs the dependency packages. The first installation takes a long time, so please be patient.
If you dismiss the notification without acting on it, it appears again after 20 seconds. If the installation fails, an error is reported and the notification reappears immediately, until .venv is created successfully.
Note
A missing .venv does not prevent the feature buttons from being activated. The .venv check is reported as a notification and does not block the main flow.
When both the SDK path and the toolchain path are valid, the Ameba-related feature buttons are activated.
Step 4: Debug dependency plugin check
This check is independent of the steps above and is not affected by whether the SDK is ready. The extension checks for the plugin Realtek.ride-debug, which the debug feature depends on. It checks once at startup and again each time you click Debug:
If it is not installed, a prompt appears in the bottom-right corner asking whether to install it. Click the Install Ride Debugger button to install it automatically.
If it is installed but the version is lower than 1.4.5, a prompt appears in the bottom-right corner asking whether to uninstall and reinstall it. Click the Uninstall and reinstall button to do so automatically.
If you cancel after clicking Debug, debugging is not started.