Code Debugging
Hardware Preparation
Debug adapter: Supports DAP-Link (Default) or J-Link
Target chip for debugging
Connection Steps
Connect the adapter’s SWDIO (SWD) to the target chip’s SWD DATA
Connect the adapter’s SWCLK (CLK) to the target chip’s SWD CLK
Connect the adapter’s GND to the target chip’s GND to ensure common ground
Connect the adapter to the PC via USB
Select the target chip for debugging in the extension
Optional debugging configurations as described in Optional Plugin Settings (Debug)
Click the Debug button to launch the integrated debugger and start code debugging
Note
RTL8730E KM4 core debugging limitation:
Disable the tickless feature before debugging, otherwise it will affect debugging behavior.
SWD pin differences:
The SWD pin positions may vary across chips/packages. Refer to the corresponding PINMUX table for confirmation.
Connection stability:
If the target is not recognized after connection, first check whether the pin mapping is correct.
If the connection is unstable, consider lowering the SWD clock frequency.
Debugging Framework
The debugging framework is shown below:
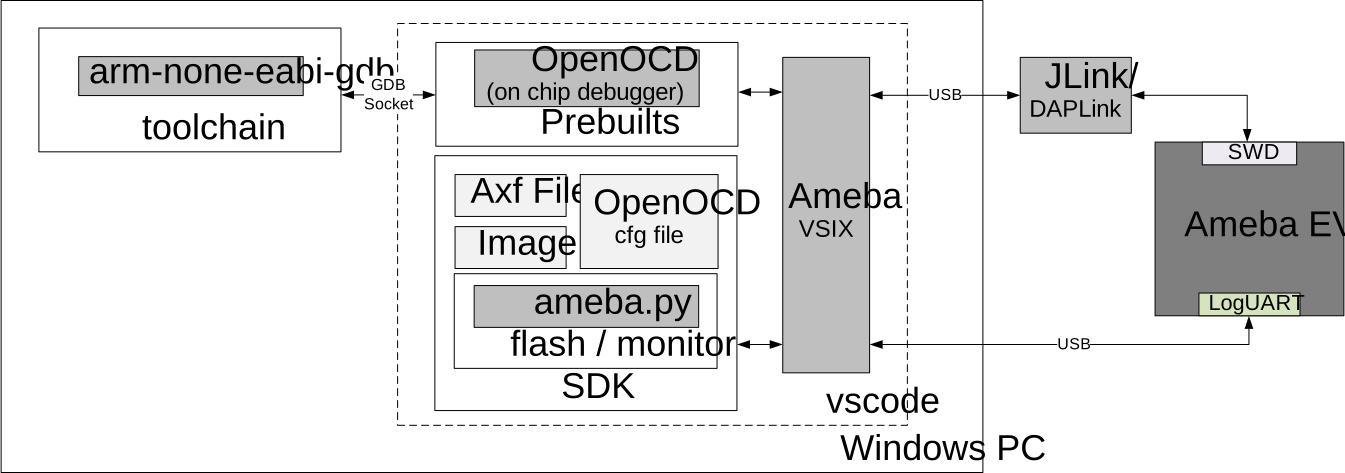
The target chip connects to the PC via a debug adapter.
When debugging starts, OpenOCD (GDB server) is launched. You can view OpenOCD output logs and status in the VS Code terminal (gdb-server).
The toolchain’s built-in GDB connects to OpenOCD, after which you can perform debugging operations.
Basic Debugging Tips
Debug Toolbar
Continue: Resume program execution (default shortcut F5).
Pause: Pause the running program (default shortcut F6).
Step Over: Execute the current line without entering the function (default shortcut F10).
Step Into: Execute step by step and enter the function (default shortcut F11).
Step Out: Return from the current function to its caller (default shortcut Shift+F11).
Variables
This is the most frequently used view during debugging; it displays all data visible at the current stop location. The system automatically categorizes:
Local: Local variables within the current function’s scope.
Global: Global variables.
Static: Static variables within the current file.
Registers: Register values of the current CPU core.
Breakpoints
Breakpoints are the most commonly used tool during debugging. When execution reaches a breakpoint, it pauses automatically, allowing you to inspect current variables or register information.
Method |
Breakpoint Management |
|---|---|
Line Number Click |
Add: Click the blank area to the left of the line number in the editor (a red dot will appear). View: Use the Breakpoints panel on the left to list all breakpoints. Delete: Click the red dot again to remove the breakpoint. |
Right-Click Menu |
Add: Right-click in the code area and select Add Hardware Breakpoint. View: Use the Breakpoints panel on the left to list all breakpoints. Delete: Use the Breakpoints panel to delete selected breakpoints. |
Debug Console |
Add: When the program is paused, enter GDB commands in the debug console
View: info breakpoints or info b
|
Note
Different chip architectures have a limited number of hardware breakpoints. Exceeding this limit will cause breakpoints to become invalid.
Watchpoints
Watchpoints monitor changes to memory addresses or variables, interrupting the program when a value is read, written, or modified.
Method |
Watchpoint Management |
|---|---|
Right-Click Menu |
Add: When the program is paused,
View: The Breakpoints panel on the left side lists all watchpoints Delete: In the Breakpoints panel on the left side, select and delete the selected watchpoint |
Debug Console |
Add: When the program is paused, enter GDB commands in the debug console
View: info watchpoints or info watch
|
Note
Different chip architectures have limitations on the number of watchpoints. Exceeding the limit will cause watchpoints to become invalid.
Watch
The Watch panel allows you to monitor variables of interest. You can monitor in the following ways:
View variables:
Right-click on a variable in the code and select Add to Watch.
When the program is paused, right-click on the target variable in the Variables panel and select Add to Watch.
Click the + button in the Watch panel and enter the variable name.
View any memory address:
Enter an address cast expression directly, such as
*(int*)0x20000004, to view the value at that address.Memory view: Press F1 and enter MemoryView to open a dedicated panel to inspect large memory regions in Hex.
Type casting:
Supports C-style casting; for example,
(char*)my_varto view a string value.
Call Stack
When code logic is complex, the call stack clearly shows the program execution path.
Hierarchical navigation: The top frame is the current paused line, the next frame is the caller (parent function), and so on. Click different frames to jump and view the contextual variables at that time.
Multi-core Debug Control
After enabling multi-core debugging, the Call Stack view lists debug sessions for all cores. You can switch between the following collaboration modes via the buttons on the view’s title bar.
Mode |
Description |
|---|---|
Run Sync |
|
All Stop |
|
Note
The full implementation of Run Sync typically relies on the All Stop mechanism. Their relationship is as follows:
With All Stop enabled, Pause/Continue and stepping actions are synchronized across all cores.
With All Stop disabled, each core behaves independently, suitable for single-core troubleshooting.
RTOS-Aware
When RTOS-Aware is enabled, the debugger recognizes the operating system’s internal structures. When halted, the debugger displays all existing threads in the RTOS. It also allows you to inspect stacks, registers, and variables of other inactive threads.
In multi-core debugging, this needs to be controlled per core. Toggle it by clicking the RA button in the Call Stack view.
Advanced Debug Features
Live Watch
The Variables and Watch views require the program to be paused to refresh, whereas Live Watch allows observing variable changes in real-time while the program runs at full speed.
Watch types: Global variables or static variables.
How to add:
Monitor variable values in the LIVE WATCH view. Click + and enter the variable name.
While paused, any variable in the Variables view can be added to Live Watch via right-click and selecting Add to live watch.
Any register in the XPERIPHERALS view can be added to Live Watch via right-click and selecting Add to live watch.
Note
You need to configure Live Watch parameters before starting a debugging session.
Peripheral Registers
The XPERIPHERALS view allows you to view the values of on-chip peripheral registers.
Principle: Based on the chip’s SVD (System View Description) file to parse register addresses and bitfields.
Note
This view will be empty if the SVD file path is not configured correctly.
RTOS Views
The RTOS kernel views comprehensively display various kernel objects managed by the RTOS. These objects are fundamental components for task management, synchronization, and communication in embedded systems. Note that these views are only available during a debugging session.
To open the RTOS views, press F1, run Open RTOS View, and select the view you want to display.
RTOS-TASK:
Displays the state of all tasks (Running, Ready, Blocked, Suspended).
Shows task name, address, stack usage/remaining stack space (useful for stack overflow diagnosis), runtime, and priority.
RTOS-QUEUE:
Displays queue name, capacity, current message count, and the list of tasks waiting on the queue.
RTOS-SOFTWARE TIMER:
Displays timer name, address, status (Active/Inactive, One-shot/Autoreload, Static/Dynamic), period, and callback function name and address.
RTOS-HEAP:
Displays the dynamic memory address range, allocation details, remaining heap size, and utilization.
RTOS-TASK NOTIFICATION:
Displays task name, address, the number of received and pending notifications.