The offline AI model conversion toolkit allows user to convert their customized
model into .nb format which can be loaded directly onto Ameba IC via the
Arduino or FreeRTOS SDK example codes.
There are 2 ways to install the toolkit. Installation via Docker image is
highly recommended.
The Offline AI Model Conversion Toolkit is now available for users with
Work or School email account.
To access offline AI model conversion tools, please fill up this
Form using your official
company, institution, or educational organization email account. This will
help us to verify your application and process your inquiry more efficiently.
Once approved, you will be added to the ameba-ai-offline-toolkit private
repository. Then, you may proceed to install the Offline Acuity Toolkit by
referring to the Docker Installation Method or Manual Installation Method
installation guides.
User will have access to exclusive features available on the Offline Toolkit.
For every new NN model example released in the SDK, the conversion support will
also be primarily given to the Offline Toolkit users first.
Docker Installation is the recommended method to install the Offline AI Model Conversion Toolkit. It provides a pre-configured environment with all necessary dependencies, making it easier to set up and use the toolkit.
Note
To access offline AI model conversion tools, please fill up this
Form using your official
company, institution, or educational organization email account. This will
help us to verify your application and process your inquiry more efficiently.
Once approved, you will be added to the ameba-ai-offline-toolkit private
repository. Then, you may refer to the following steps to install the Offline
Acuity Toolkit.
Manual Installation is an alternative method for users who prefer to set up the toolkit manually. This method requires more steps and configuration but allows for greater customization of the installation process.
Note
To access offline AI model conversion tools, please fill up this
Form using your official
company, institution, or educational organization email account. This will
help us to verify your application and process your inquiry more efficiently.
Once approved, you will be added to the ameba-ai-offline-toolkit private
repository. Then, you may refer to the following steps to install the Offline
Acuity Toolkit.
VivanteIDE is the command line tool to export the network binary file. You do
not need to open the IDE interface — only the cmdtools function is needed
for exporting .nb files.
Please refer to Vivante_IDE_User_Guide.pdf: Section Install and Uninstall VivanteIDE
for detailed installation instructions.
Install VivanteIDE for Linux OS (the Acuity toolkit is installed on Linux).
During installation, the license file can be skipped since we only need to
export network binary files.
After installation, the packages should be at:
/home/$user/Verisilicon/VivanteIDE5.8.1.1 (or your designated path).
Add the following optimization parameters to pegasus_export_ovx.sh:
You only need to read Section Install and Uninstall VivanteIDE from
Vivante_IDE_User_Guide.pdf. The rest of the features in the user guide
are not needed for exporting .nb files.
Model Conversion Steps provides a detailed guide on how to convert your AI models using the Offline AI Model Conversion Toolkit. Follow these steps to successfully convert your models into the required format for deployment on Ameba IC.
To import a model into Acuity, place the model in a folder named after it
and make sure it is accessible by the import script.
If you do not have a customized model ready, you may download the
sample models
provided on our repository for testing. Note that these models are available to approved users for
testing and development purposes only, for access, please refer toEligibility
In the folder containing the model, create a file named dataset.txt
and list the accessible paths to your calibration images (one per line).
You may choose to place all images within the same folder.
Once import is successful, modify the generated <model_name>_inputmeta.yml
file according to your model type. Key parameters to configure include
mean, scale, reverse_channel, and preproc_type. Refer to the
inputmeta file modification guidelines
for more details.
If the export is successful, you will find your .nb converted model in
the nbg-unify folder.
Note
After the model conversion is completed, it must be paired with corresponding
pre-processing and post-processing code to complete the model’s function.
The Acuity tool does not generate pre-processing and post-processing
files automatically. Users can refer to the existing pre- and post-processing
files for supported NN models.
The Viplite driver is the NN driver on Ameba IC that works with the NN engine.
If a customized model is converted by a newer Acuity Toolkit, it should be used
with a newer Viplite driver. Models converted by an older Acuity Toolkit can
also be used with a newer Viplite driver.
It is recommended to convert the YOLOv7-tiny .pt model file to an .onnx file to achieve better performance and improved compatibility during quantization.
Before exporting the model to ONNX, please modify the forward() function in the Detect class inside models/yolo.py for Ameba SDK compatibility. To understand more, please refer to Why the Forward Function Needs to Be Modified?
defforward(self,x):# x = x.copy() # for profilingz=[]# inference outputself.training|=self.exportforiinrange(self.nl):x[i]=self.m[i](x[i])# convy=x[i].sigmoid()z.append(y)out=zreturnout
Then, kindly export using the YOLOv7 export script.
5. After successful import, please modify the Input Metadata file
Open yolov7-tiny_inputmeta.yml, modify the scale and reverse_channel settings as follows:
scale:0.00392157reverse_channel:false
Reason: 0.00392157 is equivalent to 1/255, as the input image is normalized from the range 0~255 during YOLOv7 training, wherereas setting reverse_channel to false is to keep the original input channel order.
6. Run the following command to quantize the model to uint8:
$./pegasus_quantize.shyolov7-tinyuint8
7. Ensure the following options are added in pegasus_export_ovx.sh
Run the following command to export the quantized YOLOv7-tiny model:
$./pegasus_export_ovx.shyolov7-tinyuint8
Then, a network_binary.nb will be generated. The generated nb file will locate in wksp/yolov7-tiny_uint8_nbg_unify, you may rename it as yolov7-tiny.nb.
9. After the model conversion is completed, the generated .nb model can be deployed successfully on Ameba IC.
This section uses YOLOv9-Tiny as an example, you can download the converted model from the YOLOv9 GitHub repository:
YOLOv9 has two model structures:
YOLOv9 = PGI + GELAN
GELAN = inference-friendly structure
The PGI branch is mainly used during training. For inference deployment, the PGI branch can be removed through the re-parameterization process.
For example yolov9-t.pt can be converted to yolov9-t-converted.pt.
Note
The re-parameterization process for yolov9-t is the same as yolov9-s.
Please remember to change the config file to gelan-t.yaml
Please use the converted/re-parameterized YOLOv9-tiny model for deployment.
1. Convert PyTorch Model to ONNX
It is recommended to convert the .pt model file to an .onnx file before importing it into Acuity. This provides better compatibility and performance during quantization.
Please refer to the export instructions in the YOLOv9 GitHub repository and run the following command to export the ONNX model.
Reason: The camera output data type is uint8. The pre-processing node helps convert the uint8 camera data into the input data type required by the model.
4. Quantize the Model
Use the following command to quantize the model
$./pegasus_quantize.shyolov9-t-convertedQType
Replace QType with the desired quantization type (i.e. uint8, int8, int16)
5. Ensure the following options are added in pegasus_export_ovx.sh
Run the following command to export the quantized YOLOv9-tiny model:
$./pegasus_export_ovx.shyolov9-t-convertedQType
Then, a network_binary.nb will be generated. The generated nb file will locate in wksp/yolov9-t-converted_uint8_nbg_unify, you may rename it as yolov9-t-converted.nb.
Note
The path name may vary depending on the selected quantization type.
For example, if int16 is used, the folder name may contain int16 instead of uint8.
7. The steps above describe the normal quantization flow, if you want to improve the accuracy of 8-bit quantization, please refer to the sectionHybrid Quantize
Note
After model conversion is completed, the model still requires corresponding pre-processing and post-processing implementation in the SDK.
Acuity Toolkit does not automatically generate pre-processing or post-processing source files.
Users can refer to existing NN model examples in the SDK.
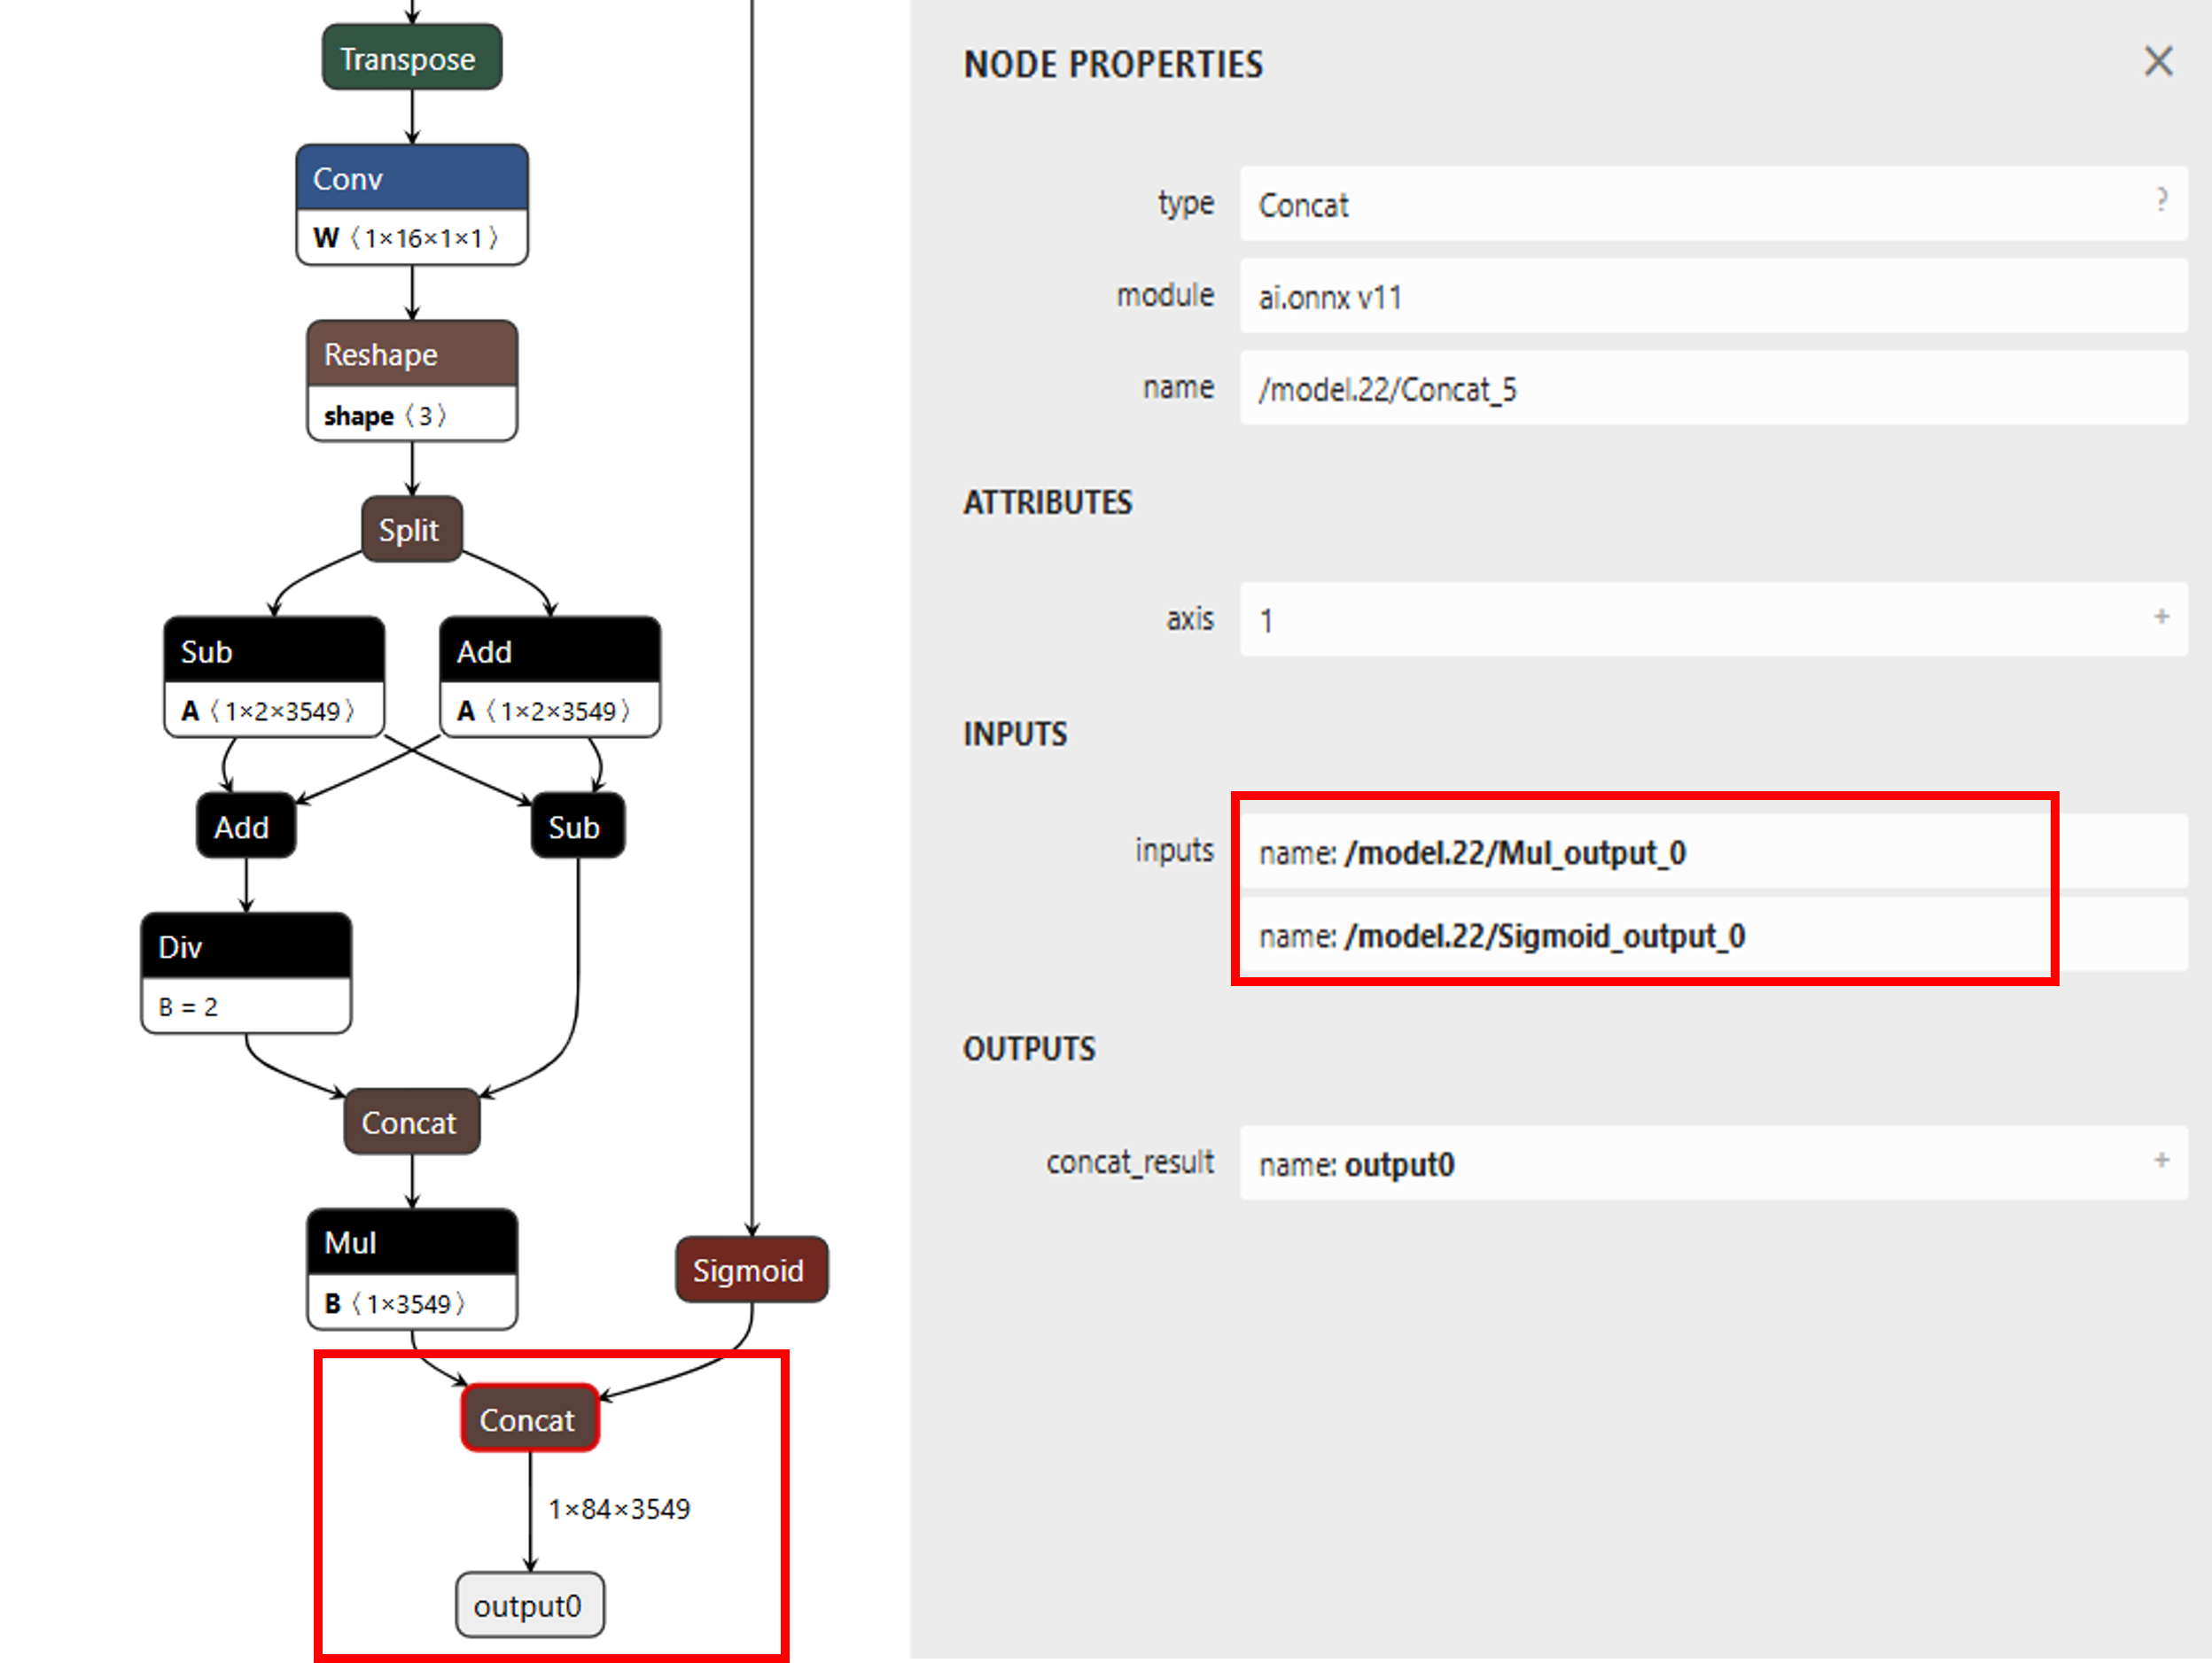
By default, the official YOLOv7 implementation rearranges the detection output tensor during the forward process.
The tensor format is changed from: [batch_size,255,H,W] to: [batch_size,3,H,W,85]
However, the Ameba SDK post-processing module expects the YOLO output format to remain as: [batch_size,255,H,W]
This format is consistent with the output format used by YOLOv3 and YOLOv4.
Therefore, to support Ameba SDK post-processing, the tensor rearrangement in the Detect.forward() function must be disabled or modified so that the output keeps the original format: [batch_size,255,H,W]
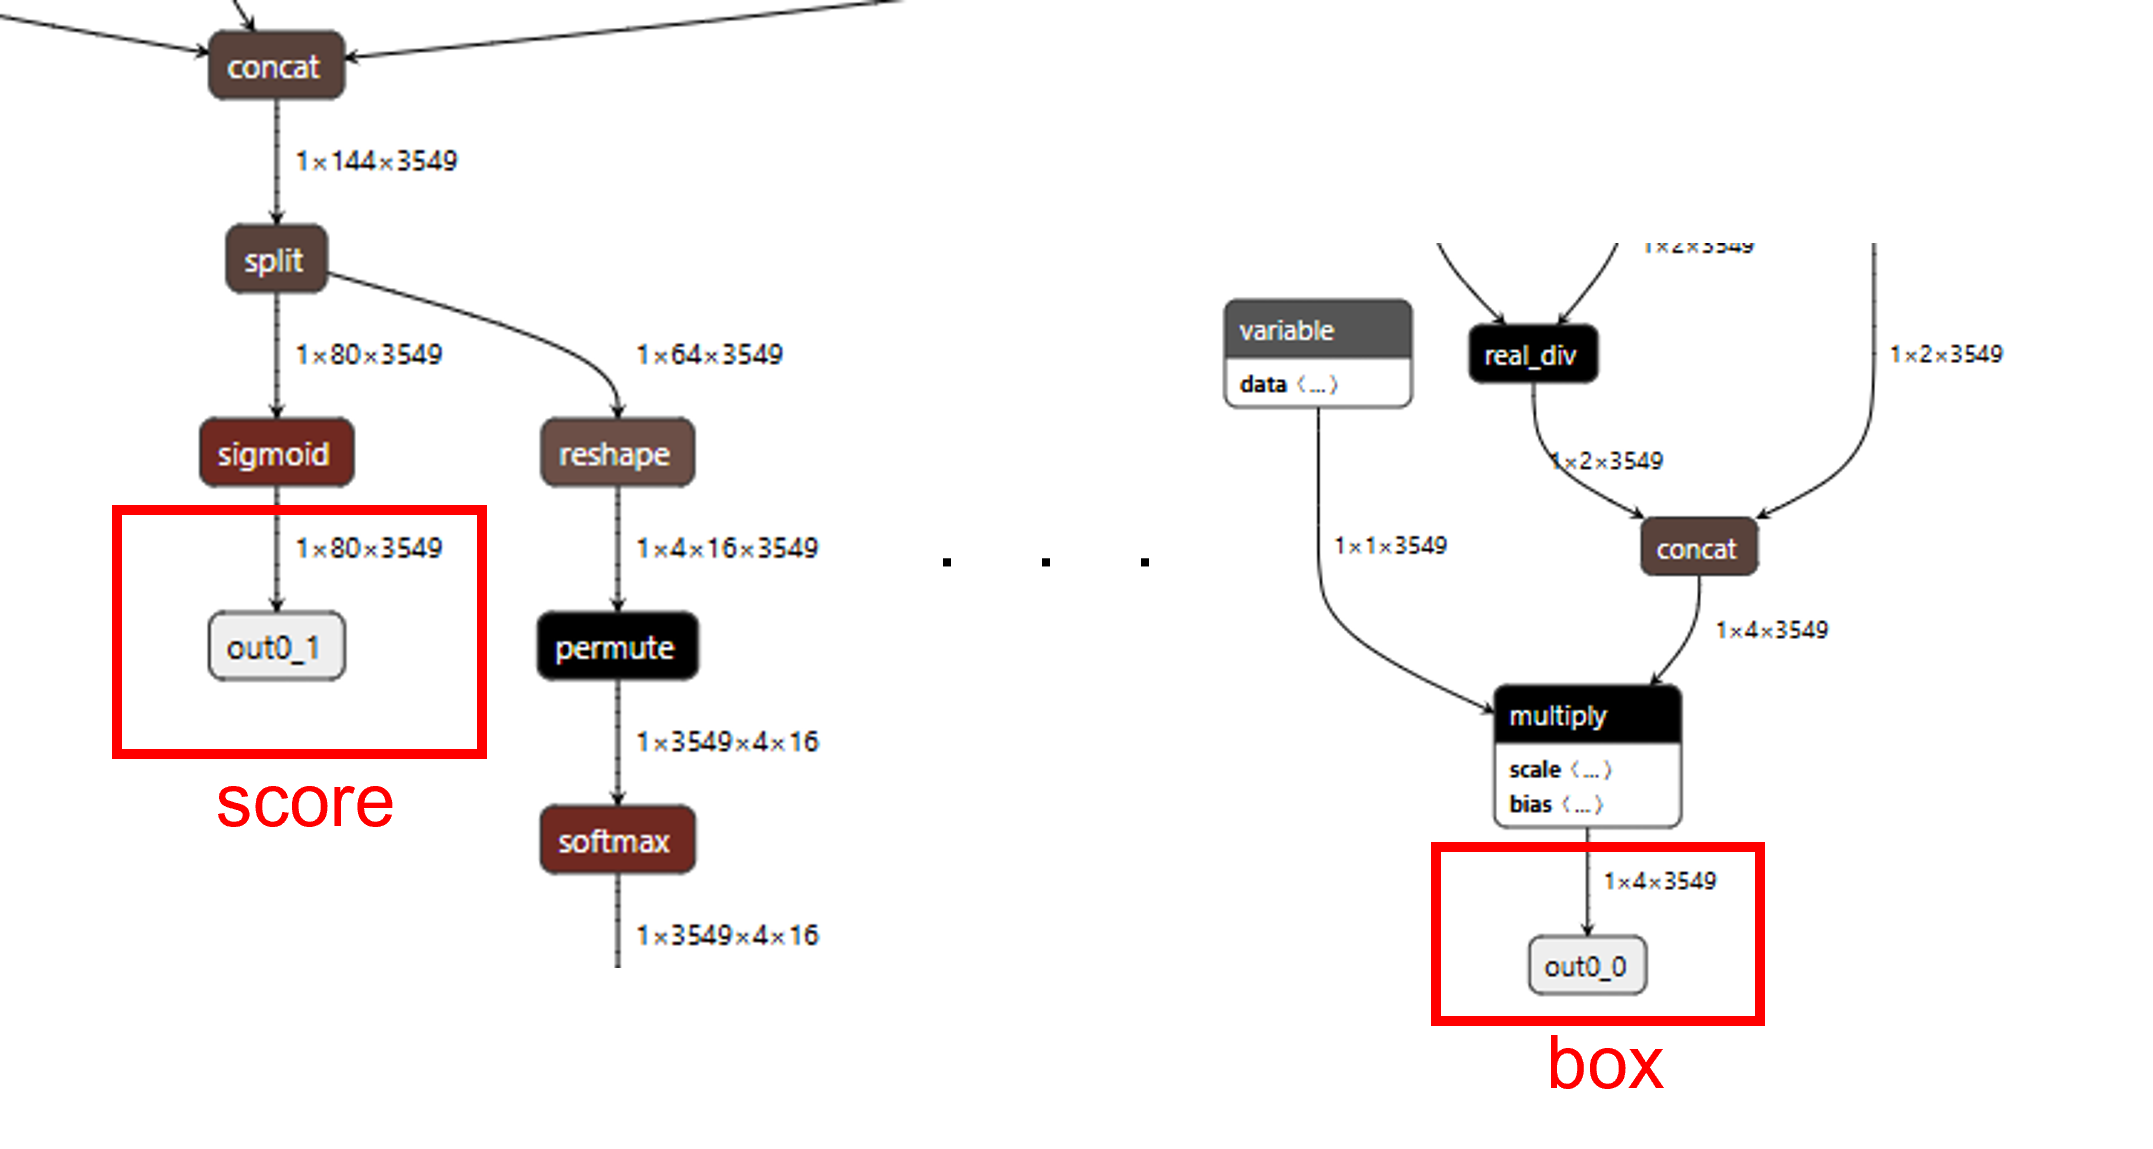
When importing YOLOv9 without specifying output layers, the model produces one combined output tensor.
However, during uint8 quantization, the class probability output may become zero.
This happens because YOLOv9 concatenates the bounding box values and class scores into one output tensor.
The value ranges are very different:
Bounding box values: 0 ~ 416
Class scores: 0 ~ 1
Since the value range of the bounding box is much larger than the score range, 8-bit quantization may lose the small score values. As a result, the probability output may become zero, and the model cannot produce valid inference results.
To avoid this issue, separate the bounding box output and class score output during the Acuity import stage.
You can use Netron to find the correct output layer names.
Reparameterization is used to reduce trainable BoF modules into deploy model for fast inference. For example, merge BN to conv, merge YOLOR to conv, etc. However, before reparameterization, the model has more parameters and computation cost.reparameterized model (cfg/deploy) used for deployment purpose.
You may clone a copy of YOLOv7 repo into your local machine and perform reparameterization there.
Else, you may create a copy of this Kaggle notebook upload your best trained model pt file and perform reparameterization on Kaggle. After running all the lines correctly, you can download your reparameterized model best_reparam.pt and use it on Ameba.
The vendor recommends importing the original float32 model into Acuity Toolkit and performing quantization using Acuity’s quantization script.
Users may also quantize the model using their own training framework, such as TensorFlow. However, they must ensure that the quantization type is supported by the Ameba’s NPU.
Acuity provided another quantization rule call hybrid quantize. YOLOv9 required 16-bit quantize to represent the output information, however, the inference time
of 16-bit quantize is longer, therefore please use hybrid quantize (uint8+int16) to decrease the model size and inference time.
To perform hybrid quantization, use the quantize command in the following seqeunce:
Use --rebuild and --compute-entropy arguments to quantize the network. This generates a .quantize file
In the .quantize file, the customized_quantize_layers section provide suggests layers for a futher quantization with the dynamic_fixed_point-i16 quantization type
Update the customized_quantize_layers section to add, modify or remove layers for a further quantization
In the yolov9-t-converted_uint8.quantize file, modify the customized_quantize_layers section, please refer to https://netron.app/ to look at the model architecture.
Since 16-bit quantize is only required when representing score information with box information (the last few layer in yolov9), therefore, only the last few layers are quantized as dynamic_fixed_point-i16 (the rest remain asymmetric_affine).
Use --hybrid arguments with the updated .quantize files to quantize the network with the same quantization type as Step1. This generates .quantize.json and update the .quantize files.
No quantization is needed for Acuity Networks converted from ONNX, TensorFlow
or TensorFlow Lite models that have been already quantized. Per-channel
quantized models are NOT supported on the NPU — ensure your
model uses per-tensor quantization.
Tip
For PyTorch framework, you are highly recommended to export your file in
.onnx format first to ensure successful conversion.
After importing model successfully, the <model>_inputmeta.yml will be generated. You need to modify it properly according to your model’s feature. So you need to understand the features of your custom model, such as the input shape, input format, data normalization etc. Below are the parameters that need to be modified for different models:
If you retrain your model with a different dataset, please update the mean/scale accordingly as the mean/scale depends on the feature of dataset and data normalization.
Kindly convert your model .pt format to .onnx format before importing.
Parameter
Value
reverse_channel
false
scale
0.003921568627451
add_preproc_node
true
preproc_type
IMAGE_RGB888_PLANAR
Note
If you retrain your model with a different dataset, please update the mean/scale accordingly as the mean/scale depends on the feature of dataset and data normalization.
If you retrain your model with a different dataset, please update the mean/scale accordingly as the mean/scale depends on the feature of dataset and data normalization.
If you retrain your model with a different dataset, please update the mean/scale accordingly as the mean/scale depends on the feature of dataset and data normalization.
For Tensorflow keras .h5 models, please do not save optimizer data in .h5 file. Otherwise it will fail when starting to import H5 model. To ignore optimizer data, please add include_optimizer=False in command. For example: model.save(‘model.h5’, include_optimizer=False)
RGB
Parameter
Value
reverse_channel
false
scale
0.003921568627451
add_preproc_node
true
preproc_type
IMAGE_RGB888_PLANAR
Gray
Some models which require gray image dataset, for example, fer2013_cnn, you need to modify yml file differently as the Acuity tool doesn’t support bmp files.
Parameter
Value
reverse_channel
false
scale
0.003921568627451
add_preproc_node
true
preproc_type
TENSOR
Note
TENSOR means the data will be native tensor data without any header. For gray image dataset, tensor files instead of jpeg or bmp files are used for calibration.
Currently, the SDK assumes that MobileNetV2 is trained under the PyTorch framework with standard ImageNet normalization; hence, the mean is set to 0. There is no need to perform scaling at model conversion as the normalization process will be handled by the pre-process function in SDK; hence the scale is set to 1.
Realtek Semiconductor Corp., (Realtek) reserves the right to make corrections,
enhancements, improvements and other changes to its products and services.
Buyers should obtain the latest relevant information before placing orders and
should verify that such information is current and complete.
Reproduction of significant portions in Realtek data sheets is permissible only
if reproduction is without alteration and is accompanied by all associated
warranties, conditions, limitations, and notices. Realtek is not responsible or
liable for such reproduced documentation. Information of third parties may be
subject to additional restrictions.
Buyers and others who are developing systems that incorporate Realtek products
(collectively, “Customers”) understand and agree that Customers remain
responsible for using their independent analysis, evaluation and judgment in
designing their applications and that Customers have full and exclusive
responsibility to assure the safety of Customers’ applications and compliance
of their applications (and of all Realtek products used in or for Customers’
applications) with all applicable regulations, laws and other applicable
requirements. Designer represents that, with respect to their applications,
Customer has all the necessary expertise to create and implement safeguards
that (1) anticipate dangerous consequences of failures, (2) monitor failures
and their consequences, and (3) lessen the likelihood of failures that might
cause harm and take appropriate actions. Customer agrees that prior to using or
distributing any applications that include Realtek products, Customer will
thoroughly test such applications and the functionality of such Realtek products
as used in such applications.
Realtek’s provision of technical, application or other design advice, quality
characterization, reliability data or other services or information, including,
but not limited to, reference designs and materials relating to evaluation kits,
(collectively, “Resources”) are intended to assist designers who are developing
applications that incorporate Realtek products; by downloading, accessing or
using Realtek’s Resources in any way, Customer (individually or, if Customer is
acting on behalf of a company, Customer’s company) agrees to use any particular
Realtek Resources solely for this purpose and subject to the terms of this
Notice.
Realtek’s provision of Realtek Resources does not expand or otherwise alter
Realtek’s applicable published warranties or warranty disclaimers for Realtek’s
products, and no additional obligations or liabilities arise from Realtek
providing such Realtek Resources. Realtek reserves the right to make
corrections, enhancements, improvements and other changes to its Realtek
Resources. Realtek has not conducted any testing other than that specifically
described in the published documentation for a particular Realtek Resource.
Customer is authorized to use, copy and modify any individual Realtek Resource
only in connection with the development of applications that include the Realtek
product(s) identified in such Realtek Resource. No other license, express or
implied, by estoppel or otherwise to any other Realtek intellectual property
right, and no license to any technology or intellectual property right of Realtek
or any third party is granted herein, including but not limited to any patent
right, copyright, mask work right, or other intellectual property right relating
to any combination, machine, or process in which Realtek products or services
are used. Information regarding or referencing third-party products or services
does not constitute a license to use such products or services, or a warranty
or endorsement thereof. Use of Realtek Resources may require a license from a
third party under the patents or other intellectual property of the third party,
or a license from Realtek under the patents or other Realtek’s intellectual
property.
Realtek’s Resources are provided “as is” and with all faults. Realtek disclaims
all other warranties or representations, express or implied, regarding resources
or use thereof, including but not limited to accuracy or completeness, title,
any epidemic failure warranty and any implied warranties of merchantability,
fitness for a particular purpose, and non-infringement of any third-party
intellectual property rights.
Realtek shall not be liable for and shall not defend or indemnify Customer
against any claim, including but not limited to any infringement claim that
related to or is based on any combination of products even if described in
Realtek Resources or otherwise. In no event shall Realtek be liable for any
actual, direct, special, collateral, indirect, punitive, incidental,
consequential or exemplary damages in connection with or arising out of
Realtek’s Resources or use thereof, and regardless of whether Realtek has been
advised of the possibility of such damages. Realtek is not responsible for any
failure to meet such industry standard requirements.
Where Realtek specifically promotes products as facilitating functional safety
or as compliant with industry functional safety standards, such products are
intended to help enable customers to design and create their own applications
that meet applicable functional safety standards and requirements. Using
products in an application does not by itself establish any safety features in
the application. Customers must ensure compliance with safety-related
requirements and standards applicable to their applications. Designer may not
use any Realtek products in life-critical medical equipment unless authorized
officers of the parties have executed a special contract specifically governing
such use. Life-critical medical equipment is medical equipment where failure of
such equipment would cause serious bodily injury or death. Such equipment
includes, without limitation, all medical devices identified by the U.S.FDA as
Class III devices and equivalent classifications outside the U.S. Customers
agree that it has the necessary expertise to select the product with the
appropriate qualification designation for their applications and that proper
product selection is at Customers’ own risk. Customers are solely responsible
for compliance with all legal and regulatory requirements in connection with
such selection.
Customer will fully indemnify Realtek and its representatives against any
damages, costs, losses, and/or liabilities arising out of Designer’s
non-compliance with the terms and provisions of this Notice.
Realtek is a trademark of Realtek Semiconductor Corporation. Other names
mentioned in this document are trademarks/registered trademarks of their
respective owners.
Though every effort has been made to ensure that this document is current and
accurate, more information may have become available subsequent to the
production of this guide.