AI Model Deployment Guide
SDK AI Model Application Types
Currently, the FreeRTOS and Arduino SDK provide several pre-deployed models. They are listed in the following table:
Category |
Model |
Repository |
|---|---|---|
Object detection |
Yolov3-tiny Yolov4-tiny Yolov7-tiny |
|
Object detection |
YOLOv7-tiny-pt |
|
Face detection |
SCRFD |
https://github.com/deepinsight/insightface/tree/master/detection/scrfd |
Face Recognition |
MobileFaceNet |
https://github.com/deepinsight/insightface/tree/master/recognition |
Sound classification |
YAMNet |
https://github.com/tensorflow/models/tree/master/research/audioset/yamnet |
Reference: NN Model Zoo
Customized Model Deployment Guide for Arduino SDK
This guide explains how to deploy a customized NN model (.nb file) on
Ameba IC using the Arduino SDK.
Load Model from Flash
Step 1: Rename the .nb file
Rename your customized .nb file to the expected filename. Refer to the
Default Supported Model Filenames section for the expected filenames.
Step 2: Copy to the Project Folder
C:\Users\<USERNAME>\AppData\Local\Arduino15\packages\realtek\hardware\<Ameba_IC>\<VERSION>\libraries\NeuralNetwork\examples
/home/<USERNAME>/.arduino15/packages/realtek/hardware/<Ameba_IC>/<VERSION>/libraries/NeuralNetwork/examples
Step 3: Open an Example
In Arduino IDE, navigate to:
File → Examples → AmebaNN → ObjectDetectionCallback
Step 4: Set Load Source
Tools → NN Model Load from: → Load from Flash
Step 5: Update modelSelect()
Update the model selection in your sketch:
ObjDet.modelSelect(OBJECT_DETECTION, CUSTOMIZED_YOLOV4TINY, NA_MODEL, NA_MODEL);
Step 6: Compile and Upload
Click Upload in the Arduino IDE. The .nb file is packaged into the
flash automatically.
Load Model from SD Card
Step 1: Rename the .nb file
Rename your customized .nb file to the expected filename. Refer to the
Default Supported Model Filenames section.
Step 2: Open an Example
In Arduino IDE, navigate to:
File → Examples → AmebaNN → ObjectDetectionCallback
Step 3: Set Load Source
Tools → NN Model Load from: → Load from SD
Step 4: Update modelSelect()
ObjDet.modelSelect(OBJECT_DETECTION, CUSTOMIZED_YOLOV4TINY, NA_MODEL, NA_MODEL);
Step 5: Prepare the SD Card
Place the .nb file in the following directory structure on the SD card:
SD card root/
└── NN_MDL/
    └── yolov4_tiny.nb
Step 6: (Optional) Change the SD Filename in Code
Edit SD_Model.cpp at:
Arduino15\packages\realtek\hardware\<Ameba IC>\<VERSION>\libraries\NeuralNetwork\src\SD_Model.cpp
static void *yolov4_get_SD_filename(void)
{
    return (void *)"sd:/NN_MDL/yolov4_tiny.nb";  // update filename here
}
Step 7: Compile, Upload, and Run
Click Upload, then insert the SD card before pressing the reset button.
Default Supported Model Filenames
Category |
Expected Filename |
|---|---|
Object Detection |
|
Face Detection |
|
Face Recognition |
|
Audio Classification |
|
Image Classification |
|
Hand Gesture |
|
Note
For SD card loading, all files must be placed inside
NN_MDL/on the SD card:sd:/NN_MDL/<filename>.nbFor flash loading (Arduino SDK), filenames must match exactly and be placed in the NeuralNetwork examples folder.
When running object detection + face detection simultaneously, use
scrfd_500m_bnkps_576x320_u8.nbpaired withyolov4_tiny_576x320.nb(same resolution).mobilefacenet_int16.nbis preferred over int8 for better face recognition accuracy.
Customized Model Deployment Guide for FreeRTOS SDK
This guide explains how to deploy a customized NN model (.nb file) on
Ameba IC using the FreeRTOS SDK. The instructions are based on the
mmf2_video_example_vipnn_rtsp_init YOLOv4 example.
Key Files
File |
Purpose |
|---|---|
|
Controls flash vs. SD loading |
|
Main example with USER_LOAD_MODEL block |
|
Pre/post-processing for YOLO models |
Load Model from Flash
Step 1: Rename the .nb file
Rename your customized .nb file to the expected filename. Refer to the
Default Supported Model Filenames section in the Arduino deployment guide for the list of
expected filenames.
Step 2: Copy .nb into the SDK
Place the model binary file in:
project/realtek_<ameba_ic>_v0_example/src/test_model/
└── model_nb/
   └── yolov4_tiny.nb    ← replace with your customized model
Step 3: Confirm MODEL_SRC is Flash (default)
In component/file_system/nn/nn_file_op.c:
#define MODEL_SRC MODEL_FROM_FLASH // default, no change needed
Step 4: Register the Model in FWFS JSON
Edit project/realtek_<ameba_ic>_v0_example/GCC-RELEASE/mp/<ameba_ic>_fwfs_nn_models.json:
{
    "msg_level": 3,
    "PROFILE": ["FWFS"],
    "FWFS": {
        "files": ["MODEL0"]
    },
    "MODEL0": {
        "name": "yolov4_tiny.nb",
        "source": "binary",
        "file": "yolov4_tiny.nb"
    }
}
Note
Only list models you actually use — unused models will bloat the final image.
Step 5: Configure the Example
In mmf2_video_example_vipnn_rtsp_init.c, set the model and input resolution:
#define YOLO_MODEL      1
#define USE_NN_MODEL    YOLO_MODEL

#if (USE_NN_MODEL == YOLO_MODEL)
#define NN_WIDTH    416
#define NN_HEIGHT   416
static float nn_confidence_thresh = 0.4;
static float nn_nms_thresh = 0.3;
#endif
Enable the example in video_example_media_framework.c:
mmf2_video_example_vipnn_rtsp_init();
Step 6: Build
cmake .. -G"Unix Makefiles" -DCMAKE_TOOLCHAIN_FILE=../toolchain.cmake -DVIDEO_EXAMPLE=ON
cmake --build . --target flash_nn
Output: flash_ntz.nn.bin in GCC-RELEASE/build/
Step 7: Flash to the Board
uartfwburn.exe -p COM? -f flash_ntz.nn.bin -b 3000000 -U -x 32
./uartfwburn.linux -p /dev/ttyUSB? -f ./flash_ntz.nn.bin -b 3000000 -U -x 32
Load Model from SD Card
Step 1: Rename the .nb file
Rename your customized .nb file to the expected filename.
Step 2: Prepare the SD Card
SD card root/
└── NN_MDL/
    └── yolov4_tiny.nb
Step 3: Set MODEL_SRC to SD
In component/file_system/nn/nn_file_op.c:
#define MODEL_FROM_FLASH  0x01
#define MODEL_FROM_SD     0x02
#define MODEL_SRC         MODEL_FROM_SD
Step 4: Enable USER_LOAD_MODEL in the Example
In mmf2_video_example_vipnn_rtsp_init.c, set USER_LOAD_MODEL to 1
and define the model object:
#define USER_LOAD_MODEL     1

#include "vfs.h"
static void *example_get_model_name(void)
{
   return (void *)"sd:/NN_MDL/yolov4_tiny.nb";
}

extern void yolov4_set_network_init_info(void *m);
extern int yolo_preprocess(void *data_in, nn_data_param_t *data_param, void *tensor_in, nn_tensor_param_t *tensor_param);
extern int yolo_postprocess(void *tensor_out, nn_tensor_param_t *param, void *res);
extern void yolo_set_confidence_thresh(void *confidence_thresh);
extern void yolo_set_nms_thresh(void *nms_thresh);

nnmodel_t yolov4_tiny_from_sd = {
   .nb                    = example_get_model_name,
   .set_init_info         = yolov4_set_network_init_info,
   .preprocess            = yolo_preprocess,
   .postprocess           = yolo_postprocess,
   .model_src             = MODEL_SRC_FILE,
   .set_confidence_thresh = yolo_set_confidence_thresh,
   .set_nms_thresh        = yolo_set_nms_thresh,
   .name = "YOLOv4t_SD"
};
Enable the example in video_example_media_framework.c:
mmf2_video_example_vipnn_rtsp_init();
Step 5: Build
cmake .. -G\"Unix Makefiles\" -DCMAKE_TOOLCHAIN_FILE=../toolchain.cmake -DVIDEO_EXAMPLE=ON
cmake --build . --target flash_nn
Step 6: Flash and Run
uartfwburn.exe -p COM? -f flash_ntz.nn.bin -b 3000000 -U -x 32
./uartfwburn.linux -p /dev/ttyUSB? -f ./flash_ntz.nn.bin -b 3000000 -U -x 32
Then, insert the SD card before pressing the reset button.
Advanced New Model Deployment Guide
This guide covers advanced topics for deploying customized NN models on Ameba IC, including SDK configuration, memory evaluation, pre-process nodes, model name modification, model security, and the post-process PC development tool.
SDK Configuration for Customized NN Models
After converting your model to .nb format, the next step is to add it to
the SDK and implement the necessary pre-processing and post-processing.
Add a Customized Model Network Binary to the SDK
After generating AmebaNet.nb, add it to the SDK:
project/realtek_<ameba_ic>_v0_example/src/test_model/
|-- model_nb/
|   |-- yolov3_tiny.nb
|   |-- yolov4_tiny.nb
|   |-- yolov7_tiny.nb
|   |-- AmebaNet.nb
|-- model_yolo.c
|-- model_yolo.h
|-- model_AmebaNet.c       --> implementation of pre-process & post-process for AmebaNet
|-- model_AmebaNet.h
Note
Remember to add your model_AmebaNet.c to
project/realtek_<ameba_ic>_v0_example/GCC-RELEASE/application/application.cmake.
Also check that the flash and DDR configuration is sufficient for your model.
Next, register the model in
project/realtek_<ameba_ic>_v0_example/GCC-RELEASE/mp/<ameba_ic>_fwfs_nn_models.json:
{
    "msg_level": 3,
    "PROFILE": ["FWFS"],
    "FWFS": {
        "files": ["MODEL0", "MODEL1"]
    },
    "MODEL0": {
        "name": "yolov4_tiny.nb",
        "source": "binary",
        "file": "yolov4_tiny.nb"
    },
    "MODEL1": {
        "name": "AmebaNet.nb",
        "source": "binary",
        "file": "AmebaNet.nb"
    }
}
Note
Select only the models you actually use in FWFS → files. Including
unused models will make the final image unnecessarily large.
Create a Model Object for the VIPNN Module
The vipnn module uses a model object (nnmodel_t) to deploy the model,
run pre-process, trigger inference, and run post-process.
Create the object in model_AmebaNet.c:
nnmodel_t AmebaNet = {
    .nb         = AmebaNet_get_network_filename,
    .preprocess     = AmebaNet_preprocess,
    .postprocess    = AmebaNet_postprocess,
    .model_src  = MODEL_SRC_FILE,
    .name = "AmebaNet"
};
Set the model file name:
void *AmebaNet_get_network_filename(void)
{
    return (void *) "NN_MDL/AmebaNet.nb";
}
Note
The NN driver uses the firmware file system (component/file_system/fwfs)
to open and read the model from flash by default. See
component/file_system/nn/nn_file_op.c for details.
Implement pre-process:
int AmebaNet_preprocess(void *data_in, nn_data_param_t *data_param,
                        void *tensor_in, nn_tensor_param_t *tensor_param)
{
    void **tensor = (void **)tensor_in;

    // do pre-process here, user can refer to model_yolo.c
    (uint8_t *)data_in;
    (uint8_t *)tensor[0];
    (uint8_t *)tensor[1];

    // clean cache since data will be accessed by NN engine directly
    dcache_clean_by_addr((uint32_t *)tensor[0], data_length);

    return 0;
}
Implement post-process:
int AmebaNet_postprocess(void *tensor_out, nn_tensor_param_t *param, void *res)
{
    void **tensor = (void **)tensor_out;
    int output_count = param->count;

    // decode tensor data, user can refer to model_yolo.c
    for (int n = 0; n < output_count; n++) {
        (uint8_t *)tensor[n];
    }

    // fill result
    int od_num = 0;
    objdetect_res_t *od_res = (objdetect_res_t *)res;
    for (int i = 0; i < box_idx; i++) {
        box_t *obj = &res_box[i];
        if (obj->invalid == 0) {
            od_res[od_num].result[0] = obj->class_idx;
            od_res[od_num].result[1] = obj->prob;
            od_res[od_num].result[2] = obj->x;
            od_res[od_num].result[3] = obj->y;
            od_res[od_num].result[4] = obj->x + obj->w;
            od_res[od_num].result[5] = obj->y + obj->h;
            od_num++;
        }
    }
    return od_num;
}
NN Memory and Flash Usage Evaluation
Evaluate the model size to ensure sufficient DDR memory and flash space.
Category |
Model |
Input size |
Quantized |
DDR memory |
File size |
|---|---|---|---|---|---|
Object detection |
Yolov3-tiny
Yolov4-tiny
Yolov4-tiny
Yolov7-tiny
NanoDet-Plus-m
NanoDet-Plus-m
|
416x416
416x416
576x320
416x416
416x416
576x320
|
uint8
uint8
uint8
uint8
uint8
uint8
|
6.9 MB (6,946,128 bytes)
7.7 MB (7,712,412 bytes)
7.48 MB (7,840,836 bytes)
8.2 MB (8,597,072 bytes)
4.33 MB (4,542,016 bytes)
4.53 MB (4,746,556 bytes)
|
5.6 MB (5,568,384 bytes)
4.1 MB (4,131,712 bytes)
3.85 MB (4,043,136 bytes)
4.44 MB (4,664,512 bytes)
1.86 MB (1,959,040 bytes)
1.83 MB (1,924,096 bytes)
|
Face detection |
SCRFD
SCRFD
|
640x640
576x320
|
uint8
uint8
|
4.1 MB (4,291,200 bytes)
2.6 MB (2,753,864 bytes)
|
0.68 MB (715,584 bytes)
0.56 MB (583,232 bytes)
|
Face Recognition |
MobileFaceNet
MobileFaceNet
|
112x112
112x112
|
int8
int16
|
1.72 MB (1,799,716 bytes)
5.1 MB (5,343,948 bytes)
|
0.86 MB (904,576 bytes)
3.42MB (3,590,656 bytes)
|
Sound classification |
YAMNet
YAMNet_s
|
15600x1
96x64
|
fp16
hybrid
|
9.2 MB (9,172,348 bytes)
0.73 MB (729,608 bytes)
|
8.7 MB (8,669,888 bytes)
0.67 MB (678,336 bytes)
|
Evaluate Memory Usage with NBinfo
Use Verisilicon_SW_VIP_NBInfo to evaluate DDR memory usage on PC:
********************************************************************************
Memory Info
********************************************************************************
Total Read Only Memory (bytes):                                   3737536
Total Command buffer (bytes):                                     167552
Total Load States (bytes):                                        34176
Total NN and TP instruction (bytes):                              132864
Total PPU instruction (bytes):                                    512
********************************************************************************
Total Operation Memory (bytes):                                   3939264
Total Input Memory (bytes):                                       519168
Total Output Memory (bytes):                                      215552
Memory Pool (bytes):                                              2769920
Video memory heap node reserved (bytes):                          20480
********************************************************************************
Total Video Memory (bytes):                                       7464448
Total System Memory (bytes):                                      247964
********************************************************************************
Ensure the NN DDR region in the linker script is large enough. Check and modify:
project/realtek_<ameba_ic>_v0_example/GCC-RELEASE/application/<rtl_ic>_ram.ld

/* DDR memory */
VOE    (rwx)    : ORIGIN = 0x70000000, LENGTH = 0x70100000 - 0x70000000  /*  1MB */
DDR    (rwx)    : ORIGIN = 0x70100000, LENGTH = 0x73000000 - 0x70100000  /* 49MB */
NN     (rwx)    : ORIGIN = 0x73000000, LENGTH = 0x74000000 - 0x73000000  /* 16MB */
Note
Also modify <rtl_ic>_boot_mp.ld in the bootloader directory to keep
the NN region consistent. For TrustZone projects, modify
<rtl_ic>_ram_ns.ld instead.
Evaluate Model Size on Flash
Ensure the NN region in the partition table is larger than your model size. For a single model (e.g., 7MB is allocated for yolov4-tiny at 4MB):
"nn": {
    "start_addr" : "0x770000",
    "length" : "0x700000",
    "type": "PT_NN_MDL",
    "valid": true
}
For multiple models, sum each model size and allocate enough flash space.
For example, if you want to deploy 4 models – yolov4-tiny, yamnet-s, mobilefacenet and centerface, the content of “amebapro2_fwfs_nn_models.json” will become:
{
    "msg_level":3,

    "PROFILE":["FWFS"],
    "FWFS":{
        "files":[
            "MODEL0",
            "MODEL1",
            "MODEL2",
            "MODEL3"
        ]
    },
    "MODEL0":{
        "name" : "yolov4_tiny.nb",
        "source":"binary",
        "file":"yolov4_tiny.nb"

    },
    "MODEL1":{
        "name" : "yamnet_s.nb",
        "source":"binary",
        "file":"yamnet_s.nb"

    },
    "MODEL2":{
        "name" : "mobilefacenet_int16.nb",
        "source":"binary",
        "file":"mobilefacenet_int16.nb"

    },
    "MODEL3":{
        "name" : "centerface_uint8.nb",
        "source":"binary",
        "file":"centerface_uint8.nb"

    }
}
Check each model size and calculate the total size = 1,535KB + 3,507KB + 663KB + 4,053KB = 9,740KB. It requires at least 10MB flash size for NN.
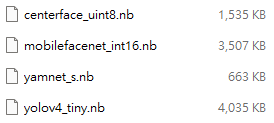
model network binary size
Therefore, the nn region length in
"project\realtek_<ameba_ic>_v0_example\GCC-RELEASE\mp\<ameba_ic>_partitiontable.json"
should not less than 10MB
"nn":{
            "start_addr" : "0x770000",
            "length" : "0xA00000",   --> 10MB > total size(9,740KB)
            "type": "PT_NN_MDL",
            "valid": true
      },
How to Add a Pre-process Node (Optional)
Sometimes you need to perform data preprocessing before inference. The Acuity Toolkit can auto-generate a pre-process node that runs on the NN engine, offloading the CPU. This node handles color space conversion, scaling, and cropping.
Enable it by configuring inputmeta.yml:
input_meta:
  databases:
  - path: dataset.txt
    type: TEXT
    ports:
    - lid: input.1_137
      category: image
      dtype: float32
      sparse: false
      tensor_name:
      layout: nchw
      shape:
      - 1
      - 3
      - 320
      - 576
      fitting: scale
      preprocess:
        reverse_channel: false
        mean:
        - 127.5
        - 127.5
        - 127.5
        scale: 0.0078125
        preproc_node_params:
          add_preproc_node: true
          preproc_type: IMAGE_NV12
          preproc_image_size:
          - 576
          - 320
Note
This feature requires Acuity 6.18.8 and VIPLite driver 1.12.0 or newer. Older versions do not fully support it.
How to Modify the Customized Model Name After Conversion (Optional)
The network binary graph format stores the network name at offset 12 bytes from the head, with a length of 64 bytes.
Section |
Field |
Data Type |
Count |
Size in Bytes |
Meaning |
Header |
Magic … … Network_name … |
CHAR UINT32 UINT32 CHAR UINT32 |
4 1 1 64 1 |
4 4 4 64 4 |
Must be “VPMN” for a valid binary graph file … … Indicates the name of a network … |
You can edit these 64 bytes with any hex editor.
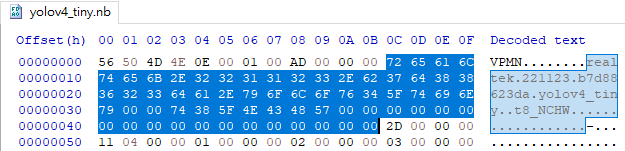
The name is queried at runtime in module_vipnn.c via:
vip_query_network(ctx->network, VIP_NETWORK_PROP_NETWORK_NAME, ctx->network_name);
dprintf(LOG_INF, "network name:%s\n\r", ctx->network_name);
After modifying, you should see the following log (User may need to change the debug log level to LOG_INF to see this information in console):
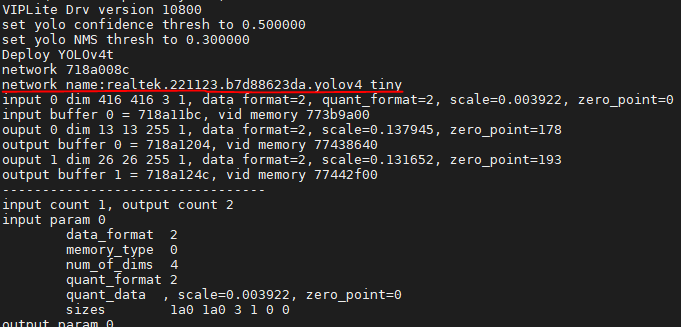
model name
YOLOv9-tiny Deployment Guide
SDK configuration for customized YOLOv9-tiny model
The model binary file (.nb) was obtained from previous section. In this section, the guide shows how to add this model binary file to SDK and implement the necessary pre-processing and post-processing.
Add customized model network binary to SDK
After yolov9_tiny.nb generated, please add this file to SDK folder:
project/realtek_<ameba_ic>_v0_example/src/test_model/model_nb. All
model network binary files will be placed here, the structure should be:
project/realtek_<ameba_ic>_v0_example/src/test_model/
|-- model_nb/
|   |-- yolov3_tiny.nb  --> yolov3-tiny network binary graph file
|   |-- yolov4_tiny.nb  --> yolov4-tiny network binary graph file
|   |-- yolov7_tiny.nb  --> yolov7-tiny network binary graph file
|   |-- yolov9_tiny.nb  --> yolov9-tiny network binary graph file
|-- model_yolo.c
|-- model_yolo.h
|-- model_yolov9.c  --> implementation of pre-process & post-process of yolov9
|-- model_yolov9.h
Note
Remember to add your model_yolov9.c to project/realtek_<ameba_ic>_v0_example/scenario.cmake. Additionally, kindly check the configuration of flash size and ddr size for the nn model is enough. Please refer “Evaluate Model Size on Flash” section in Advanced New Model Deployment Guide to do evaluation.
Next, add model to the model list.
Go to
project/realtek_<ameba_ic>_v0_example/GCC-RELEASE/mp/<ameba_ic>_fwfs_nn_models.json
and add yolov9_tiny.nb to this list:
{
    "msg_level":3,

    "PROFILE":["FWFS"],
    "FWFS":{
        "files":[
            "MODEL0",
            "MODEL1"
        ]
    },
    "MODEL0":{
        "name" : "yolov4_tiny.nb",
        "source":"binary",
        "file":"yolov4_tiny.nb"
    },
    "MODEL1":{
        "name" : "yolov9_tiny.nb",
        "source":"binary",
        "file": "yolov9_tiny.nb"
    }
}
Note
If you only want to use yolov9_tiny.nb, just choose “MODEL1” in “FWFS”-“files”. Otherwise, your final image will become very large since it contain some unused model binary files.
Create a model object can be used by VIPNN module
The vipnn module will use the model object to deploy the model, do model pre-process, trigger model inference and do model post-process.
Therefore, kindly create nnmodel_t yolov9_tiny in model_yolov9.c.
The following are the necessary functions which will be used by VIPNN module,
so please register these function pointers to yolov9_tiny object after
finishing implementation:
nnmodel_t yolov9_tiny = {
    .nb         = yolov9_get_network_filename,
    .preprocess     = yolov9_preprocess,
    .postprocess    = yolov9_postprocess,
    .model_src  = MODEL_SRC_FILE,
    .name = "YOLOv9t"
};
Set the NN model file name used by NN driver
The model name need to be set, so NN driver can open and load the network binary file via file system during runtime deployment.
void *yolov9_get_network_filename(void)
{
    return (void *) "NN_MDL/yolov9_tiny.nb";
}
Note
The NN driver will use firmware file system (component/file_system/fwfs) to open and read the model from flash by default. For further information, user can refer “nn file operation layer” used by NN driver – component/file_system/nn/nn_file_op.c.
Set the NN model desired_class by NN driver
Due to the output of yolov9, the running speed of the algorithm depends on the number of objects to detect (3549 anchors and 80 classes), it means that the detection of all 80 classes is not needed, find only relative information for the classes desired, therefore, only input the desired class array to reduce the running time of postprocess function
To register the desired class in VIPNN module, please create an nn_desired_class_t in module_vipnn.c and module_vipnn.h.
The following are the steps which will be added in VIPNN module,
In module_vipnn.h
defined the structure and add
nn_desired_class_tinside structurennmodel_tdefined
set_desired_classfunction and addnn_set_desired_class_tinnnmodel_tstructure
typedef struct nn_desired_class_s {
    int *class_info;
    int len;
} nn_desired_class_t;

typedef void (*nn_set_desired_class_t)(nn_desired_class_t *desired_class_list);
typedef struct nnmodel_s {
    ...
    nn_set_confidence_thresh_t set_confidence_thresh;
    nn_set_nms_thresh_t set_nms_thresh;
    nn_set_desired_class_t set_desired_class;
    ...
} nnmodel_t;
- In module_vipnn.c
defined the register vipnn case
case CMD_VIPNN_SET_DESIRED_CLASS:
    if (ctx->params.model->set_desired_class) {
        ctx->params.model->set_desired_class((nn_desired_class_t *)arg);
    }
    break;
In model_yolov9.c
set the desired class for yolov9
void yolov9_set_desired_class(nn_desired_class_t *desired_class_list)
{
    yolov9_desired_class_list_len = desired_class_list->len;
    yolov9_desired_class_list = desired_class_list->class_info;
}
- In mmf2_video_example_vipnn_rtsp_init.c
specify the target class and register through vipnn module
static int desired_class_list[] = {0, 2, 5, 7};
static const int class_size = (sizeof(desired_class_list) / sizeof(int));
static nn_desired_class_t desired_class_param = {
    .class_info = desired_class_list,
    .len = class_size
};

mm_module_ctrl(vipnn_ctx, CMD_VIPNN_SET_DESIRED_CLASS, (int)&desired_class_param);
Implement customized pre-process and post-process
User can do their customized pre-process for the image before passing it to NN model inference; in addition, they can do their customized post-process to decode the output tensor from result of inference.
Implement pre-process in model_yolov9.c:
int yolov9_preprocess(void *data_in, nn_data_param_t *data_param, void *tensor_in, nn_tensor_param_t *tensor_param)
{
    void **tensor = (void **)tensor_in;

    //do pre-process here, user can refer model_yolo.c to do it
    (uint8_t *)data_in;
    (uint8_t *)tensor[0];
    //…

    //clean the cache since the data will be accessed by NN engine directly
    dcache_clean_by_addr((uint32_t *)tensor[0], data_length);

    return 0;
}
Implement post-process in model_yolov9.c:
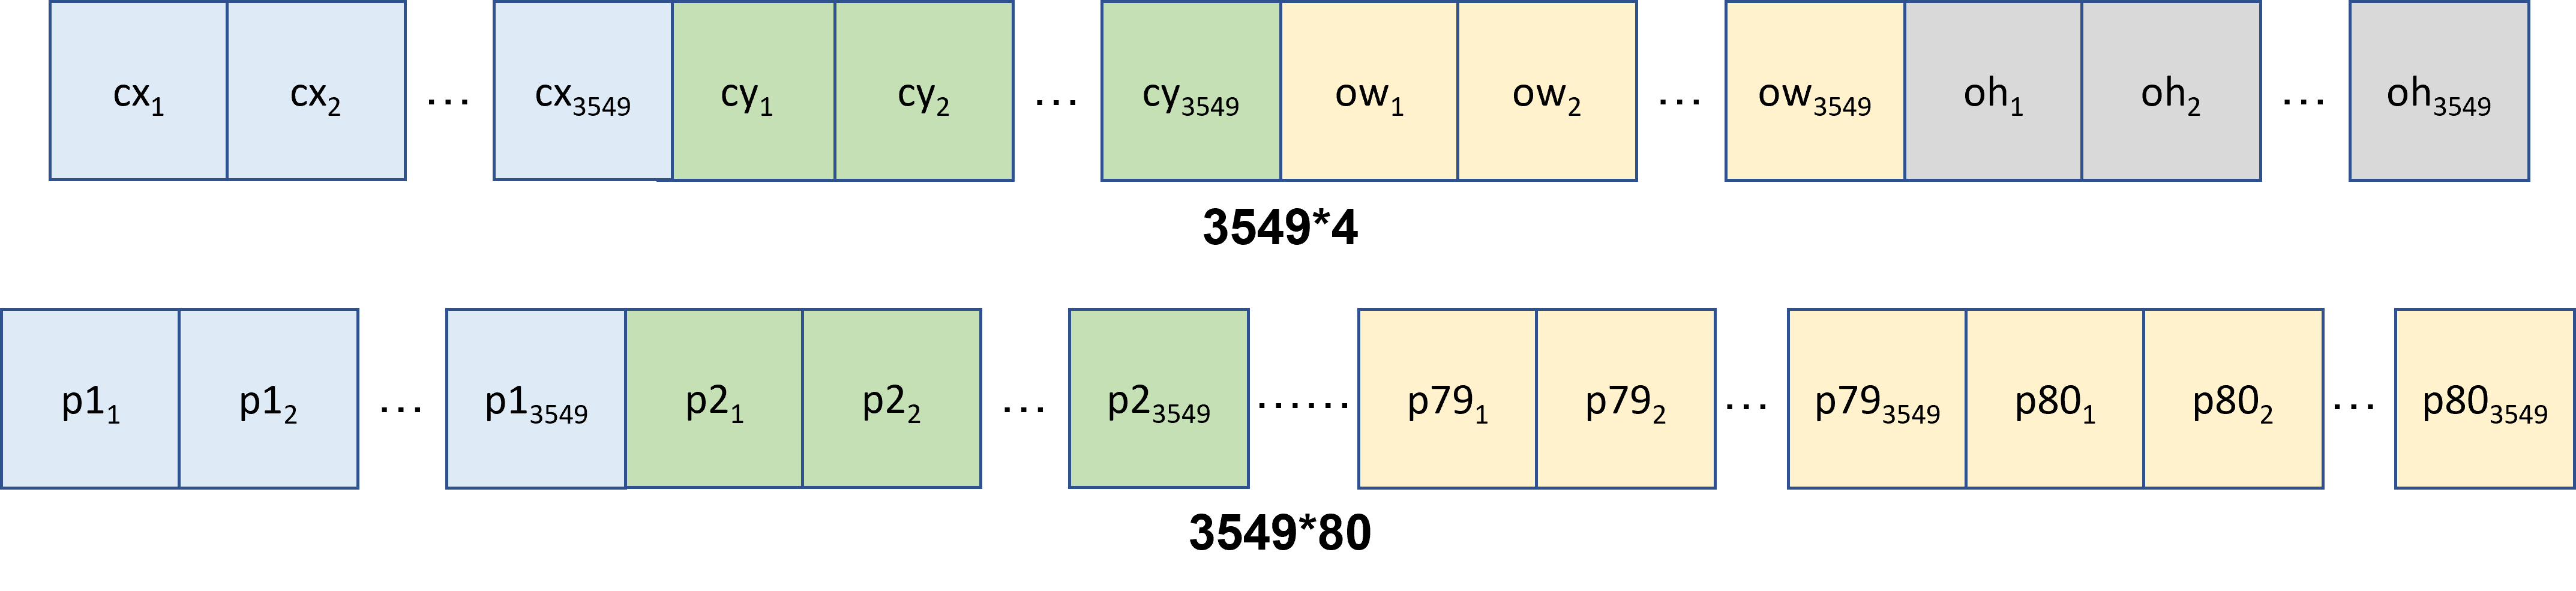
yolov9 tensor output format
The anchor num is 3549 for yolov9_tiny, and the classes num is 80, the output of yolov9_tiny include center_x, center_y, width, height and the score for each classes (total 80)
cx, cy, ow, oh: center_x, center_y, width, height
p1: probability of class 1, etc.
undernumber: num anchor, ex. p2_1 represent the score of class 2 for anchor 1, p80_3500 represent the score of class 80 for anchor 3500
int yolov9_postprocess(void *tensor_out, nn_tensor_param_t *param, void *res)
{
    void **tensor = (void **)tensor_out;
    for(int idx=0; i < num_anchor; idx++){
        int cur_label = yolov9_desired_class_list[0]*num_anchor;
        uint8_t *tmp_pred_u8 = (uint8_t *)preds + idx;
        //This algo will execute faster since it only search the desired_class_list
        for(int i=0; i < yolov9_desired_class_list_len; i++){
            if (tmp_pred_u8[yolov9_desired_class_list[i]*num_anchor] > tmp_pred_u8[cur_label]) {
                cur_label = yolov9_desired_class_list[i]*num_anchor;
            }
        }
        //This algo will execute slower since it search all 80 classes
        for (int label = 0; label < num_class; label++) {
            if (tmp_pred_u8[label*num_anchor] > tmp_pred_u8[cur_label]) {
                cur_label = label*num_anchor;
            }
        }
    }
}
Model Security
Some customers have in-house self-trained models that need protection. The SDK supports model authentication and model encryption to protect intellectual property.
Model graph binary authentication (integrity + trust)
Model graph binary encryption (confidentiality)
The authentication and decryption are processed by the cryptographic hardware accelerator. Keys used for decryption are stored in on-chip eFuse OTP.
Secure feature |
Algorithm Support |
Key management |
|---|---|---|
Model Authentication |
Hash: sha256 Signature: EdDSA_ED25519 |
Use private key to sign model on PC or server. Use public key to verify model signature. Use the FW signing key to sign the model. NN module uses the public key in FW manifest to verify the signature at runtime. Note: enable trust boot so the public key is verified by chain of trust. |
Model Encryption |
AES_256_CBC |
Use AES-256 key to encrypt model on PC or server. Use the “user eFuse OTP KEY 0” to encrypt the model. NN module uses this key to decrypt at run time. Note: if no “user eFuse OTP KEY 0” exists, inject it via |
Model Authentication — Hash and Signature Check
Model authentication includes integrity check and trust check. After signing
the model, a SHA-256 hash and EdDSA signature are appended at the end of the
.nb file. The signature verifies trust of the hash, and the hash verifies
the integrity of the model.
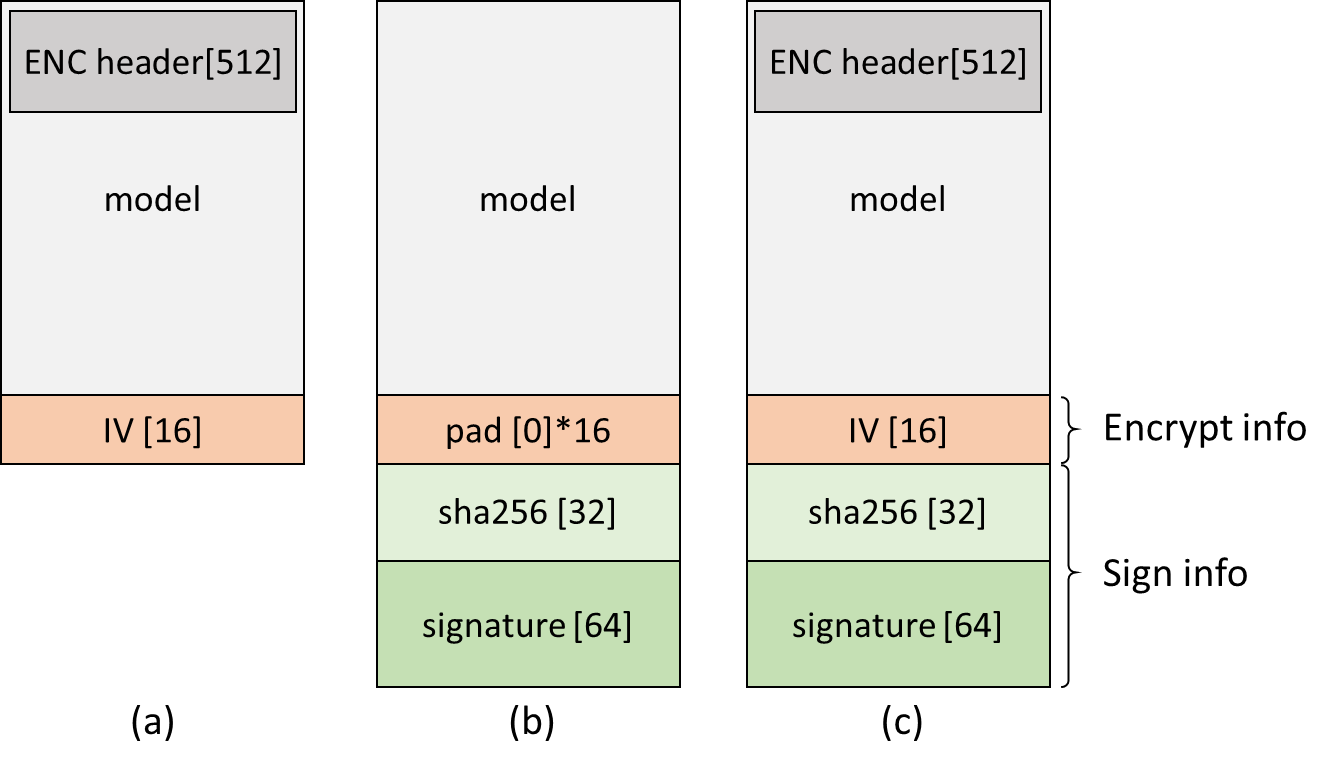
Signed model format:
Encrypted only:
[model header (encrypted)] [rest of model] [IV]
Signed only:
[model] [hash] [signature]
Signed + Encrypted:
[model header (encrypted)] [rest of model] [IV] [hash] [signature]
Model Encryption
User can encrypt the model graph binary to prevent parsing. Typically only the first 512 bytes (fixed header) of the model need to be encrypted.
Section |
Size in Bytes |
Header and Tables |
512 (Fixed) |
Data Sections |
Dynamic |
The SDK decrypts the encrypted model header using AES-256-CBC with the user OTP eFuse key.
Note
The hardware crypto engine on the device accelerates the decryption process.
SDK Configuration for Security
Model signature validation and decryption are disabled by default. Enable
them in platform_opts.h:
/* For NN configuration */
#define CONFIG_NN_AES_ENCRYPTION 1
#define CONFIG_NN_HASH_SIGNATURE_CHECK 1
Note
These two features can be enabled independently.
Secure Deployment Flow
After enabling NN decryption or hash/signature check feature in SDK, the model will be deployed securely according to the flow as shown below.
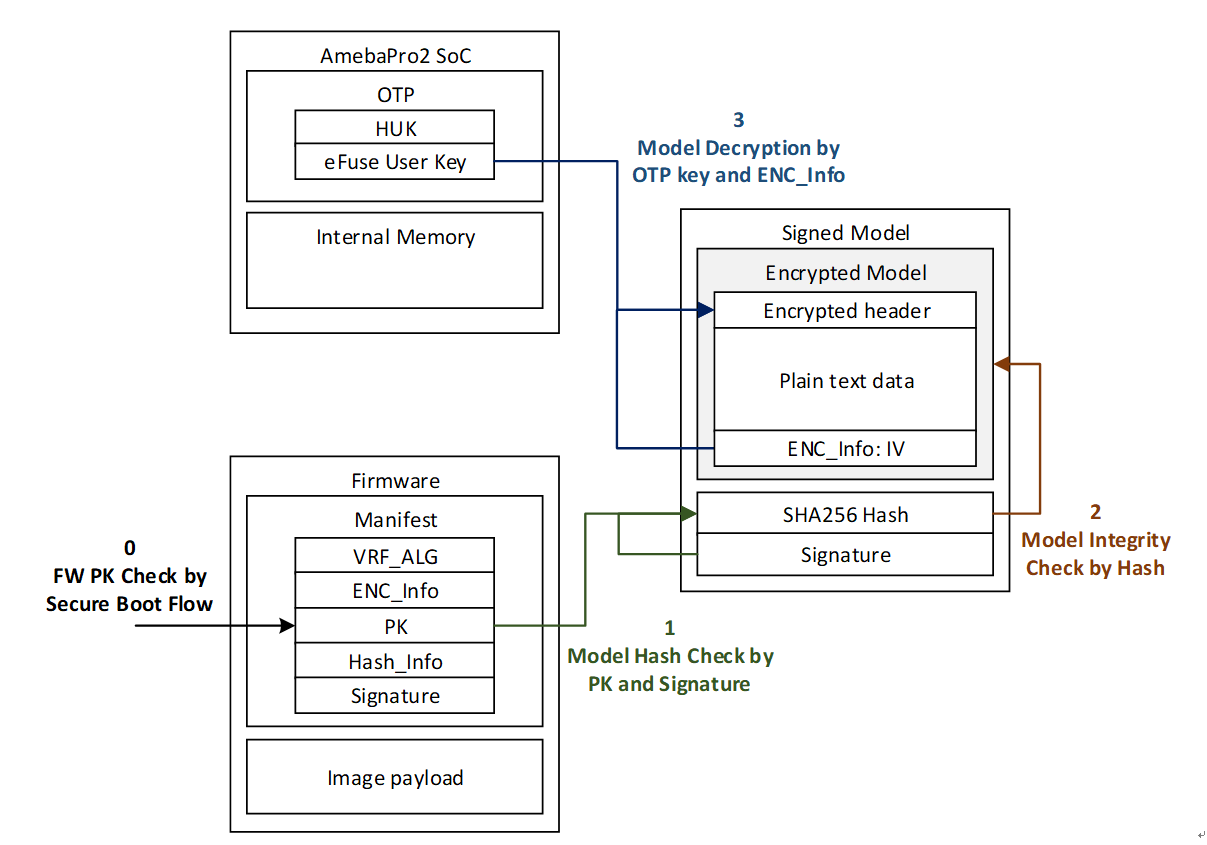
secure NN model deployment
Signing and Encryption PC Tool
The tool is located at:
project/realtek_<ameba_ic>_v0_example/src/test_model/model_nb/model_signature/model_sign_ed25519.py
Install required packages (PyNaCl, PyCrypto):
$ pip install pynacl
$ pip install pycryptodome
The format of any key is a Hex string file. For example, the content of 32-bytes signing key (model-sign-key) will be look like:
104008de9c2fed8fbb20139ea3eafb6b60e8fb8a603b488c90586e2750b7f3ae
The followings are the command usage to sign or encrypt the model. The tool also provide the corresponding verification command.
Sign only:
Sign the model with sign key (ED25519 public key)
$ python3 model_sign_ed25519.py --sign-key "model-sign-key" --model "../yolov4_tiny.nb"
Verify the model with verify key (ED25519 secret key)
$ python3 model_sign_ed25519.py --verify-key "model-verify-key" --signed-model "../yolov4_tiny.nb.sig"
Note
After signing, user can get signed model – yolov4_tiny.nb.sig. User should download this model to flash partition or file system.
Encrypt only:
Encrypt the model with AES key (AES-256-CBC symmetric key), the IV will be generated randomly by the tool
$ python3 model_sign_ed25519.py --model "../yolov4_tiny.nb" --enc-key "model-enc-key"
Decrypt the model with same AES key
$ python3 model_sign_ed25519.py --signed-model "../yolov4_tiny.nb.enc" --enc-key "model-enc-key"
Note
After encrypting, user can get encrypted model – yolov4_tiny.nb.enc. User should download this model to flash partition or file system.
Sign and Encrypt:
Sign and encrypt the model with sign key and encrypt key
$ python3 model_sign_ed25519.py --sign-key "model-sign-key" --model "../yolov4_tiny.nb" --enc-key "model-enc-key"
Decrypt and verify the model signature with verify key and encrypt key
$ python3 model_sign_ed25519.py --verify-key "model-verify-key" --signed-model "../yolov4_tiny.nb.enc.sig" --enc-key "model-enc-key"
Note
After signing and encrypting, user can get encrypted model with signature – yolov4_tiny.nb.enc.sig. User should download this model to flash partition or file system.
Note
Signed model:
yolov4_tiny.nb.sigEncrypted model:
yolov4_tiny.nb.encSigned + Encrypted:
yolov4_tiny.nb.enc.sig
Download the resulting file to the flash partition or file system.
Performance Test Results
Security feature |
Time (ms) |
Remark |
|
|---|---|---|---|
Authentication |
Signature check |
3 |
Checks signature of 32 bytes model hash. Time is fixed. |
Hash check |
38 |
Depends on model size (yolov4-tiny: 4MB). |
|
Decryption |
Cipher text decrypt |
3 |
Always decrypts 512 bytes fixed header. Time is fixed. |
Post-process PC Development Tool
You can develop and validate post-processing on a PC before deploying to the device. After running the inference script in the Acuity Toolkit, you can obtain the output tensor of the model and decode it on PC to get the comprehensible results such as object class, probability and bounding box.
The post-process API interface used by the PC tool and the <RTL_IC> device are the same, making it easy to transition from development to deployment.
Take Yolov4 as example, the following are the steps to use the tool:
Steps
Step 1: Develop post-process in model_yolo_sim.c.
Step 2: Set up tensor parameters from the NB file in main.c:
static void yolo_pc_configure_tensor_param(nn_tensor_param_t *input_param, nn_tensor_param_t *output_param)
{
    char *nbg_filename = "../../test_model/model_nb/yolov4_tiny.nb";
    config_param_from_nb_file(nbg_filename, input_param, output_param);
}

int yolo_simulation(void)
{
    nn_tensor_param_t input_param, output_param;
    yolo_pc_configure_tensor_param(&input_param, &output_param);
    // ...
}
Step 3: Get the output tensor from Acuity inference after running the inference script and set file paths:
int yolo_simulation(void)
{
    // ...
    char *acuity_tensor_name[16];
    acuity_tensor_name[0] = "../data/yolo_data/iter_0_output_30_65_out0_1_255_13_13.tensor";
    acuity_tensor_name[1] = "../data/yolo_data/iter_0_output_37_76_out0_1_255_26_26.tensor";
    void *pp_tensor_out[16];
    memset(pp_tensor_out, 0, sizeof(pp_tensor_out));
    acuity_output_tensor_conversion(acuity_tensor_name, pp_tensor_out, &output_param);
    // ...
}
Step 4: Build:
mkdir build && cd build
cmake .. -G"Unix Makefiles"
make -j4
Step 5: Execute:
./nn_postprocess
Step 6: Check the result. An image with bounding boxes will be saved at
data/yolo_data/prediction.jpg.
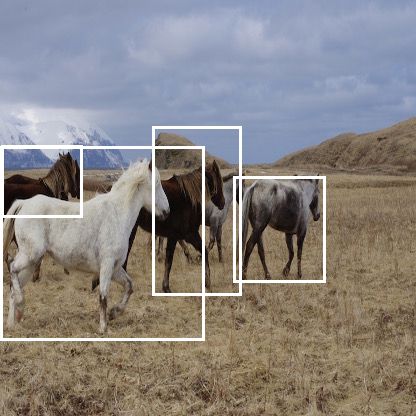
detection result example
Appendix A: Acuity Supported Operation Layers
ONNX to ACUITY Operation Mapping
ONNX Operation |
ACUITY Operation |
|---|---|
Abs |
abs |
Add |
add |
And |
logical_and |
ArgMax |
argmax |
ArgMin |
argmin |
Atan |
atan |
Atanh |
atanh |
BatchNormalization |
batchnormalize |
Cast |
cast |
CastLike |
cast |
Ceil |
ceil |
Celu |
celu |
Clip |
clipbyvalue |
Concat |
concat |
Conv |
conv1d/group_conv1d/depthwise_conv1d/convolution/conv2d_op/depthwise_conv2d_op/conv3d |
ConvTranspose |
deconvolution/deconvolution1d |
Cos |
cos |
Cumsum |
cumsum |
DepthToSpace |
depth2space |
DequantizeLinear |
dequantize |
DFT |
dft |
Div |
divide |
Dropout |
dropout |
Einsum |
einsum |
Elu |
elu |
Equal |
equal |
Erf |
erf |
Exp |
exp |
Expand |
expand_broadcast |
Floor |
floor |
Gather |
gather |
GatherElements |
gather_elements |
GatherND |
gathernd |
Gemm |
matmul/fullconnect |
Greater |
greater |
GreaterOrEqual |
greater_equal |
GridSample |
gridsample |
GRU |
gru |
HammingWindow |
hammingwindow |
HannWindow |
hannwindow |
HardSigmoid |
hard_sigmoid |
HardSwish |
hard_swish |
InstanceNormalization |
instancenormalize |
LeakyRelu |
leakyrelu |
Less |
less |
LessOrEqual |
less_equal |
Log |
log |
Logsoftmax |
log_softmax |
LRN |
localresponsenormalization |
LSTM |
lstm |
MatMul |
matmul/fullconnect |
Max |
eltwise(MAX) |
MaxPool/AveragePool/GlobalAveragePool/GlobalMaxPool |
pooling/pool1d/pool3d |
MaxRoiPool |
roipooling |
Mean |
eltwise(MEAN) |
MeanVarianceNormalization |
instancenormalize |
Min |
eltwise(MIN) |
Mish |
mish |
Mod |
mod |
Mul |
multiply |
Neg |
neg |
NonZero |
nonzero |
OneHot |
onehot |
Or |
logical_or |
Pad |
pad |
Pow |
pow |
Prelu |
prelu |
QLinearConv |
convolution/conv1d |
QLinearMatMul |
matmul |
QuantizeLinear |
quantize |
Reciprocal |
variable+divide |
ReduceL1 |
abs+reducesum |
ReduceL2 |
reducesum+multiply+sqrt |
ReduceLogSum |
reducesum+log |
ReduceLogSumExp |
exp+reducesum+log |
ReduceMax |
reducemax |
ReduceMean |
reducemean |
ReduceMin |
reducemin |
ReduceProd |
reduceprod |
ReduceSum |
reducesum |
ReduceSumSquare |
multiply+reducesum |
Relu |
relu |
Reshape/Squeeze/Unsqueeze/Flatten |
reshape |
Resize |
image_resize |
ReverseSequence |
reverse_sequence |
Round |
round |
ScatterND |
scatter_nd_update |
Selu |
selu |
Shape |
shapelayer |
Sigmoid |
sigmoid |
Sign |
sign |
Silu |
swish |
Sin |
sin |
Size |
size |
Slice |
slice/stridedslice |
Softmax |
softmax |
Softplus |
softrelu |
Softsign |
abs+add+divide+variable |
SpaceToDepth |
space2depth |
Split |
split/slice |
Sqrt |
sqrt |
Squeeze |
squeeze |
STFT |
stft |
Sub |
subtract |
Sum |
eltwise(SUM) |
Tanh |
tanh |
Tile |
tile |
TopK |
topk |
Transpose |
permute |
Unsqueeze |
reshape |
Upsample |
image_resize |
Where |
where |
Xor |
not_equal |
Darknet to ACUITY Operation Mapping
Darknet Operation |
ACUITY Operation |
|---|---|
avgpool |
pooling |
batch_normalize |
batchnormalize |
connected |
fullconnect |
convolutional |
convolution |
depthwise_convolutional |
convolution |
leaky |
leakyrelu |
logistic |
sigmoid |
maxpool |
pooling |
mish |
mish |
region |
region |
relu |
relu |
reorg |
reorg |
route |
concat/slice |
scale_channels |
multiply |
shortcut |
add/slice+add/pad+add |
softmax |
softmax |
swish |
swish |
upsample |
upsampling |
yolo |
yolo |
Appendix B: Acuity Supported AI Frameworks
AI Framework |
Import File Format |
|---|---|
Caffe |
.caffemodel |
TensorFlow |
.pb |
TensorFlow Lite |
.tflite |
Darknet |
.cfg |
ONNX |
.onnx |
PyTorch |
.pt |
Keras |
.h5 |
Note
No quantization is needed for Acuity Networks converted from ONNX, TensorFlow or TensorFlow Lite models that have been already quantized. Per-channel quantized models are NOT supported on the NPU — ensure your model uses per-tensor quantization.
Tip
For PyTorch framework, you are highly recommended to export your file in
.onnx format first to ensure successful conversion.
Reference: ACUITY Toolkit User Guide
NN MMF examples
Please refer to the application note for the usage of NN MMF example with VIPNN module.