Azure IoT Service Configuration
Here we introduce some required steps to prepare for your IoT Service. For Azure IoT Examples, it is recommended to set up Azure IoT Hub and DPS on your Azure Service Portal for testing. And for Ameba IoT Hub Plug and Play Examples, you can either choose to connect to Azure IoT Hub/DPS or connect to Azure IoT Central for simpler deployment.
Azure IoT Hub and DPS
IoT Hub and DPS can be created on your Azure Portal. You can perform the following steps to set up your own IoT Service on Azure Portal and manage your resources.
Create your IoT Hub on Azure Portal. Once created, you will be able to retrieve your IoT Hub hostname on your IoT Hub menu. This IoT Hub hostname is required for Azure examples in our SDK and will be used as
HUB_HOSTNAMEin the example.Now you can add a device to your IoT Hub by either manually adding or by device provisioning. You have to specify the Device ID for your device and choose Symmetric key or X.509 for device connection if you add the device manually. If you use device provisioning, the Device ID will be assigned by DPS which will be the same as the Registration ID of the device enrollment. Also, the registered device will keep the same authentication type as the DPS device enrollment.
Once you have your device created, you can run the Azure example to
connect your device to IoT Hub by giving HUB_HOSTNAME, device id as
HUB_DEVICE_ID, connection authentication type either Symmetric key
as HUB_SAS_KEY or X.509 certificate/private key as
X509CERTIFICATE/ X509PRIVATEKEY.
Create your Device Provisioning Services (DPS) on Azure Portal and have your device enrollment ready. The ID scope of the DPS and the Registration ID of device enrollment will be used in Azure Examples as
ID_SCOPEandREGISTRATION_ID. Here we introduce individual enrollment only. When you add individual enrollment to your DPS, you can select Symmetric Key or X.509 mechanism.SAS (Symmetric Key):Specify the Registration ID, IoT Hub Device ID and IoT Hub hostname you want to assign to. The Primary key will be auto-generated and will be used in the Azure examples as
SAS_KEY. Once device provisioning is done, the device with name as your IoT Hub Device ID will be registered to your IoT Hub. The registered device will use the same symmetric key for connection.X.509:Specify the IoT Hub Device ID and IoT Hub hostname you want to assign to. Also, you need to select the X509 certificate file you have for provisioning.
Please note that:
Registration ID for X.509 individual enrollment is retrieved from the X.509 certificate Subject Name.
For the X509 certificate used for IoT provisioning, please make sure your x509 certificate is created with x509 v3 extension.
X509v3 Basic Constraints: CA:FALSE
X509v3 Key Usage: Digital Signature, Non Repudiation, Key Encipherment
To connect to DPS with X.509 enrollment, you will need to provide X509 certificate and private key as
X509CERTIFICATEandX509PRIVATEKEYin your examples. Once device provisioning is done, the device with name as your IoT Hub Device ID will be registered to your IoT Hub. The registered device will use the same X.509 certificate for connection.
Azure IoT Central
Azure IoT Central is an integrated platform for users to develop their Azure IoT Service. You can customize your IoT solution on this platform and manage your IoT resources easily and gracefully.
First, you have to create an application on your Azure IoT Central and then select and publish Ameba device on Device Template. Next, navigate to Devices and create a new device. For individual enrollment, follow the steps below to set up your device connection.
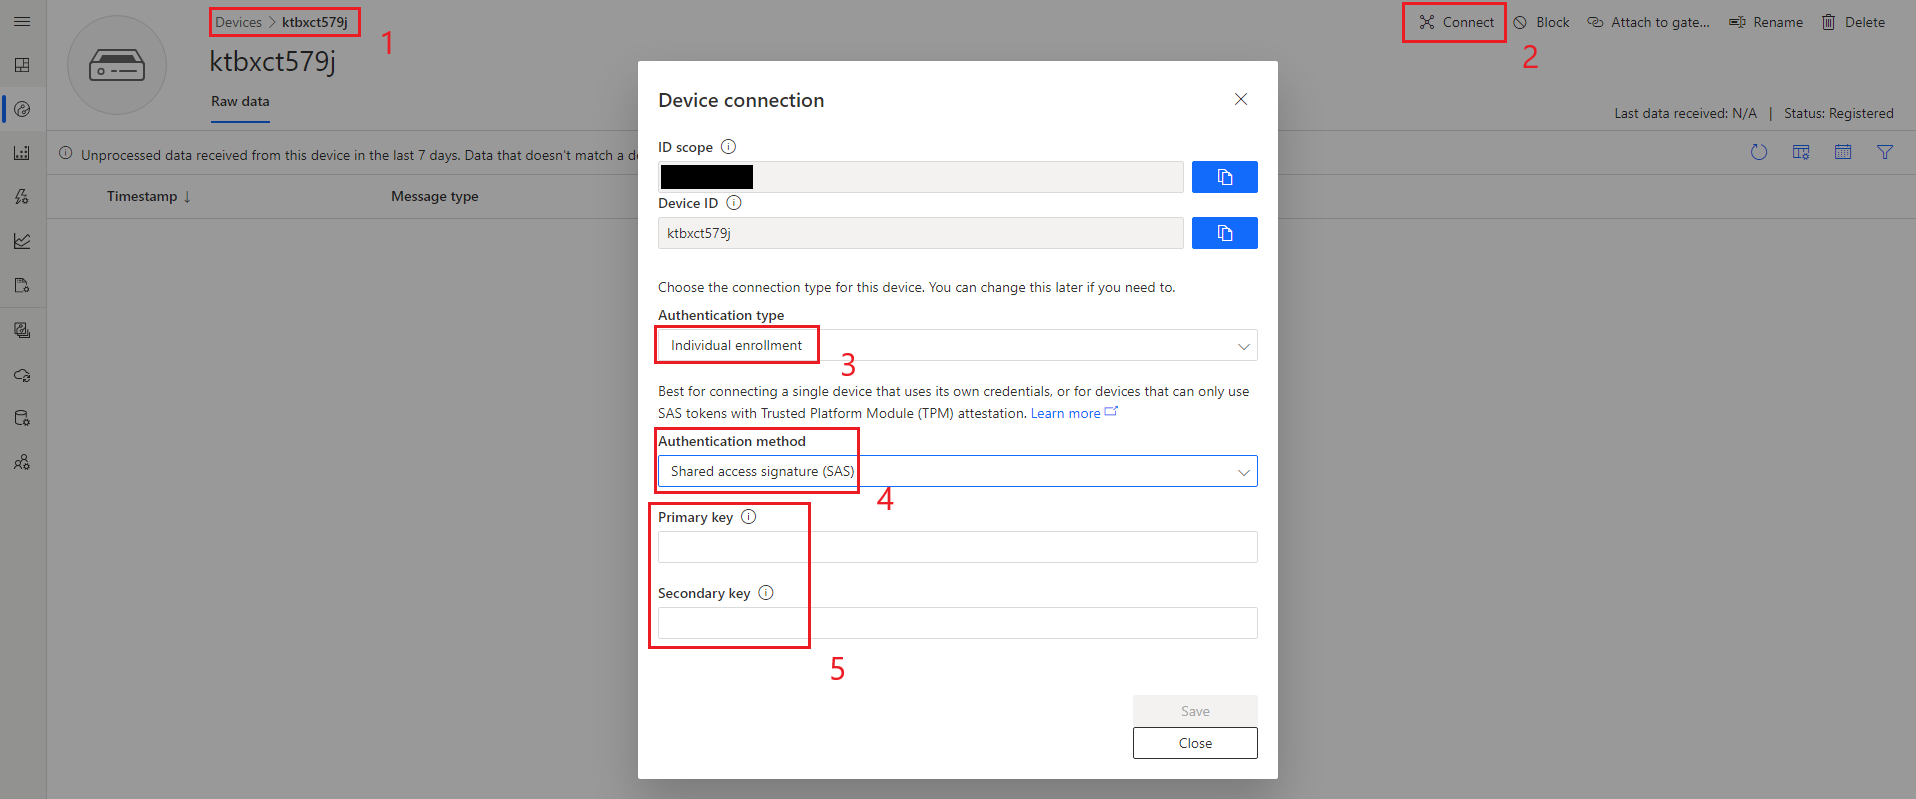
Click on your device.
Click on the Connect icon on your device page, you will see the Device connection window pop up.
Select Individual enrollment on the Authentication type.
Choose Shared access signature (SAS) or Certificate (X.509) on the Authentication method.
Enter the SAS Primary key or Upload the X.509 Certificate. Here are some tips for creating the SAS key and X.509 Certificate.
Now you can fill in the connection information in the Ameba IoT Hub Plug
and Play examples where ID scope as ID_SCOPE, Device ID as
REGISTRATION_ID, SAS key as SAS_KEY and X509 certificate/private
key as X509CERTIFICATE/X509PRIVATEKEY.
Note that due to IoT Central’s limitation, command wifi_scan mentioned
in the Realtek device model is temporarily not supported in IoT Central.