MCP User Guide
Overview
MCP (Model Context Protocol) is an open standard protocol introduced by Anthropic that lets AI Agents securely connect to external tools, data sources, and workflows. Through MCP, AI Agents move beyond suggestions — they can directly perform actions. Claude Code, Cline, Continue, Roo Code, and other mainstream AI Agents are all supported.
Ameba provides two MCP services with distinct roles. Together they form an automated iteration loop: query docs → modify code → build → flash → observe behavior:
Documentation Query MCP (knowledge layer) — a cloud-hosted MCP server that lets AI Agents query the Ameba official documentation over HTTP to learn API usage and example code.
SDK Development MCP (execution layer) — a local MCP server, launched directly on the developer’s machine by the AI client (Claude Code) and communicating over standard input/output without networking or extra authentication. It can directly modify project configuration, build, flash, and verify code execution.

The Documentation Query MCP shares its knowledge source with the AI Chatbot, but they serve different use cases:
The chatbot is for developers asking questions manually.
The Documentation Query MCP is for AI Agents that automatically query documentation in real time during SDK development to support code-level decisions — that is its core value.
The diagram below shows how the dev board, PC, AI Agent, both MCP services, and the Ameba SDK relate to one another, along with a typical development workflow:

Edit code: the Agent modifies SDK source files in the editor, guided by both the actual SDK code and the Documentation MCP knowledge;
Build firmware: the Agent calls the
build_firmwaretool to trigger cmake/ninja compilation, and automatically syncs the flash layout configuration toproject_info.json5;Flash firmware: the Agent calls the
flash_firmware_tooltool to write firmware to the dev board viaAmebaFlash.py;Serial verification: the Agent calls
serial_expect_tooland related tools to wait for boot logs or run interactive commands and verify the result.
Documentation Query MCP
The Ameba AIoT documentation provides an MCP server that shares its knowledge source with the AI Chatbot. After installing the Ameba Documentation Query MCP server, AI Agents can directly query and retrieve content from the Ameba AIoT official documentation.
Getting the MCP Server URL
Steps to obtain the MCP server URL:
Open the RealMCU AIOT website
Click the AI icon in the lower-right corner to open the RealMCU AI Chatbot
In the dialog, find the Use MCP dropdown
For Claude Code, click Add to Claude Code and copy the CLI command
For other AI Agents (Roo Code, Cline, Continue, etc.), click Copy MCP Link to get the MCP server URL

Note
MCP server URL:
https://ameba-aiot.mcp.kapa.ai
After obtaining the MCP server URL, follow the tab below for your AI Agent to complete the setup.
Installation and Authentication
General steps:
Get the MCP service URL (see previous section).
Configure the MCP client.
Complete authentication (typically via GitHub OAuth).
Start using it.
Step 1: Add the MCP service
Run the following command in your terminal to add the Ameba Documentation Query MCP service to Claude Code:
claude mcp add --transport http realmcu-ask-ai-docs https://ameba-aiot.mcp.kapa.ai
Parameters:
--transport http: use HTTP transportrealmcu-ask-ai-docs: MCP server name (customizable)https://ameba-aiot.mcp.kapa.ai: MCP service URL
Step 2: Complete authentication
Open Claude Code
Type the
/mcpcommand in the dialog and check therealmcu-ask-ai-docsauthentication status:realmcu-ask-ai-docs · △ needs authentication
Press Enter to confirm authentication, then follow Claude’s prompts to complete the flow
Once authenticated, return to the Claude interface and continue the conversation
Type
/mcpagain to verify the statusrealmcu-ask-ai-docs · ✔ connected
Tip
List installed MCP services:
claude mcp listRemove the MCP service:
claude mcp remove realmcu-ask-ai-docs

Step 1: Add the MCP service
Add via the Cursor IDE interface.:
Go to View -> Settings -> Tools & MCPS, and click the + button for New MCP Servers.
In the opened mcp.json, replace the following content to add the Ameba documentation query MCP service.
{
    "mcpServers": {
        "realmcu-ask-ai-docs": {
            "type": "http",
            "url": "https://ameba-aiot.mcp.kapa.ai"
        }
    }
}
After saving the configuration, you can exit and re-enter the settings. Observe that the MCP Servers section should now have realmcu-ask-ai-docs appearing, with the status showing ‘Needs authentication’.
Step 2: Complete Authentication
Use the official MCP Inspector tool to complete GitHub OAuth login, and after obtaining the Access Token, fill it into the Continue configuration.
Click ‘Connect’ to go to the web page and complete the authentication. After finishing, return to the Cursor interface, where it will show ‘MCP enabled’.
The realmcu-ask-ai-docs MCP service will then be available for use in Cursor.
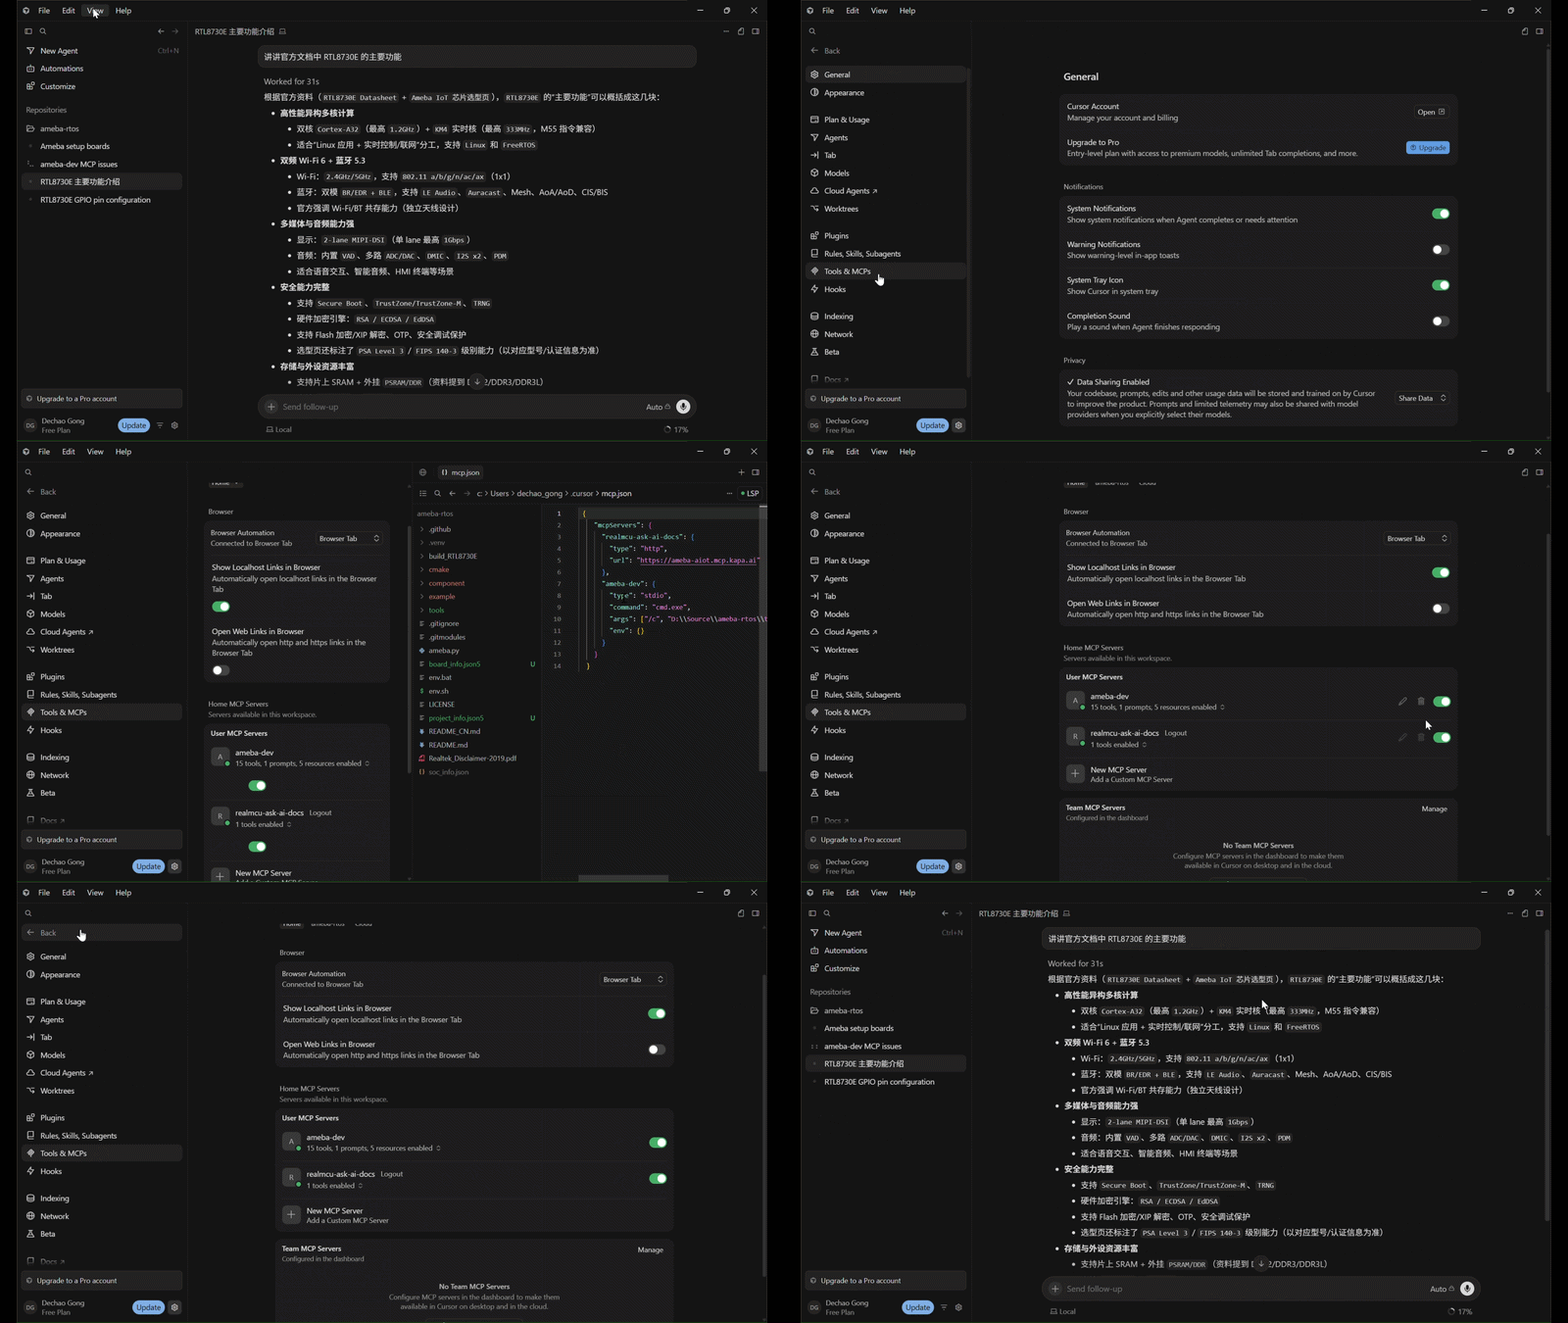
Step 1: Add MCP Service
Add via the Codex IDE interface:
Enter File -> Settings -> MCP servers, Click Add server
Choose
Streamable HTTPmode, enter the corresponding content below:
Name: realmcu-ask-ai-docs
URL: https://ameba-aiot.mcp.kapa.ai
Bearer token env var:<your_personal_access_token>
Codex currently has incomplete support for the OAuth 2.0 authentication flow for Remote MCP Servers, and cannot automatically pop up the third-party OAuth (e.g., GitHub) authentication page. It is recommended to use the MCP Inspector to complete the authentication, extract the Token, and then fill it into the Codex configuration as a temporary workaround.
Step 2: Complete Authentication
Use the official MCP Inspector tool to complete GitHub OAuth login, and after obtaining the Access Token, fill it into the Trae configuration.
Install and start the MCP Inspector
npx @modelcontextprotocol/inspectorConfigure the connection in the Inspector
Transport Type: Streamable HTTP
URL: https://ameba-aiot.mcp.kapa.ai
Click Connect, at this point, the GitHub OAuth authentication page will pop up normally. Click to complete the authorization.
Extract the Token from the browser developer tools.
After completing GitHub authorization, open the browser F12 → Network dashboard, locate the request sent to ameba-aiot.mcp.kapa.ai, and check the request headers: Authorization: Bearer eyJhbGxxxxxx… Copy the Token value.
Fill the Token into the
Bearer token env varfield in the Codex configuration, then save and return.The realmcu-ask-ai-docs MCP service will then appear as available in Codex. Check the box to enable the service.
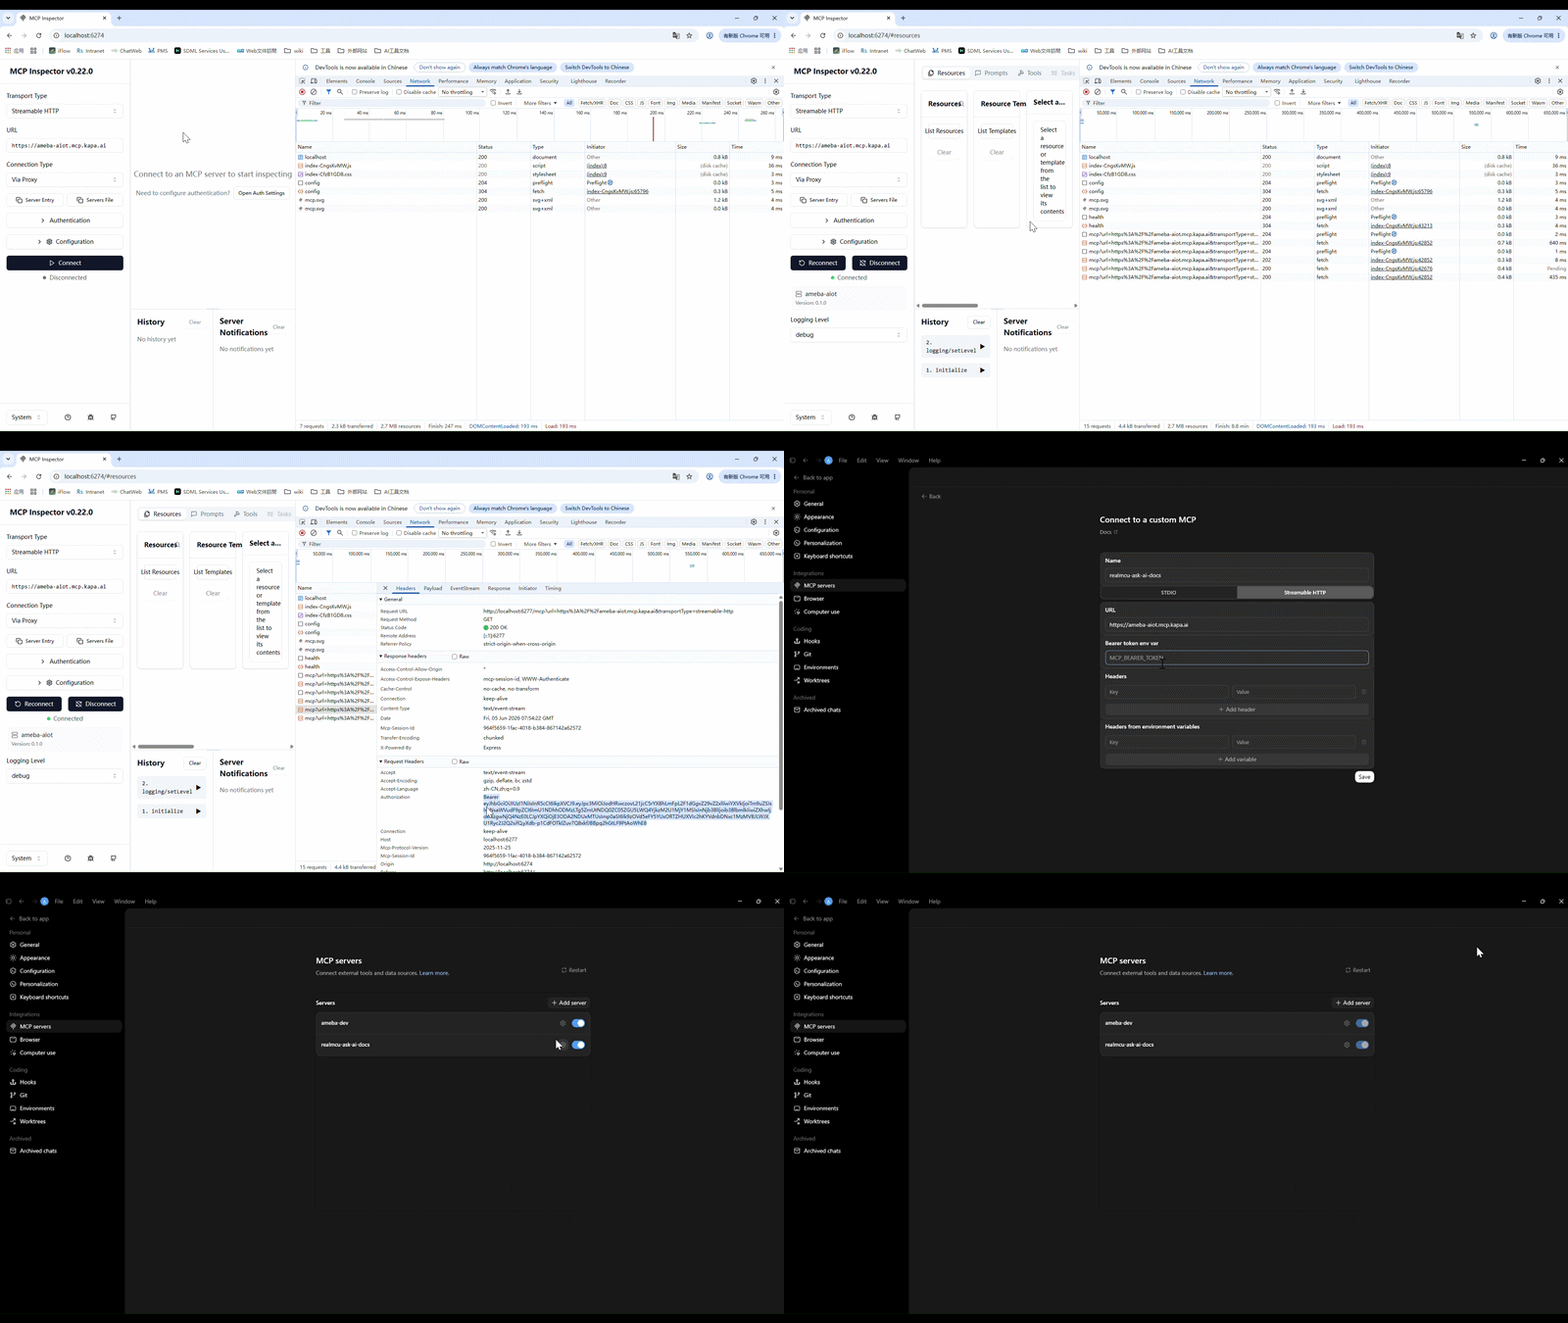
Step 1: Add the MCP service
Add the Ameba documentation query MCP service in Trae’s MCP configuration:
Open the Trae Settings interface.
Find the MCP section and manually add an MCP.
click
Add MCP, select manual addition.Add Manually
Add the following content:
{
    "mcpServers": {
        "realmcu-ask-ai-docs": {
            "url": "https://ameba-aiot.mcp.kapa.ai",
            "headers": {
                "Authorization": "Bearer <your_personal_access_token>"
            }
        }
    }
}
Trae currently has incomplete support for the OAuth 2.0 authentication flow for Remote MCP Servers, and cannot automatically pop up the third-party OAuth (e.g., GitHub) authentication page. It is recommended to use the MCP Inspector to complete the authentication, extract the Token, and then fill it into the Trae configuration as a temporary workaround.
Step 2: Complete Authentication
Use the official MCP Inspector tool to complete GitHub OAuth login, and after obtaining the Access Token, fill it into the Trae configuration.
Install and start the MCP Inspector.
npx @modelcontextprotocol/inspectorConfigure the connection in the Inspector.
Transport Type: Streamable HTTP
URL: https://ameba-aiot.mcp.kapa.ai
Click Connect, at this point the GitHub OAuth authentication page will pop up normally. Click to complete the authorization.
Extract the Token from the browser developer tools.
After completing GitHub authorization, open the browser F12 → Network dashboard, locate the request sent to ameba-aiot.mcp.kapa.ai, check the request headers: Authorization: Bearer eyJhbGxxxxxx…, and copy the Token value.
Fill the Token into the Trae configuration, save it, and refresh.
{
    "mcpServers": {
        "realmcu-ask-ai-docs": {
            "url": "https://ameba-aiot.mcp.kapa.ai",
            "headers": {
                "Authorization": "Bearer eyJhbGxxxxxx..."
            }
        }
    }
}
The realmcu-ask-ai-docs MCP service will then appear as available in Trae.
You can create a new agent in the Agent interface, enable the realmcu-ask-ai-docs MCP service, and select that agent in the chat dialog for interaction.
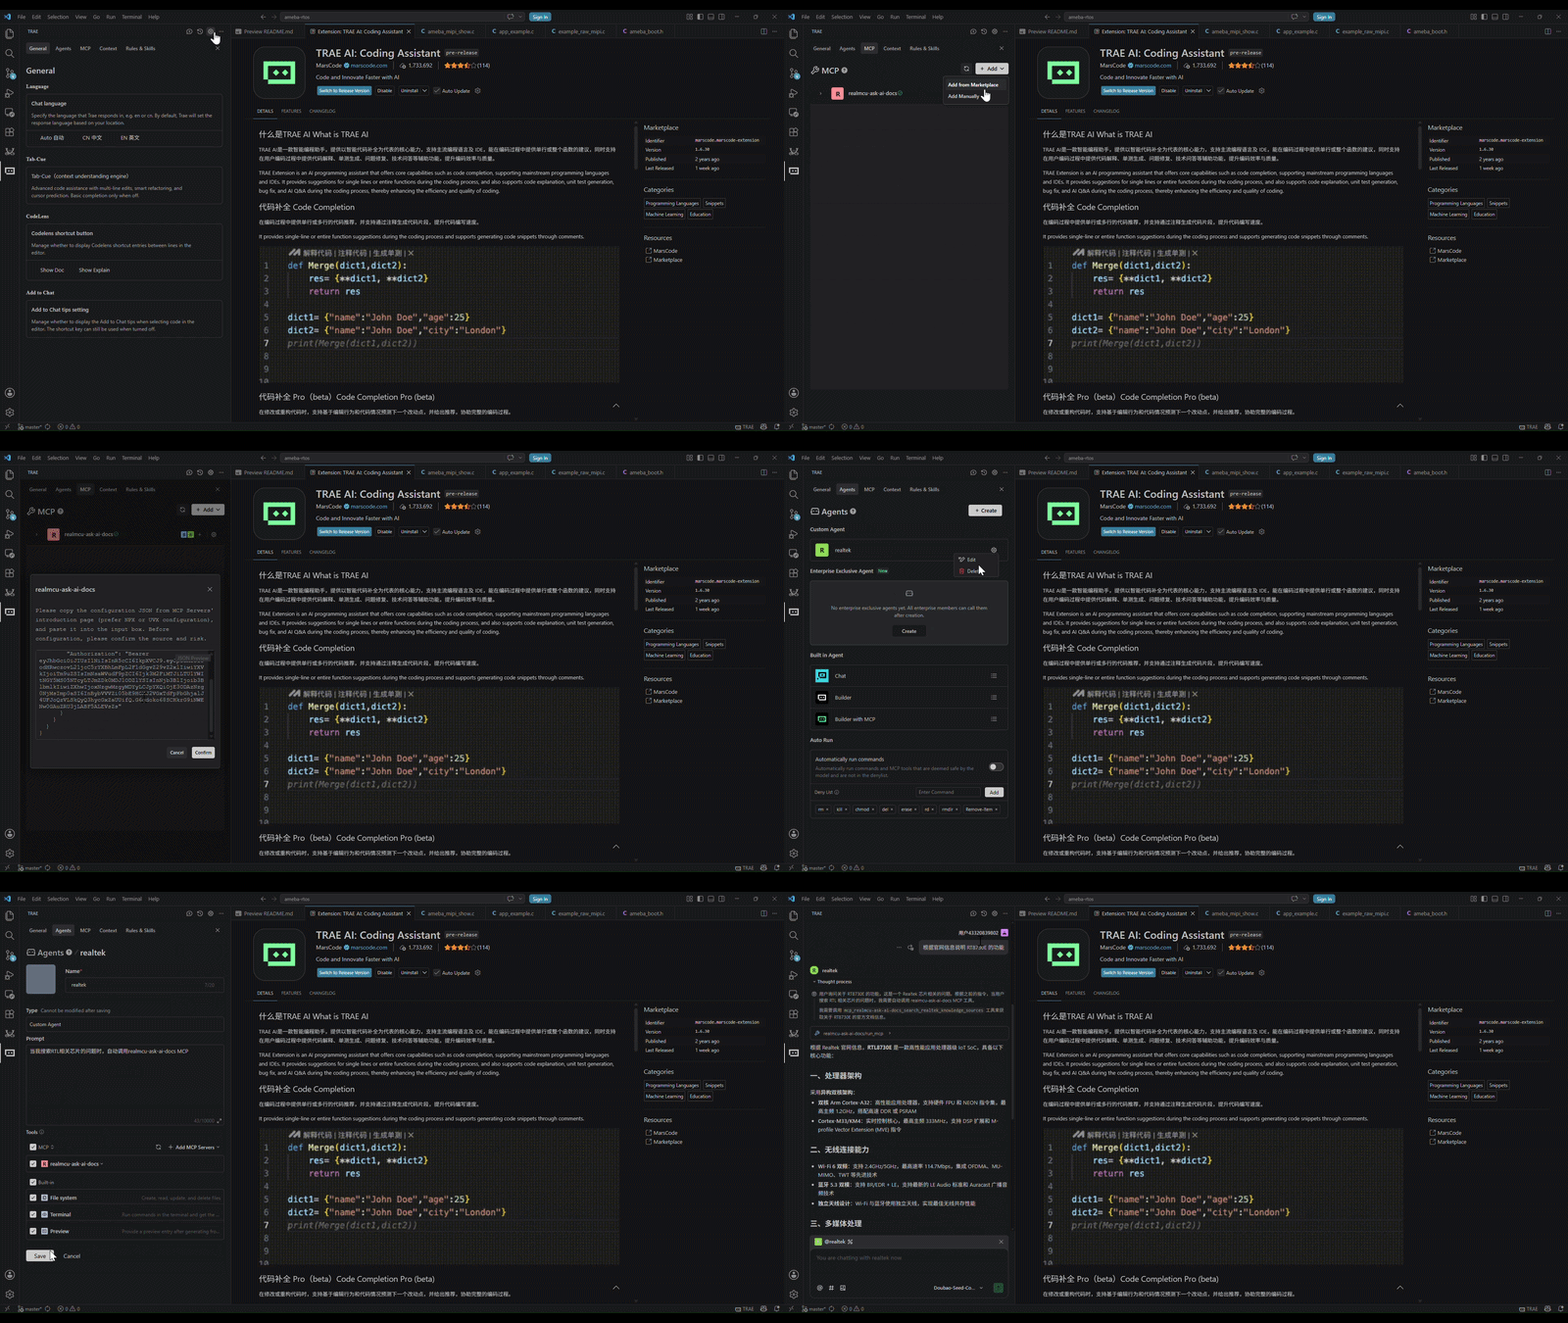
Step 1: Add the MCP service
Add via the VS Code settings UI:
Go to Cline > MCP Servers > Remote Servers and fill in:
Name: realmcu-ask-ai-docs
URL: https://ameba-aiot.mcp.kapa.ai
Transport Type: Streamable HTTP
Click Add Server to add the Ameba Documentation Query MCP service
Step 2: Complete authentication
Switch to the Configure view, find the newly added realmcu-ask-ai-docs MCP service, and click Authenticate
Follow the prompts to complete the authentication flow

Step 1: Add the MCP service
Add the Ameba Documentation Query MCP service to the Roo Code MCP configuration file:
Open the Roo Code Settings panel
Find the MCP Servers section and edit the JSON configuration:
Click
Edit Global MCPto open the global configuration filemcp_config.jsonClick
Edit Project MCPto open the workspace configuration file.roo/mcp.json
Add the following content:
{
    "mcpServers": {
        "realmcu-ask-ai-docs": {
            "type": "streamable-http",
            "url": "https://ameba-aiot.mcp.kapa.ai",
            "disabled": false,
            "alwaysAllow": [],
            "headers": {
                "Authorization": "Bearer <your_personal_access_token>"
            }
        }
    }
}
Roo Code’s support for the Remote MCP Server OAuth 2.0 flow is currently incomplete and cannot automatically launch a third-party OAuth (e.g., GitHub) page. As a workaround, use MCP Inspector to complete authentication, then paste the extracted Token into the Roo Code configuration.
Step 2: Complete authentication
Use the official MCP Inspector to complete the GitHub OAuth login, then paste the resulting Access Token into Roo Code.
Install and launch MCP Inspector
npx @modelcontextprotocol/inspectorConfigure the connection in Inspector
Transport Type: Streamable HTTP
URL: https://ameba-aiot.mcp.kapa.ai
Click Connect → the GitHub OAuth page will appear → complete the authorization
Extract the Token from browser developer tools
After completing the GitHub authorization, open the browser F12 → Network panel, find the request to ameba-aiot.mcp.kapa.ai, inspect the request header: Authorization: Bearer eyJhbGxxxxxx…, and copy the Token value.
Paste the Token into the Roo Code configuration
{
    "mcpServers": {
        "realmcu-ask-ai-docs": {
            "type": "streamable-http",
            "url": "https://ameba-aiot.mcp.kapa.ai",
            "disabled": false,
            "alwaysAllow": [],
            "headers": {
                "Authorization": "Bearer eyJhbGxxxxxx..."
            }
        }
    }
}
The realmcu-ask-ai-docs MCP service is now ready to use in Roo Code.

Step 1: Add the MCP service
Add via the VS Code settings UI:
Go to Continue -> Open Settings -> Tools, and click the + button next to MCP Servers
In the new-mcp-server.yaml that opens, replace the contents with the following to add the Ameba Documentation Query MCP service:
name: My Continue Config
version: 0.0.1
schema: v1
mcpServers:

- name: realmcu-ask-ai-docs

    type: streamable-http
    url: https://ameba-aiot.mcp.kapa.ai
    requestOptions:
        headers:
        Authorization: "Bearer <your_personal_access_token>"
Recommended: use MCP Inspector to complete authentication, then paste the Token into the Continue configuration.
Step 2: Complete authentication
Use the official MCP Inspector to complete the GitHub OAuth login, then paste the resulting Access Token into Continue.
Steps 1-3 for obtaining the Token are the same as Roo Code authentication
Paste the Token into the Continue configuration
name: My Continue Config
version: 0.0.1
schema: v1
mcpServers:

- name: realmcu-ask-ai-docs

    type: streamable-http
    url: https://ameba-aiot.mcp.kapa.ai
    requestOptions:
        headers:
        Authorization: "Bearer eyJhbGxxxxxx..."
The realmcu-ask-ai-docs MCP service is now ready to use in Continue.

Query Examples
Examples of querying Ameba documentation, using Claude Code:
Example 1: query the OTA compression feature overview

Example 2: query GPIO usage

MCP Features
The Documentation Query MCP server uses HTTP and exposes the following tool to AI Agents:
Tool |
Description |
|---|---|
search_realtek_knowledge_sources(query) |
Performs semantic search across Realtek’s documentation and other knowledge sources, returning the most relevant text fragments and source links — providing AI Agents with official reference material. |
Troubleshooting
Symptom / Question |
Resolution |
|---|---|
MCP service connection fails |
Verify the network can reach |
How long does authentication remain valid |
The validity depends on the Token type and is usually long-lived. To re-authenticate, tell the AI Agent “re-authenticate the MCP service” |
Can multiple MCP services be configured at once |
Yes. Add multiple MCP server entries in the same configuration file using distinct server names |
The AI Agent does not call the MCP service on its own |
The current conversation context did not trigger an invocation. Tell the AI explicitly to query via MCP, e.g., “query Ameba’s OTA feature via the realmcu-ask-ai-docs MCP service” |
SDK Development MCP
The SDK Development MCP launches its MCP server as a local subprocess and communicates with the AI client over standard input/output, requiring no network connection or additional authentication. The AI can directly modify project configuration, build, flash, and read/write the serial port — driving an automated, closed-loop development workflow based on the returned results.
This MCP is deeply optimized for embedded development: tool composition, parameter design, and return-value structure are all designed with agent usability as the top priority. Build and flash logs are specially compacted — compared to running CLI commands directly, they consume far less context while preserving critical error information and rich hints that help the agent accurately determine its next action.
Environment Setup and Registration
Step 1: Initialize the environment and install dependencies
Replace <SDK_ROOT> with the actual absolute path of the SDK (e.g. /home/user/ameba-sdk). Run the following from the SDK root to initialize the Python virtual environment and toolchain, and complete the first build:
cd <SDK_ROOT>
source env.sh
ameba.py build
Replace <SDK_ROOT> with the actual absolute path of the SDK (e.g. C:\Users\user\ameba-sdk). Run the following from the SDK root to initialize the Python virtual environment and toolchain, and complete the first build:
cd <SDK_ROOT>
env.bat
ameba.py build
Step 2: Register the MCP
Register the SDK Development MCP with the AI client. The configuration applies to the current SDK workspace; different SDK checkouts do not interfere with each other.
Run the registration command from the SDK root (written to the workspace scope of ~/.claude.json or %APPDATA%\Claude\claude.json):
# Linux / macOS / WSL2
claude mcp add ameba-dev -- <SDK_ROOT>/tools/ameba/ameba_dev_mcp/launcher.sh

# Windows
claude mcp add ameba-dev -- <SDK_ROOT>\tools\ameba\ameba_dev_mcp\launcher.bat
Verify:
claude mcp list
# Expected to appear:ameba-dev: ✓ Connected
Uninstall:
claude mcp remove ameba-dev
Add via the Cursor IDE interface:
Go to View -> Settings -> Tools & MCPS, and click the + button for New MCP Servers.
In the opened mcp.json, replace the following content to add the SDK development MCP service:
{
    "mcpServers": {
        "ameba-dev": {
            "type": "stdio",
            "command": "cmd.exe",
            "args": ["<SDK_ROOT>/tools/ameba/ameba_dev_mcp/launcher.sh"],
            "env": {}
        }
    }
}
On Windows, change command to <SDK_ROOT>\\tools\\ameba\\ameba_dev_mcp\\launcher.bat (backslashes must be escaped as \\ in JSON).
Verify: After saving the configuration and returning, observe that the MCP Servers section should now display an entry for ameba-dev。
Uninstall: Select Delete MCP server in the corresponding MCP Servers section, or delete the ameba-dev entry from the JSON configuration.
Add via the Codex IDE interface:
Enter File -> Settings -> MCP servers, Click Add server
choose
STDIOmode, enter the corresponding content below:
Name: ameba-dev
Command to launch: <SDK_ROOT>/tools/ameba/ameba_dev_mcp/launcher.sh
On Windows, change command to <SDK_ROOT>\\tools\\ameba\\ameba_dev_mcp\\launcher.bat (backslashes must be escaped as \\ in JSON).
Verify: After saving the configuration and returning, observe that the MCP Servers section should now display an entry for ameba-dev。
Uninstall: Select Uninstall in the corresponding MCP Servers settings.
Trae does not yet provide a single CLI registration command. Add via the project-level configuration file .trae/mcp.json. Create this file in the SDK root:
{
    "mcpServers": {
        "ameba-dev": {
            "command": "<SDK_ROOT>/tools/ameba/ameba_dev_mcp/launcher.sh",
            "args": [],
            "env": {}
        }
    }
}
On Windows, change command to <SDK_ROOT>\\tools\\ameba\\ameba_dev_mcp\\launcher.bat (backslashes must be escaped as \\ in JSON).
Enable project-level MCP: go to Trae Settings → MCP and turn on the Enable Project MCP switch. Trae will automatically load ameba-dev from .trae/mcp.json and it will appear in the MCP list.
You can also add it manually via the settings center: MCP → Add → Manual Add, and paste the JSON above into the dialog.
Uninstall: delete the ameba-dev entry from .trae/mcp.json, or click Delete in the MCP list.
Cline does not yet provide a single CLI registration command. Add via the interactive wizard or by editing the JSON configuration file directly.
Method 1: Interactive wizard
cline mcp
# Select Add server and fill in::
#   server name : ameba-dev
#   transport   : stdio
#   command     : <SDK_ROOT>/tools/ameba/ameba_dev_mcp/launcher.sh
#                 (Windows: <SDK_ROOT>\tools\ameba\ameba_dev_mcp\launcher.bat)
Method 2: Edit JSON directly
In the Cline panel, click the MCP Servers icon → Configure → Configure MCP Servers, and add the following to the JSON:
{
    "mcpServers": {
        "ameba-dev": {
            "command": "<SDK_ROOT>/tools/ameba/ameba_dev_mcp/launcher.sh",
            "args": [],
            "env": {},
            "disabled": false,
            "autoApprove": []
        }
    }
}
On Windows, change command to <SDK_ROOT>\\tools\\ameba\\ameba_dev_mcp\\launcher.bat (backslashes must be escaped as \\ in JSON).
Verify: in the Cline panel’s MCP Servers list, confirm that ameba-dev is shown as connected.
Uninstall: run cline mcp and select Delete server, or delete the ameba-dev entry from the JSON configuration.
Note
The MCP server requires .venv to exist before it can start. If .venv has not been created when registering the MCP server, the AI client will show a connection failure. Complete Step 1 first, then restart the AI client to connect automatically.
Board Configuration
Before first use, run the following in the Claude Code chat:
/ameba-setup-boards
The AI will guide you through entering the board model, serial port, and other information, and automatically perform a read-only environment check — no manual JSON editing required. After setup, two configuration files are generated in the SDK root:
File |
Description |
|---|---|
|
Board configuration: alias → SoC model + serial port + connection type (local/remote) |
|
Flash layout: firmware files and address table per SoC, auto-populated after the first |
To add or remove boards or change ports later, re-run /ameba-setup-boards or edit board_info.json5 directly.
To manually specify the .bin files and flash addresses, see Appendix: project_info.json5 manual mode.
Typical Agent Workflow
Tell the AI your development goal in Claude Code, and it will sequentially call build_firmware → flash_firmware_tool → serial_connect_tool → serial_expect_tool → serial_disconnect_tool to complete one full verification cycle:
# Tell the AI in Claude Code:
Update the log print in main() to include the project version number. Build and flash to RTL8720E_COM20, then show me the boot log once it comes up.
Example AI tool call sequence:
build_firmware(alias="RTL8720E_COM20")
flash_firmware_tool(alias="RTL8720E_COM20")
serial_connect_tool(alias="RTL8720E_COM20")
serial_expect_tool(alias="RTL8720E_COM20",
                   patterns=["KM4 START SCHEDULER", "Crash Dump"],
                   timeout=20.0)
serial_disconnect_tool(alias="RTL8720E_COM20")
MCP Features
The SDK Development MCP exposes three categories of functionality to the AI Agent:
Tools are operations the AI can invoke directly (e.g. build, flash, serial read/write);
Prompts are pre-defined guided workflows the agent follows to complete multi-step interactive tasks;
Resources are read-only data the AI can retrieve (e.g. device profiles, configuration files).
Tools
Tool |
Description |
|---|---|
|
Switch the current build target SoC |
|
Build firmware for the current SoC; automatically syncs |
|
Flash firmware to the dev board using board/project configuration |
|
List available serial ports on the local machine or for a specified board |
|
Scan available serial ports on a remote AmebaRemoteService (no |
|
Write or merge board entries into |
|
Read-only environment check: validates JSON configuration, serial port visibility, and remote TCP connectivity |
|
Read the current value of one or more Kconfig symbols |
|
Set Kconfig symbol values and regenerate per-core headers |
|
Search Kconfig symbols by name or prompt text (regex supported) |
|
Open the serial port; resets the board and clears the buffer by default |
|
Close the serial connection and release the port |
|
Send a command and wait for a response (buffer drain + write + pattern match) |
|
Block until a specified pattern matches, idle timeout, or hard timeout fires |
|
Non-blocking snapshot of the current receive buffer |
Prompts
Prompt |
Description |
|---|---|
|
Guides board configuration initialization in one interactive session, generates |
Resources
Resource URI |
Description |
|---|---|
|
List all supported device profiles and memory types |
|
Get detailed information for a specific device: flash layout, RAM address, firmware image list, etc. |
|
Get the detailed profile for a specific device and memory type (nor/nand) |
|
List all configured board aliases in |
|
Get the resolved configuration for a single board (passwords masked) |
|
Full |
|
Full |
|
Hardware troubleshooting reference (drivers, auto-download circuit, common error codes) |
Troubleshooting
Press Ctrl+O in Claude Code to expand the detailed parameters and return values of MCP tool calls and inspect specific error codes. Notes:
Remote scenario: when the dev board is connected to a Windows PC, run
AmebaRemoteService.exeon that PC to forward the serial port over TCP (port 58916).Auto-download circuit: the dev board must support the hardware auto-download circuit; otherwise automatic download and automatic reset will not work. (For auto-download circuit requirements, see
<SDK_ROOT>/tools/ameba/ameba_dev_mcp/hardware_debug.md.)
Symptom / Error code |
Resolution |
|---|---|
|
Re-run |
|
Make sure the dev board is plugged in |
|
Start |
|
Meet the hardware auto-download circuit requirements described in |
|
The error message lists the available aliases; retry with the correct board alias |
ameba-dev shows as disconnected in |
Confirm that |
Server fails to start (import error) |
Run |
Appendix: project_info.json5 Manual Mode
Each SoC entry in project_info.json5 supports two modes:
Mode |
Who manages images |
Will |
|---|---|---|
|
MCP writes automatically |
Yes (updated automatically after every successful build) |
|
User fills in by hand |
No (MCP never modifies this entry) |
Manual mode is suitable for the following scenarios:
Need to flash a fixed
.binto a specific address without letting build results overwrite the configuration;Decoupling flashing from compilation (e.g., flashing a pre-built release bin);
Need to customize which images participate in flashing (add/remove entries).
Configuration
Set flash_layout_setting_mode to manual and fill in build_dir and images[] manually:
"RTL8721F": {
  "flash_layout_setting_mode": "manual",
  "build_dir": "/home/me/sdk/build_RTL8721F",
  "memory_type": "nor",
  "images": [
    {
      "path": "/home/me/sdk/build_RTL8721F/boot.bin",
      "start_addr": "0x08000000",
      "end_addr": "0x0803FFFF"
    },
    {
      "path": "/home/me/sdk/build_RTL8721F/app.bin",
      "start_addr": "0x08040000"
      /* end_addr is optional; if omitted, it is inferred from the actual file size and used for region overlap checking */
    },
    {
      /* optional=true: missing files only produce a warning, not a flash failure */
      "path": "/home/me/sdk/build_RTL8721F/vfs.bin",
      "start_addr": "0x083C0000",
      "optional": true
    }
  ]
}
Field reference:
Field |
Required |
Description |
|---|---|---|
|
Yes |
Fixed to |
|
Yes |
Absolute path to the |
|
No |
|
|
Yes |
Absolute path of the |
|
Yes |
Flash start address, format |
|
No |
End address (inclusive); if omitted, inferred from file size, used only for region overlap checking |
|
No |
When |
Migrating from auto to manual
Locate the SoC’s
autoentry in the currentproject_info.json5and copy out the images data inside thegenerated by buildcomment block;Change
flash_layout_setting_modetomanual;Remove the
/* === generated by build, do not edit === */comment;Adjust
images[]as needed.
After this, a successful build_firmware will not overwrite this entry — the flash addresses are entirely under your control.
Notes
All paths must be absolute; relative paths are rejected by validation;
images[]must contain at least one entry, otherwiseMANUAL_IMAGES_EMPTYis reported;Before flashing, MCP performs region overlap checking (when
end_addris known);In manual mode, MCP does not re-parse the SDK flash layout; the user is responsible for keeping addresses consistent with the SDK.