Wi-Fi R-Mesh Programming Guide
Example
This section demonstrates how to establish an R-Mesh network and achieve data communication between nodes. This example will help you become familiar with the basic usage of R-Mesh.
Obtain the SDK
SDK download: IoT SDK
Note
By default, the root node in SDK supports only 2 connections. To enable more connections, please follow these steps:
Obtain the R-Mesh WLAN library (contact us)
Replace
lib_wifi_whc_ap.aat{sdk}/amebaxxx_gcc_project/project_km4/asdk/lib/applicationReplace
lib_wifi_common.a,lib_wifi_fw.a, andlib_wifi_whc_np.aat{sdk}/amebaxxx_gcc_project/project_km0/asdk/lib/application
Enable R-MESH Feature
Open the Wi-Fi configuration file
{sdk}/component/soc/usrcfg/amebaxxx/ameba_wificfg.cand set the following parameter:wifi_user_config.wtn_en = 1;
For additional settings, please refer to Programming Interface
Enable R-MESH NAT Feature
Note
Skip this step if RNAT functionality is not required.
Open the Wi-Fi configuration file
{sdk}/component/soc/usrcfg/amebaxxx/ameba_wificfg.cand set the following parameter:wifi_user_config.wtn_rnat_en = 1;
To designate the node as a permanent RNAT node, set this parameter (required in current version as automatic RNAT selection is under development):
wifi_user_config.wtn_fixed_rnat_node = 1;
Execute
./menuconfig.pyin{sdk}/amebadxxx_gcc_projectand select :----Connectivity config---- CONFIG WHC INTF ---> ... CONFIG LWIP ---> [ ] Enable Fast DHCP [*] Enable NAT REPEATER [*] Enable LWIP NETCONN SEM PER THREAD [ ] Enable LWIP Debug ...
For additional RNAT settings, please refer to RNAT Parameters
Compilation and Flashing
Please refer to standard compilation procedures: gcc_build_environment
Visualization Tool (Gravitation)
To visually display R-Mesh node topology, we provide the Gravitation tool. Please refer to Gravitation for configuration.
Join the Network
Method 1: Use ATCMD to add all nodes to the network.
- Example:
AT+WLCONN=ssid,rmesh_test,pw,12345678
Method 2: Use RPP (R-mesh Provision Protocol) to join network (coming soon)
Topology Display
After joining the network, nodes automatically send information to the Gravitation tool. The following figure shows 4 nodes successfully connected to the AP.
Basic information appears above each node is:
MAC_Addr[5]:IP(update_time).Example: The node in the top-left corner shows:
1A:192.168.2.102(2:26)which means:MAC Address:
XX:XX:XX:XX:0x1AIP Address:
192.168.2.102
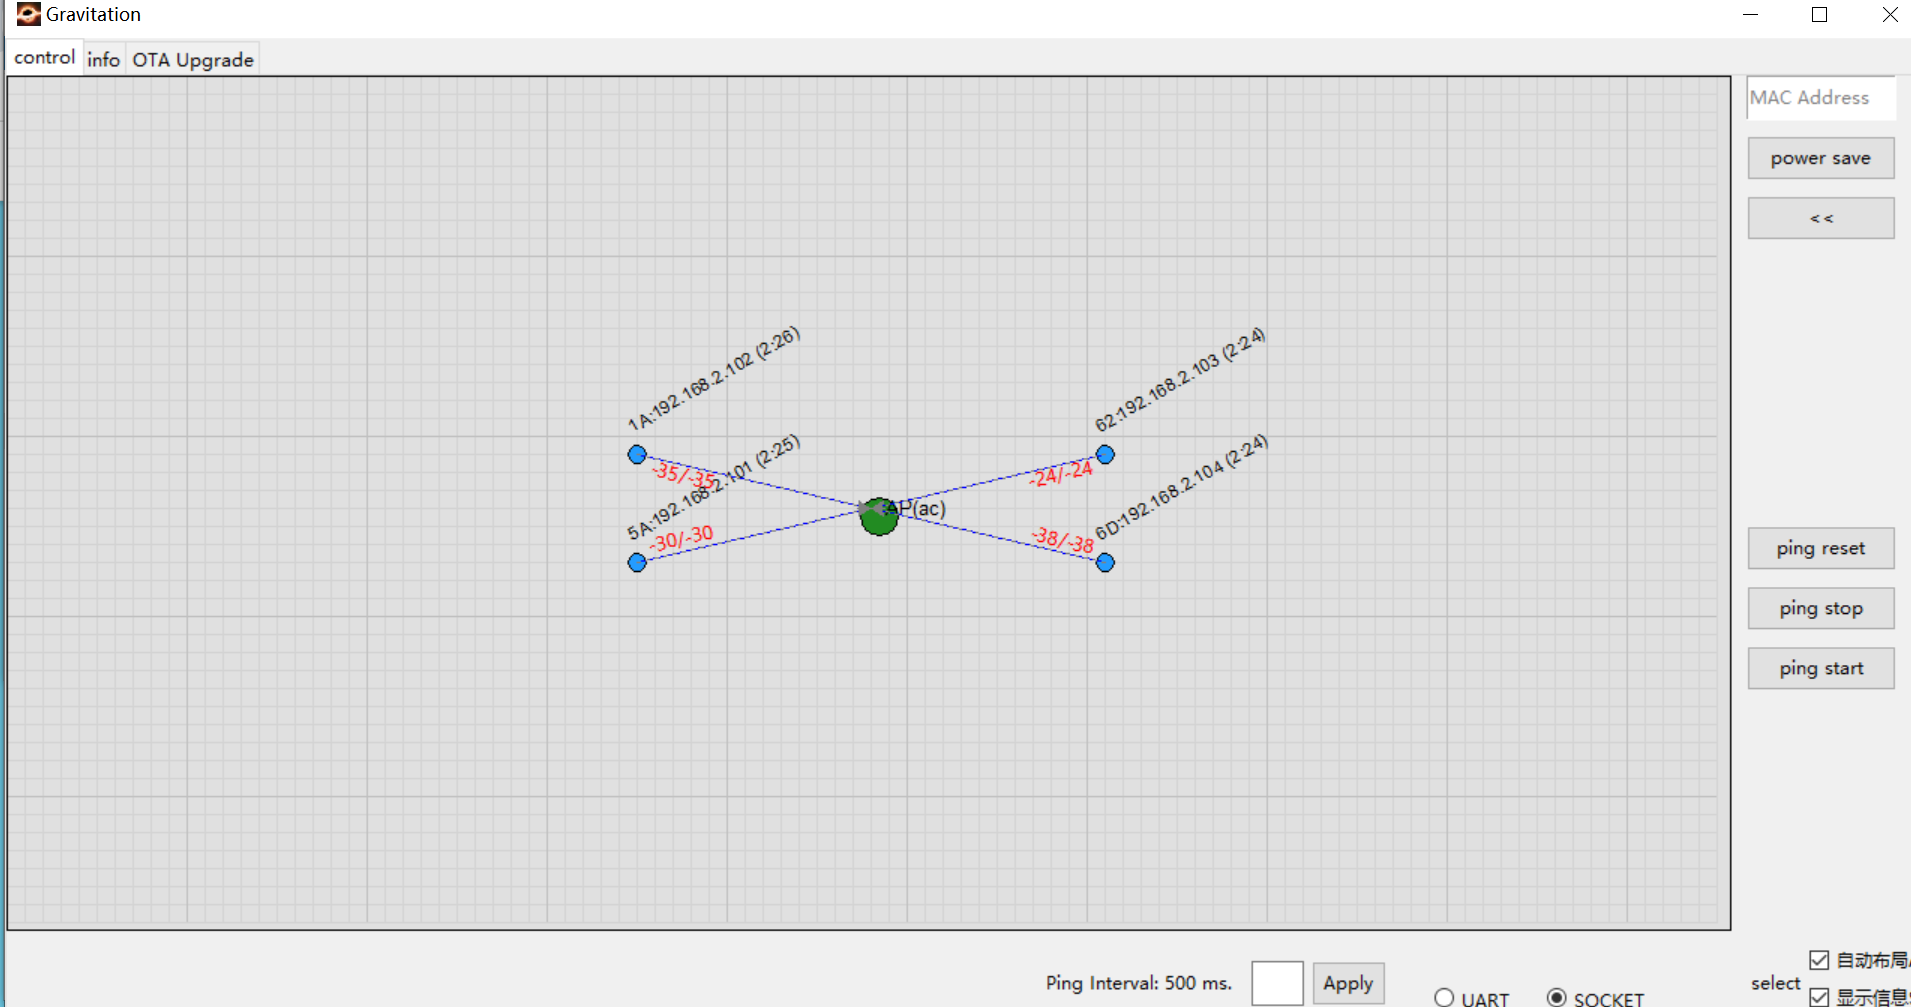
For more details, please refer to Gravitation .
Note
While the tool displays node connection relationships, it cannot reflect physical locations. You may:
Disable Auto Layout in the bottom-right corner
Manually drag nodes to match their real-world positions
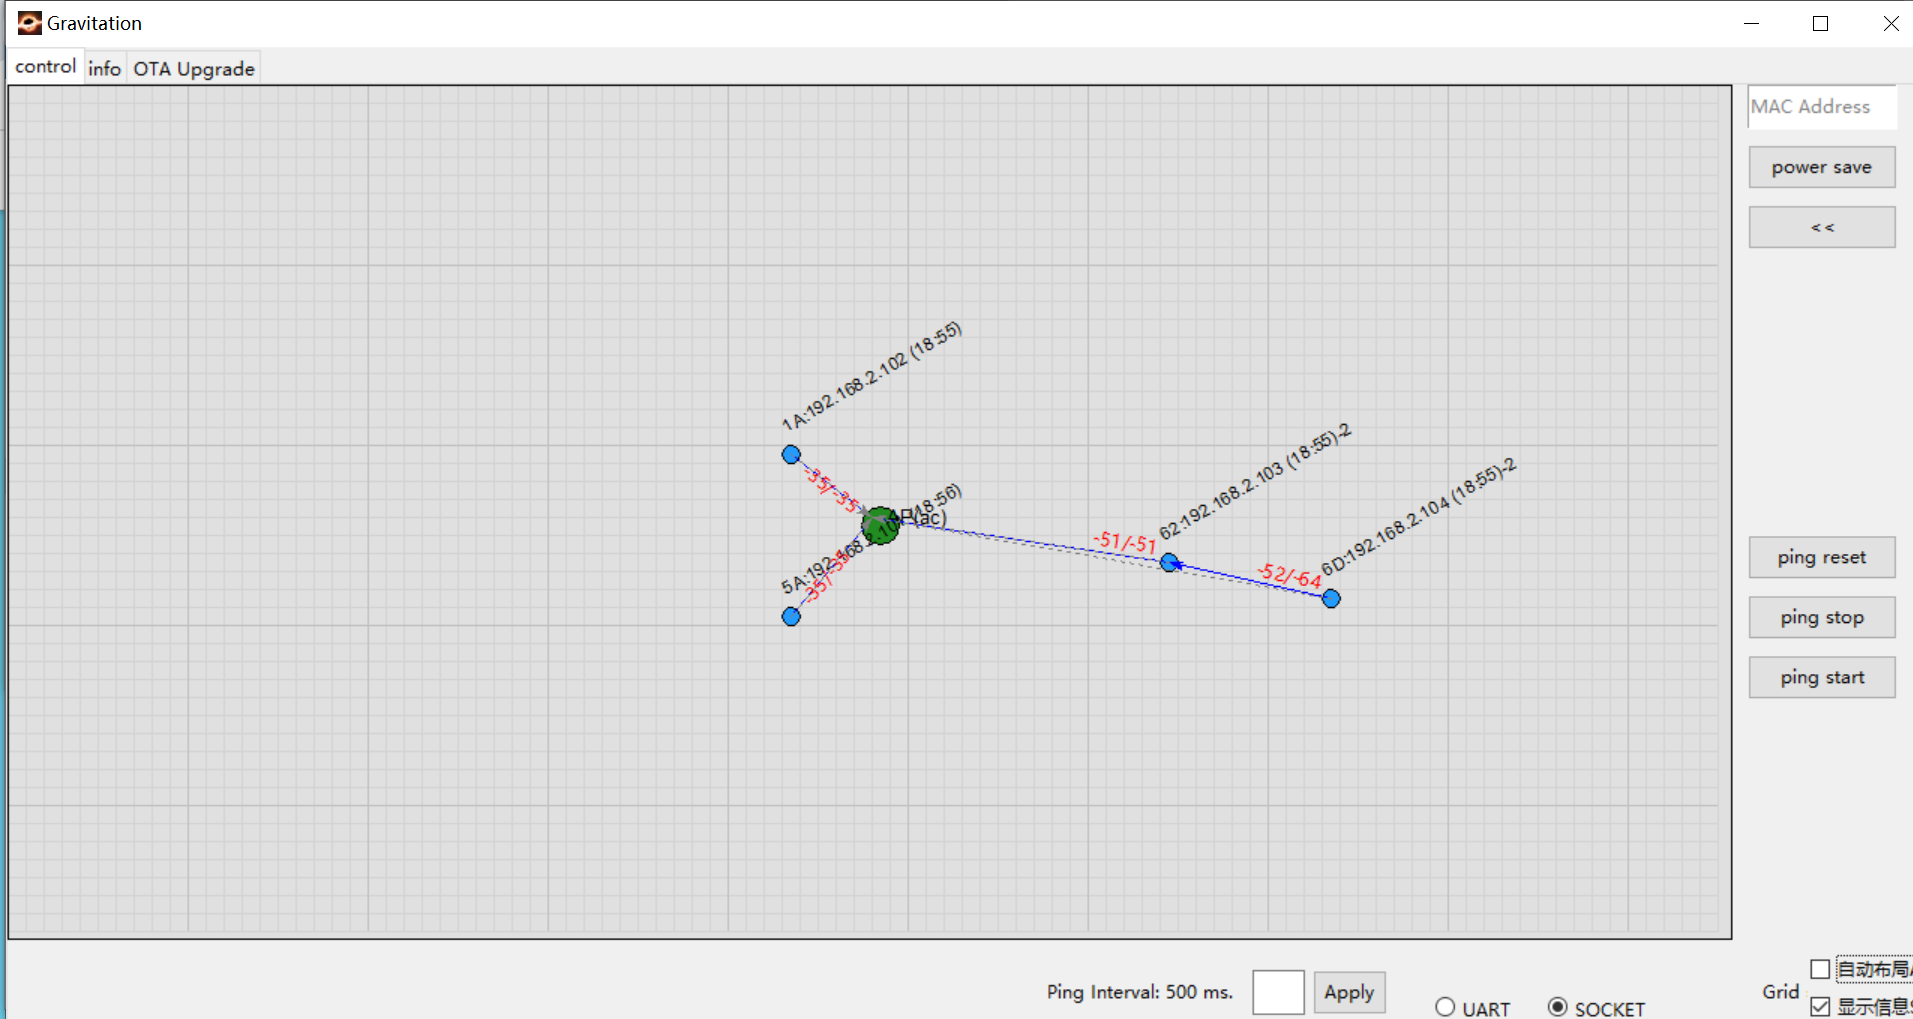
Switch Verification
To verify switch behavior:
Physically move two nodes away from the AP (e.g., node 62 and node 6D shown on the right)
Observe that node 6D automatically switches its connection to node 62 when AP’s RSSI is worse than node 62
Communication Verification
Method 1: Execute the Ping command on any node
- Ping Test Example:
AT+PING=192.168.2.102
Method 2: Use Gravitation Tool’s Ping Test Function
The tool conveniently initiates ping tests for all nodes:
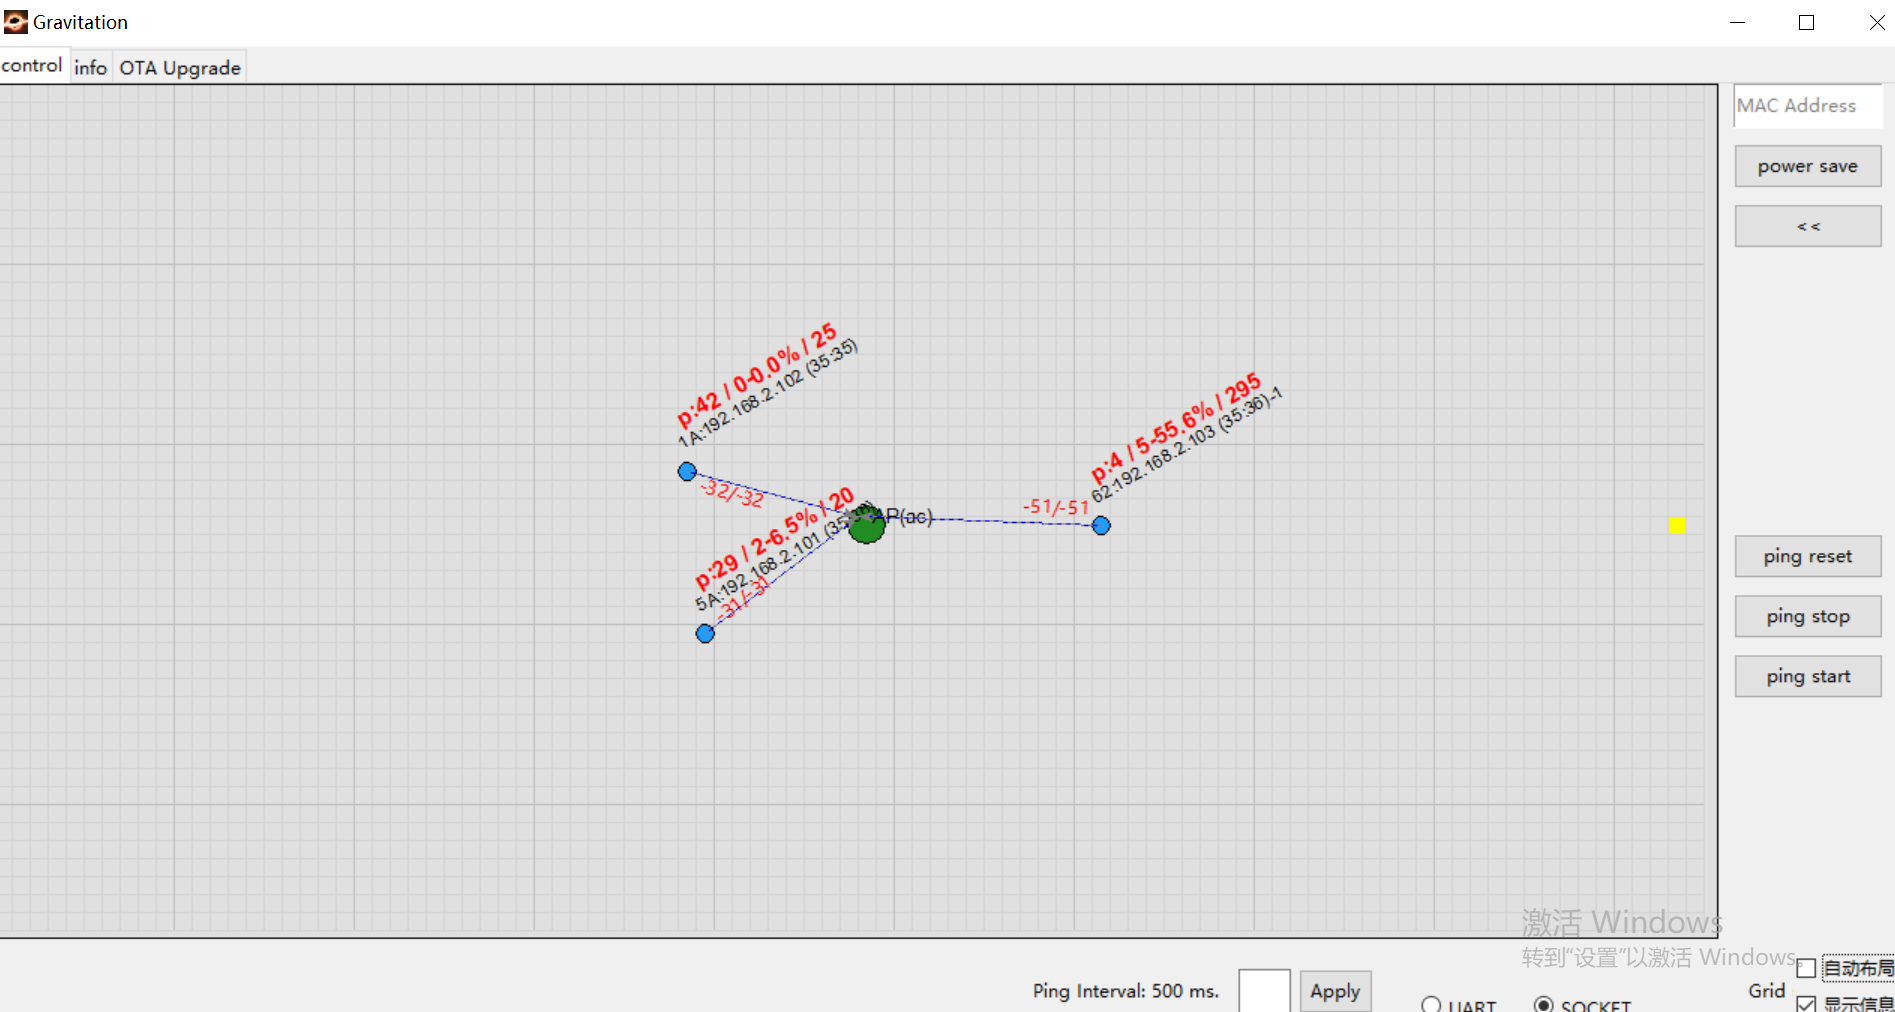
Ping log appears above each node is:
Ping: Successful packets/Failed packets - Packet loss rate/RTTExample: The node in the down-left corner shows:
P:29/2-6.5%/20which means:29 successful packets
2 failed packets
6.5% packet loss rate
RTT of 20 ms
Programming Interface
Common
User Configuration File
Path:
{sdk}/component/soc/usrcfg/amebaxxx/ameba_wificfg.c
Parameter
Description
wtn_en
R-Mesh enable. Set to 1 to activate
wtn_strong_rssi_thresh
Node directly connects to AP if detected RSSI exceeds this threshold
wtn_father_refresh_timeout
Child node switches parent if no beacon received within this period (in ms)
wtn_child_refresh_timeout
Parent node removes child if no beacon received within this period (in ms)
wtn_max_node_num
Max nodes in R-Mesh network. Determines beacon window size: higher node count reduces window size and increases interval
RNAT Parameters
User Configuration File
Path:
{sdk}/component/soc/usrcfg/amebaxxx/ameba_wificfg.c
Parameter
Description
wtn_rnat_en
R-Mesh NAT enable. Set to 1 to activate.
wtn_fixed_rnat_node
Force device as R-NAT node. Set to 1 to enable (effective only when
wifi_user_config.wtn_rnat_en=1)wtn_connect_only_to_rnat
Connect only to RNAT or its child nodes as parent. Set to 1 to enable
ap_sta_num
Max child nodes connectable when acting as RNAT. Currently supports up to 14 clients
Note
- When
wifi_user_config.ap_sta_num > 5, adjust memory layout as follows:Open
{sdk}/amebadplus_gcc_project/amebaDplus_layout.ldand modifyRAM_KM0_IMG2_SIZEfrom 96K to 116K to support 14 direct clients.#define RAM_KM0_IMG2_SIZE KBYTES(116)
RNAT menuconfig
Execute
./menuconfig.pyin{sdk}/amebaxxx_gcc_project, then select:----Connectivity config---- CONFIG WHC INTF ---> ... CONFIG LWIP ---> [ ] Enable Fast DHCP [*] Enable NAT REPEATER [*] Enable LWIP NETCONN SEM PER THREAD [ ] Enable LWIP Debug ...