Amazon KVS WebRTC
Introduction
Amazon Kinesis Video Streams (KVS) WebRTC is a fully managed capability that enables real-time two-way media streaming between web browsers, mobile applications, and connected IoT devices through a managed cloud infrastructure.
This guide describes how to set up and run the KVS WebRTC demo (kvs_webrtc_mmf) on AmebaPro2.
Download Source Code
Navigate to the library directory:
cd project/realtek_amebapro2_v0_example/src/amazon_kvs/lib_amazon
Clone the following repositories for KVS WebRTC:
amazon-kinesis-video-streams-webrtc-sdk-c
git clone -b webrtc-on-freertos-wss-1220-R https://github.com/ambiot-mini/amazon-kinesis-video-streams-webrtc-sdk-c.git
cisco/libsrtp
git clone -b webrtc-on-freertos https://github.com/ambiot-mini/libsrtp.git
tatsuhiro-t/wslay
git clone https://github.com/ambiot-mini/wslay.git
sctplab/usrsctp
git clone -b webrtc-on-freertos https://github.com/ambiot-mini/usrsctp.git
nodejs/llhttp
git clone -b release/v6.0.6 https://github.com/nodejs/llhttp.git
Set mbedtls Version
In the KVS WebRTC project, mbedtls-2.16.6 is required. Set the mbedtls version in project/realtek_amebapro2_v0_example/GCC-RELEASE/config.cmake:
set(mbedtls "mbedtls-2.16.6")
Modify lwipopts.h
Enable IPv6 support in component/lwip/api/lwipopts.h:
#define LWIP_IPV6 1
Configure the Example
Configure the AWS key and channel name in
component/example/kvs_webrtc_mmf/sample_config_webrtc.h:/* Enter your AWS KVS key here */ #define KVS_WEBRTC_ACCESS_KEY "xxxxxxxxxx" #define KVS_WEBRTC_SECRET_KEY "xxxxxxxxxx" /* Setting your signaling channel name */ #define KVS_WEBRTC_CHANNEL_NAME "xxxxxxxxxx"
Configure the video parameters in
component/example/kvs_webrtc_mmf/example_kvs_webrtc_mmf.c:#define V1_RESOLUTION VIDEO_HD #define V1_FPS 30 #define V1_GOP 30 #define V1_BPS 1024*1024
Prepare Certificate
Put the certificate on an SD card (component/example/kvs_webrtc_mmf/certs/cert.pem) and set its path in sample_config_webrtc.h:
/* Cert path */
#define KVS_WEBRTC_ROOT_CA_PATH "sd:/cert.pem"
Select Camera Sensor
Check your camera sensor model and define it in <AmebaPro2_SDK>/project/realtek_amebapro2_v0_example/inc/sensor.h:
#define USE_SENSOR SENSOR_GC2053
Using AWS IoT Credential (Optional)
Testing KVS WebRTC with IAM user key (AK/SK) is straightforward but not recommended for production. To use AWS IoT Thing credentials for more secure management, refer to the following resources:
Build the Project
Run the following commands to build the image with the
kvs_webrtc_mmfexample:cd project/realtek_amebapro2_v0_example/GCC-RELEASE mkdir build cd build cmake .. -G"Unix Makefiles" -DCMAKE_TOOLCHAIN_FILE=../toolchain.cmake -DEXAMPLE=kvs_webrtc_mmf cmake --build . --target flash
Use the image tool to download the image to AmebaPro2 and reboot.
Configure the Wi-Fi connection using the following UART commands:
ATW0=<WiFi_SSID>     : Set the WiFi AP to be connected
ATW1=<WiFi_Password> : Set the WiFi AP password
ATWC                 : Initiate the connection
If everything works fine, you should see output similar to the following:
wifi connected
wifi connected
=== KVS Example Start ===
[KVS WebRTC module]: webrtc branch name = webrtc-on-freertos-wss-0323-R
[KVS WebRTC module]: webrtc commit hash = c5f1ee6763ede84a1b33e75665dbfdc9b1e69237
[KVS WebRTC module]: waiting get epoch timer
...
[WebRTC] Starting
initializing the app with channel(webrtc_iot_thing)
Signaling client state changed to 9 - 'Connected'
The bootup time of webrtc is 5367 ms
wss ping ==>
<== wss pong
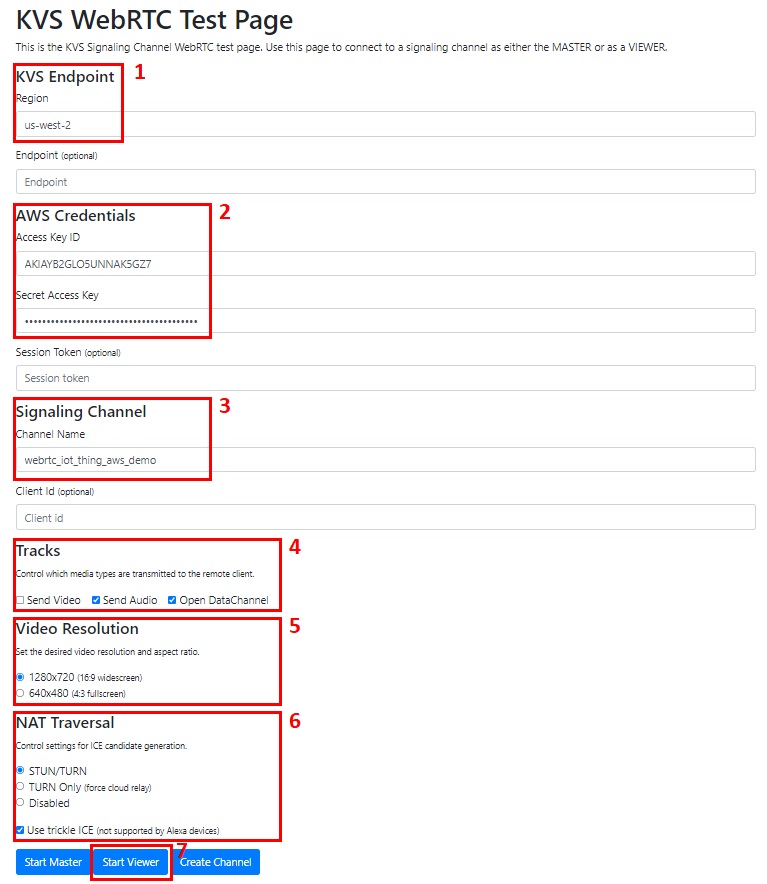
Validate Result
Use the KVS WebRTC Test Page to validate the result. Set up the test page as shown below: