离线 AI 模型转换工具包(Acuity Toolkit)概述

离线 AI 模型转换工具包简介

离线 AI 模型转换工具包允许用户将其自定义模型转换为 .nb 格式, 该格式可通过 Arduino 或 FreeRTOS SDK 示例代码直接加载到 Ameba IC 上。

安装该工具包有两种方式。 强烈推荐 通过 Docker 映像安装。

申请资格

备注

离线 AI 模型转换工具包现面向拥有 工作或学校 电子邮件账户的用户开放。

要访问离线 AI 模型转换工具,请使用您的 官方公司、机构或教育组织电子邮件账户 填写此 表单 。 这将帮助我们验证您的申请并更高效地处理您的请求。

申请批准后,您将被添加到 ameba-ai-offline-toolkit 私有仓库。 然后,您可以参照 Docker 安装方法手动安装方法 安装指南来安装离线 Acuity Toolkit。

离线与线上转换工具包简要对比

用户将可以使用离线工具包拥有的专属功能。对于 SDK 中发布的每个新的 NN 模型示例, 转换支持也将优先提供给离线工具包用户。

功能

离线工具包

线上转换

支持 YOLOv9-tiny

支持 MobileNetV2

在 Docker/Linux 上的自动化开发

不适用

欲知支持的 AI 框架 ,请参考 附录 A:Acuity 支持的操作层

安装离线 AI 模型转换工具包

Docker 安装方法

Docker 安装 是安装离线 AI 模型转换工具包的推荐方法。它提供了一个预配置的环境,包含所有必要的依赖项,使工具包的安装和使用更加简便。

备注

要访问离线 AI 模型转换工具,请使用您的 官方公司、机构或教育组织邮箱账户 填写此 表单 。这将帮助我们验证 您的申请并更高效地处理您的请求。

获得批准后,您将被添加到 ameba-ai-offline-toolkit 私有仓库中。然后,您可以 参考以下步骤安装 Offline Acuity Toolkit。

下载 Acuity Toolkit Docker

下载并使用本软件即表示您同意完全遵守 Acuity 许可证 的条款和条件。

  • 用户 无需 下载 Verisilicon_SW_VIP_Acuity_6.18.8_whl_20250303.tgz

    Verisilicon_Tool_VivanteIDE_v5.8.1_...tgz —— 这些软件包已安装在 Docker 映像中。

  • ACUITY_PATH 也已在 Docker 映像中设置(在 .bashrc 中)。

  • 我们将 acuity_examples_c901149Verisilicon_SW_NBInfo_1.2.17_20230412

    挂载到 Docker 中以便灵活操作,因此您需要下载这些软件包。

工具包文件与 GitHub 访问

我们将 Docker 映像存储在 GitHub Container Registry (GHCR) 上。请创建 Personal Access Token (PAT):

  1. GitHub → Settings → Developer settings → Personal access tokens → Tokens (classic)

  2. Generate new token (classic)

  3. 权限设置:至少选择: write:packagesread:packagesdelete:packages

  4. Repository 访问权限:请选择 All repositories

Docker 入口

在执行 "install" 和 "run" 脚本之前,请确保您已在 Docker 上完成 GHCR 的身份验证。 使用生成的 PAT 作为密码。

docker login ghcr.io -u <username>
Linux:

请参考 https://docs.docker.com/engine/install/ubuntu/ 在 Ubuntu 上安装 Docker 引擎。

链接:https://github.com/Ameba-AIoT/ameba-ai-offline-toolkit/tree/main/Docker/Linux

cd Docker/Linux
source install.sh    # 该脚本将从 ghcr.io 下载 Docker 映像
source run.sh        # Docker 入口

该脚本会将 acuity_examplesVerisilicon_SW_NBInfo 挂载到 Docker 中。 请将这些文件夹放置在 run.sh 的同一路径下。

docker run -it --rm \
   --user $(id -u):$(id -g) \
   -e HOME=/home/user \
   -w /workspace/acuity_examples \
   -v \"$(pwd)/acuity_examples_c901149:/workspace/acuity_examples\" \
   -v \"$(pwd)/Verisilicon_SW_NBInfo_1.2.17_20230412:/workspace/Verisilicon_SW_NBInfo_1.2.17_20230412\" \
   ${IMAGE_NAME}:${IMAGE_TAG}

小技巧

默认情况下,Docker 守护进程始终以 root 用户身份运行,因此在调用 Docker 命令时需要加上 sudo

您可以创建一个名为 docker 的 Unix 组并将您的用户添加到该组中。

$ sudo groupadd docker
$ sudo usermod -aG docker $USER
$ newgrp docker

更多详情请参考 Docker 安装后指南

手动安装方法

手动安装 是为希望自行配置工具包的用户提供的替代方法。该方法需要更多步骤和配置,但允许对安装过程进行更高程度的自定义。

备注

要访问离线 AI 模型转换工具,请使用您的 公司、机构或教育组织官方邮箱账号 填写此 表单 。这将帮助我们核实您的申请并更高效地处理您的请求。

审核通过后,您将被添加到 ameba-ai-offline-toolkit 私有仓库中。然后,您可以按照以下步骤安装 Offline Acuity Toolkit。

下载 Acuity Toolkit

下载和使用本软件即表示您同意完全遵守 Acuity 许可证 中的条款和条件。

Acuity Toolkit 链接:https://github.com/Ameba-AIoT/ameba-ai-offline-toolkit/releases

Toolkit 文件

安装 Acuity Toolkit

本节将介绍如何安装 Acuity Toolkit。

有关详细信息,请参阅以下用户指南文档:

  • Vivante.Programming.ACUITY.Toolkit.User.Guide.pdf

  • Vivante_IDE_User_Guide.pdf

  • Vivante.App.Note.Pegasus.Scripts.pdf

在 PC 上安装 Acuity Toolkit

Acuity Toolkit 用于从预训练模型生成神经网络二进制文件。

Acuity 工具与文档

版本

Acuity 工具/文档

描述

Acuity 6.18.8

Verisilicon_SW_VIP_Acuity_6.18.8_whl_20250303.tgz

Acuity toolkit 用户指南文档

Acuity Python 版本 toolkit(请查看 Vivante.VIP.ACUITY.Toolkit.User.Guide.pdf 第 2 章中的安装步骤)

Verisilicon_SW_NBInfo_1.2.17_20230412.tgz

内存评估工具(请查看其 readme 文件中的使用说明)

Verisilicon_Tool_VivanteIDE_v5.8.1

用于导出网络二进制文件的命令行工具

acuity_examples_c901149.tgz

Acuity 示例和脚本

Verisilicon_SW_VIP_Acuity_6.18.8_whl_20250303.tgz

  1. 请使用推荐的 Vivante_ML_Toolkit_acuity_whl_6.18.8_python3.8.10 版本。

  2. 安装 wheel 版本。

  3. 按照 Vivante.Programming.ACUITY.Toolkit.User.Guide.pdf:第 2.2 节 安装 ACUITY Wheel 版本 中的步骤操作。

  4. 安装完成后,使用 pip3 show acuity 验证。

  5. 导出 Acuity 路径(添加到 ~/.bashrc):

    export ACUITY_PATH=<directory of acuity-toolkit-whl-version>/bin
    

安装完成后,请参考 acuity_examples_c901149.tgz 中的脚本来执行 Acuity Toolkit 工作流程:

  1. 查看 acuity_examples readme 文件中的使用说明。详细信息请参阅 Vivante.App.Note.Pegasus.Scripts.pdf

    • Vivante.Programming.ACUITY.Toolkit.User.Guide.pdf:第 3.2 节 pegasus 工作流程 说明了操作步骤。

    • Vivante.Programming.ACUITY.Toolkit.User.Guide.pdf:第 3.4 节 命令参考 提供了关于 import、quantize、inference 和 export 命令的详细信息。

  2. acuity_examples_c901149 中为您自定义的模型创建自己的文件夹(在 Models 文件夹下)。

  3. 参考转换步骤和 NN 量化讨论章节,了解模型转换示例。

安装 VivanteIDE

VivanteIDE 是用于导出网络二进制文件的命令行工具。您无需打开 IDE 界面——仅需使用 cmdtools 功能即可导出 .nb 文件。

有关详细的安装说明,请参阅 Vivante_IDE_User_Guide.pdf:安装和卸载 VivanteIDE 部分

  1. 在 Linux 操作系统上安装 VivanteIDE(Acuity toolkit 安装在 Linux 上)。

  2. 安装过程中,可以跳过许可证文件,因为我们只需要导出网络二进制文件。

  3. 安装完成后,软件包应位于以下路径: /home/$user/Verisilicon/VivanteIDE5.8.1.1 (或您指定的路径)。

  4. 将以下优化参数添加到 pegasus_export_ovx.sh

RTL8735B:
--optimize \'VIP8000NANONI_PID0XAD\' \
--pack-nbg-viplite \
--viv-sdk \'home/Acuity/VivanteIDE5.3.0_cmdtools/cmdtools\' \

备注

您只需阅读 Vivante_IDE_User_Guide.pdf 中的 安装和卸载 VivanteIDE 部分 。用户指南中的其余功能对于导出 .nb 文件并非必需。

NN 模型转换步骤

使用 Acuity Toolkit 在 Docker 上进行 NN 模型转换步骤

模型转换步骤 提供了使用离线 AI 模型转换工具包转换 AI 模型的详细指南。请按照以下步骤操作,成功将您的模型转换为可在 Ameba IC 上部署的所需格式。

步骤 1:导入前准备

  • 请确保您已安装并设置好 Docker 后再继续。

    如果尚未完成,请参考 Docker 安装方法

  • 请确认 pegasus_export_ovx.sh 中已添加以下命令,

    以确保在 Docker 上成功导出:

RTL8735B:
--optimize \'VIP8000NANONI_PID0XAD\' \
--pack-nbg-viplite \
--viv-sdk \'home/Acuity/VivanteIDE5.3.0_cmdtools/cmdtools\' \
  • 要将模型导入 Acuity,请将模型放置在与模型同名的文件夹中,

    并确保导入脚本可访问该文件夹。

  • 如果您还没有准备好自定义模型,可以下载我们仓库中提供的

    示例模型 进行测试。 请注意,这些模型仅供测试和开发使用,申请访问权限请参考 申请资格

  • 在模型所在文件夹中,创建一个名为 dataset.txt 的文件,

    并列出校准图像的可访问路径(每行一个)。 您可以选择将所有图像放在同一文件夹中。

步骤 2:导入模型

使用以下命令导入模型:

./pegasus_import.sh <model_name>

导入成功后,根据您的模型类型修改生成的 <model_name>_inputmeta.yml 文件。需要配置的关键参数包括 meanscalereverse_channelpreproc_type 。详细说明请参考:rst_link:输入元数据修改指南,arduino/ai/ai_tools/model_conversion/offline_conversion/inputmeta_file_modification

例如,导入 YOLOv4-tiny:

./pegasus_import.sh yolov4_tiny

然后修改 yolov4_tiny_inputmeta.yml

scale: 0.00392156    # 1/255
reverse_channel: false

步骤 3:量化模型

模型量化可以减小模型文件的大小并加快推理速度,但这通常会导致 1% 到 3% 的轻微精度下降。

在开始量化之前,请先准备好用于校准的数据集:

  1. 从原始数据集中随机选取一部分图像,并将它们复制到一个新的文件夹中。

  2. 创建一个名为 dataset.txt 的文本文件,并将这些选中图像的文件路径记录在其中。

  3. dataset.txt 文件放置在与模型相同的目录中。

执行量化过程:

./pegasus_quantize.sh <model_name> <quantization_type>

其中 quantization_type 可以是 uint8 (asymmetric_affine) 或 int16 (dynamic_fixed_point)。

以 YOLOv4-tiny 为例:

./pegasus_quantize.sh yolov4_tiny uint8

步骤 4:导出模型

量化完成后,导出量化后的模型:

./pegasus_export_ovx.sh <model_name> <quantization_type>

如果导出成功,您将在 nbg-unify 文件夹中找到转换后的 .nb 模型。

备注

模型转换完成后,需要配合相应的预处理和后处理代码才能完成模型的完整功能。 Acuity 工具 不会 自动生成预处理和后处理文件。用户可以参考已支持的 NN 模型 的现有预处理和后处理文件。

要验证推理结果,请使用:

./pegasus_inference.sh

Acuity 5.21.1 用户附加说明

如果您使用的是 Acuity 5.21.1(而非 6.6.1 或 6.18.8),导出参数有所不同:

RTL8735B:
--optimize \'VIP8000NANONI_PID0XAD\' \
--pack-nbg-viplite \
--viv-sdk \'home/Acuity/VivanteIDE5.3.0_cmdtools/cmdtools\' \

Viplite 驱动兼容性

Viplite 驱动是 Ameba IC 上与 NN 引擎配合使用的 NN 驱动。如果自定义模型由较新的 Acuity Toolkit 转换,则应配合较新的 Viplite 驱动使用。由较旧的 Acuity Toolkit 转换的模型也可配合较新的 Viplite 驱动使用。

Viplite 驱动与 Acuity Toolkit 兼容性

Viplite 驱动版本

AcuityToolkit 5.21.1

AcuityToolkit 6.6.1

AcuityToolkit 6.18.8

1.3.4

V

X

X

1.8.0

V

V

X

1.12.0

V

V

V/X

2.0.0

V

V

V

自定义 NN 模型转换

YOLOv7-tiny (PyTorch)

本节将演示为 YOLOv7-tiny PyTorch 生成模型二进制文件的过程。

您可以选择自行训练,或从 YOLOv7 仓库 下载 yolov7-tiny.pt

1. 训练自定义 YOLOv7-tiny 模型

  • 请记得将 training/yolov7-tiny.yaml 中的 nc class 数量修改为您的自定义类别数量

2. 对训练好的 yolov7-tiny.pt 进行重参数化

3. 将 PyTorch 转换为 ONNX

  • 建议将 YOLOv7-tiny 的 .pt 模型文件转换为 .onnx 文件,以获得更好的性能和量化兼容性。

  • 在导出 ONNX 模型之前,请修改 models/yolo.pyDetect 类的 forward() 函数,以确保与 Ameba SDK 的兼容性。了解更多,请参考 为什么需要修改前向传播函数?

    def forward(self, x):
        # x = x.copy()  # for profiling
        z = []  # inference output
        self.training |= self.export
        for i in range(self.nl):
            x[i] = self.m[i](x[i])  # conv
            y = x[i].sigmoid()
            z.append(y)
        out = z
        return out
    
  • 然后,使用 YOLOv7 导出脚本进行导出。
    $ python export.py --weights weights/yolov7-tiny.pt --simplify --img-size H W
    

4. 执行以下命令将 YOLOv7-tiny ONNX 模型导入 Acuity

$ ./pegasus_import.sh yolov7-tiny

备注

由于 YOLOv7 是基于锚点的模型,因此在导入 yolov7-tiny 时无需分离输出。

cmd="$PEGASUS import onnx\
    --model         ${NAME}.onnx \
    --output-model  ${NAME}.json \
    --output-data   ${NAME}.data \
    $(cat inputs_outputs.txt)"

5. 成功导入后,请修改输入元数据文件

  • 打开 yolov7-tiny_inputmeta.yml,按如下方式修改 scalereverse_channel 设置:

scale: 0.00392157
reverse_channel: false
  • 原因:0.00392157 相当于 1/255,因为 YOLOv7 训练过程中输入图像从 0~255 范围进行了归一化;而将 reverse_channel 设置为 false 是为了保持原始输入通道顺序。

6. 执行以下命令将模型量化为 uint8:

$ ./pegasus_quantize.sh yolov7-tiny uint8

7. 确保在 pegasus_export_ovx.sh 中添加以下选项

针对 Acuity 6.18.8

Manual:

手动安装:

--optimize 'VIP8000NANONI_PID0XAD' \
--pack-nbg-unify \
--viv-sdk 'home/<username>/VeriSilicon/VivanteIDE5.8.1.1/cmdtools' \

备注

使用手动安装路径时,请将 <username> 替换为您的实际 Linux 用户名。

8. 导出 NBG 文件

  • 执行以下命令导出量化后的 YOLOv7-tiny 模型:

$ ./pegasus_export_ovx.sh yolov7-tiny uint8
  • 然后,将生成 network_binary.nb。生成的 nb 文件位于 wksp/yolov7-tiny_uint8_nbg_unify,您可以将其重命名为 yolov7-tiny.nb

9. 模型转换完成后,生成的 .nb 模型即可成功部署在 Ameba IC 上。

YOLOv9-tiny

本节以 YOLOv9-Tiny 为例,您可以从 YOLOv9 GitHub 仓库 下载转换后的模型:

YOLOv9 有两种模型结构:

  • YOLOv9 = PGI + GELAN

  • GELAN = 推理友好型结构

PGI 分支主要用于训练。在推理部署时,可以通过重参数化过程移除 PGI 分支。 例如,yolov9-t.pt 可以转换为 yolov9-t-converted.pt

备注

  1. yolov9-t 的重参数化过程与 yolov9-s 相同。

  2. 请记得将配置文件更改为 gelan-t.yaml

  3. 请使用转换/重参数化后的 YOLOv9-tiny 模型进行部署。

1. 将 PyTorch 模型转换为 ONNX

  • 建议在将 .pt 模型文件导入 Acuity 之前先转换为 .onnx 文件,这可以提供更好的兼容性和量化性能。

  • 请参考 YOLOv9 GitHub 仓库 中的导出说明,并执行以下命令导出 ONNX 模型:

$ python3 export.py --weight yolov9-t-converted.pt --imgsz 416 416 --include onnx
  • 导出完成后,应生成 ONNX 模型 yolov9-t-converted.onnx

2. 将 ONNX 模型导入 Acuity

$ ./pegasus_import.sh yolov9-t-converted
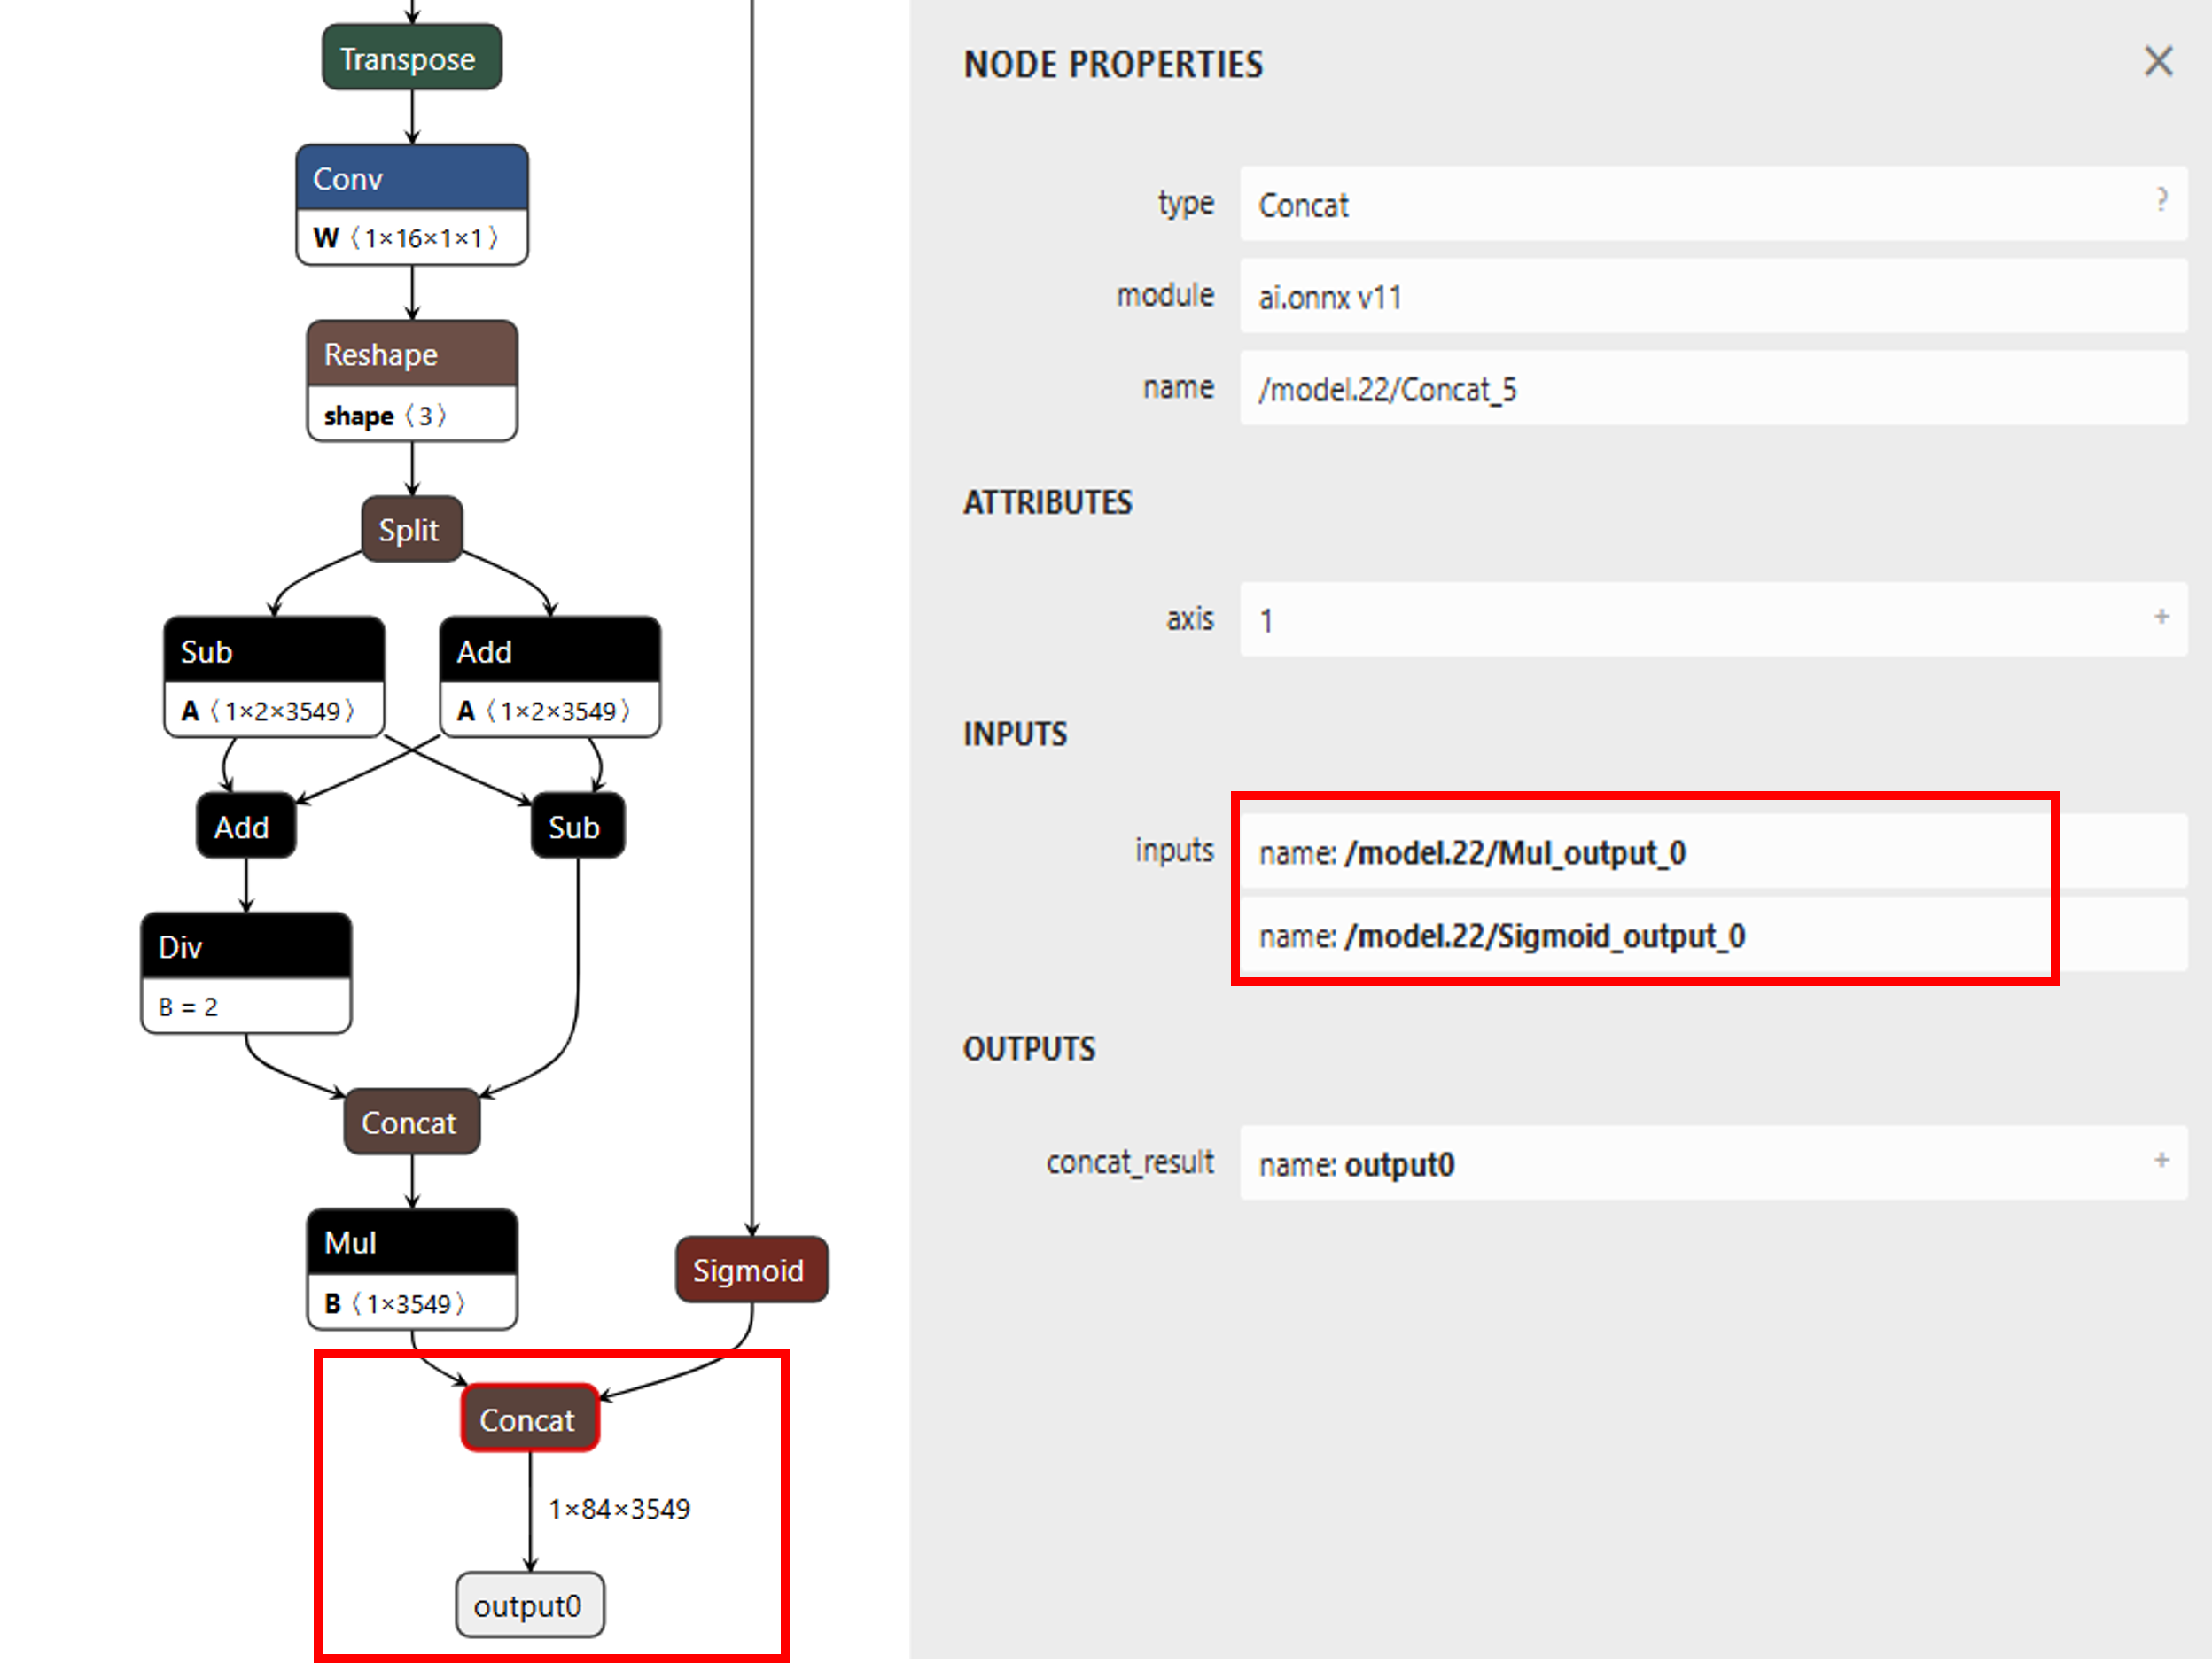
  • 原始的 YOLOv9-tiny 模型只有一个输出张量,大小为 3549 x 84

  • 输出包含:4 个边界框值 + 80 个类别得分

  • 模型结构如下图所示:

../../../../_images/yolov9_model_struc.png
  • 按如下方式修改导入命令:

cmd="$PEGASUS import onnx\
    --model         ${NAME}.onnx \
    --outputs       '/model.22/Mul_output_0  /model.22/Sigmoid_output_0' \
    --output-model  ${NAME}.json \
    --output-data   ${NAME}.data \
    $(cat inputs_outputs.txt)"

分离后的输出结构

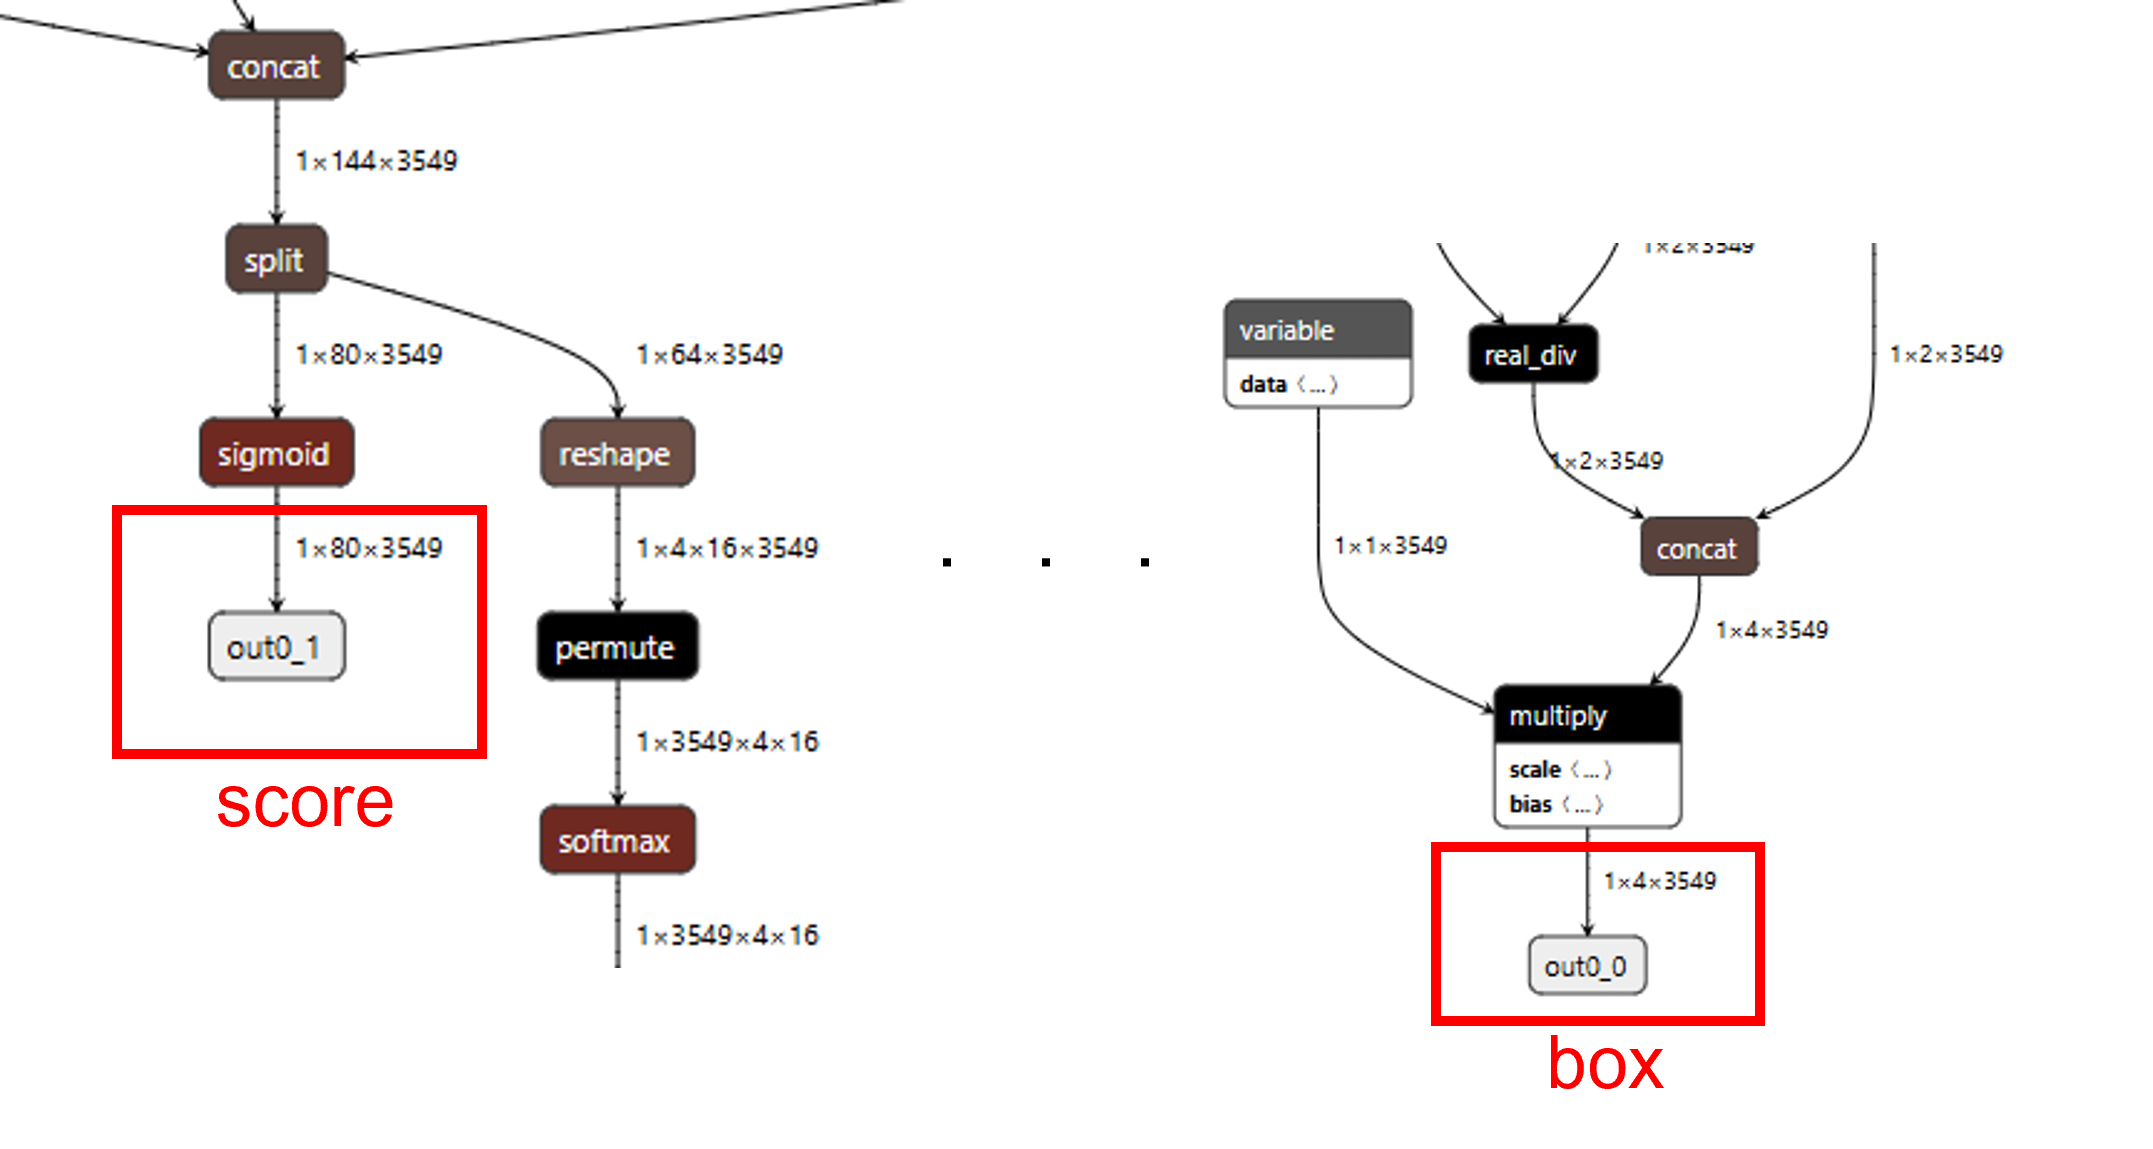
  • 分离边界框和得分输出后,YOLOv9-tiny 将有两个输出张量:

    • 输出 1:3549 x 4 // 边界框

    • 输出 2:3549 x 80 // 类别概率

  • 作者提供的 YOLOv9-tiny 模型在 80 个类别上训练。

  • 分离后的模型结构如下图所示:

../../../../_images/yolov9_model_sep.png

输出分离后的 YOLOv9-tiny 模型结构

3. 修改输入元数据

  • 打开文件:yolov9-t-converted_inputmeta.yml

  • 按如下方式修改 scale 设置:

scale: 0.00392157
  • 原因:0.00392157 相当于 1/255,因为 YOLOv7 训练过程中输入图像从 0~255 范围进行了归一化。

INT8 或 INT16 量化的额外设置

  • 如果您选择 int8int16 作为量化类型,请设置:

add_preproc_node: true
preproc_type: IMAGE_RGB888_PLANAR
  • 原因:摄像头输出数据类型为 uint8。预处理节点帮助将 uint8 摄像头数据转换为模型所需的输入数据类型。

4. 量化模型

使用以下命令量化模型

$ ./pegasus_quantize.sh yolov9-t-converted QType
  • QType 替换为所需的量化类型(例如 uint8int8int16

5. 确保在 pegasus_export_ovx.sh 中添加以下选项

针对 Acuity 6.18.8

Manual:

手动安装:

--optimize 'VIP8000NANONI_PID0XAD' \
--pack-nbg-unify \
--viv-sdk 'home/<username>/VeriSilicon/VivanteIDE5.8.1.1/cmdtools' \

备注

使用手动安装路径时,请将 <username> 替换为您的实际 Linux 用户名。

6. 导出 NBG 文件

  • 执行以下命令导出量化后的 YOLOv9-tiny 模型:

$ ./pegasus_export_ovx.sh yolov9-t-converted QType
  • 然后,将生成 network_binary.nb。生成的 nb 文件位于 wksp/yolov9-t-converted_uint8_nbg_unify,您可以将其重命名为 yolov9-t-converted.nb

备注

路径名称可能因所选量化类型而异。

例如,如果使用 int16,文件夹名称可能包含 int16 而不是 uint8

7. 上述步骤描述了常规量化流程,如果您希望提高 8 位量化的精度,请参考 混合量化 章节

备注

模型转换完成后,模型仍需在 SDK 中实现相应的前处理和后处理。

Acuity Toolkit 不会自动生成前处理或后处理源文件。

用户可以参考 SDK 中现有的 NN 模型示例。

要检查 Acuity 的推理输出,请使用:

$ ./pegasus_inference.sh

为什么需要修改前向传播函数?

  • 默认情况下,官方 YOLOv7 实现在前向传播过程中重新排列了检测输出张量。

  • 张量格式从 [batch_size, 255, H, W] 变为 [batch_size, 3, H, W, 85]

  • 然而,Ameba SDK 后处理模块期望 YOLO 输出格式保持为 [batch_size, 255, H, W]

  • 该格式与 YOLOv3 和 YOLOv4 使用的输出格式一致。

  • 因此,为了支持 Ameba SDK 后处理,必须禁用或修改 Detect.forward() 函数中的张量重排,使输出保持原始格式:[batch_size, 255, H, W]

为什么需要分离输出?

  • 在导入 YOLOv9 时如果没有指定输出层,模型会生成一个合并的输出张量。

  • 然而,在 uint8 量化过程中,类别概率输出可能会变为零。

  • 这是因为 YOLOv9 将边界框值和类别得分拼接到了同一个输出张量中。

  • 值域差异很大:
    • 边界框值:0 ~ 416

    • 类别得分:0 ~ 1

  • 由于边界框的值域远大于得分的值域,8 位量化可能会丢失较小的得分值。因此,概率输出可能变为零,模型无法产生有效的推理结果。

  • 为避免此问题,请在 Acuity 导入阶段分离边界框输出和类别得分输出。

  • 您可以使用 Netron 查找正确的输出层名称。

自定义 YOLOv7-tiny 模型重参数化指南

  • 重参数化用于将可训练的 BoF 模块精简为部署模型,以实现快速推理。例如,将 BN 合并到卷积层,将 YOLOR 合并到卷积层等。然而,在重参数化之前,模型具有更多的参数和计算成本。重参数化后的模型(cfg/deploy)用于部署目的。

  • 您可以克隆一份 YOLOv7 仓库 到您的本地机器上,并在其中执行重参数化。

  • 或者,您可以创建一份此 Kaggle 笔记本 的副本,上传您训练好的最佳模型 pt 文件,并在 Kaggle 上执行重参数化。正确运行所有代码行后,您可以下载重参数化后的模型 best_reparam.pt,并在 Ameba 上使用。

支持的量化类型

请参见 支持的模型量化类型

备注

供应商建议将原始的 float32 模型导入 Acuity Toolkit,并使用 Acuity 的量化脚本进行量化。

用户也可以使用自己的训练框架(如 TensorFlow)对模型进行量化。但是,必须确保量化类型受 Ameba 的 NPU 支持。

自定义 NN 模型的 SDK 配置

关于 YOLOv9-tiny 在 SDK 上的部署,请参见 YOLOv9-tiny 部署指南

混合量化

Acuity 提供了另一种量化规则,称为混合量化。YOLOv9 需要 16 位量化来表示输出信息,然而, 16 位量化的推理时间较长,因此请使用混合量化(uint8+int16)来减小模型大小和推理时间。

要执行混合量化,请按以下顺序使用量化命令:

  1. 使用 --rebuild--compute-entropy 参数量化网络。这将生成一个 .quantize 文件

    • .quantize 文件中,customized_quantize_layers 部分提供了建议使用 dynamic_fixed_point-i16 量化类型进行进一步量化的层

python3 pegasus.py quantize \
--model 'yolov9-t-converted.json' \
--model-data 'yolov9-t-converted.data' \
--quantizer 'asymmetric_affine' \
--qtype 'uint8' \
--with-input-meta 'yolov9-t-converted_inputmeta.yml' \
--rebuild \
--compute-entropy \
  1. 更新 customized_quantize_layers 部分,以添加、修改或移除需要进一步量化的层

    • yolov9-t-converted_uint8.quantize 文件中修改 customized_quantize_layers 部分,请参考 https://netron.app/ 查看模型架构。

    • 由于仅在 yolov9 的最后几层需要将得分信息与边界框信息一起表示时才需要 16 位量化,因此,仅将最后几层量化为 dynamic_fixed_point-i16(其余层保持 asymmetric_affine)。

  2. 使用更新后的 .quantize 文件并添加 --hybrid 参数,以与步骤 1 相同的量化类型对网络进行量化。这将生成 .quantize.json 并更新 .quantize 文件。

python3 pegasus.py quantize \
--model 'yolov9-t-converted.json' \
--model-data 'yolov9-t-converted.data' \
--model-quantize 'yolov9-t-converted_uint8.quantize' \
--quantizer 'asymmetric_affine' \
--qtype 'uint8' \
--with-input-meta 'yolov9-t-converted_inputmeta.yml' \
--hybrid \
  1. 使用 .data 文件和生成的 .quantize.json 文件导出此混合量化模型

python3 pegasus.py export ovxlib \
--model 'yolov9-t-converted_uint8.quantize.json' \
--model-data 'yolov9-t-converted.data' \
--model-quantize 'yolov9-t-converted_uint8.quantize' \
--with-input-meta 'yolov9-t-converted_inputmeta.yml' \
--dtype 'quantized' \

附录 A:Acuity 支持的操作层

ONNX 到 ACUITY 操作映射

ONNX 到 ACUITY 操作映射

ONNX Operation

ACUITY Operation

Abs

abs

Add

add

And

logical_and

ArgMax

argmax

ArgMin

argmin

Atan

atan

Atanh

atanh

BatchNormalization

batchnormalize

Cast

cast

CastLike

cast

Ceil

ceil

Celu

celu

Clip

clipbyvalue

Concat

concat

Conv

conv1d/group_conv1d/depthwise_conv1d/convolution/conv2d_op/depthwise_conv2d_op/conv3d

ConvTranspose

deconvolution/deconvolution1d

Cos

cos

Cumsum

cumsum

DepthToSpace

depth2space

DequantizeLinear

dequantize

DFT

dft

Div

divide

Dropout

dropout

Einsum

einsum

Elu

elu

Equal

equal

Erf

erf

Exp

exp

Expand

expand_broadcast

Floor

floor

Gather

gather

GatherElements

gather_elements

GatherND

gathernd

Gemm

matmul/fullconnect

Greater

greater

GreaterOrEqual

greater_equal

GridSample

gridsample

GRU

gru

HammingWindow

hammingwindow

HannWindow

hannwindow

HardSigmoid

hard_sigmoid

HardSwish

hard_swish

InstanceNormalization

instancenormalize

LeakyRelu

leakyrelu

Less

less

LessOrEqual

less_equal

Log

log

Logsoftmax

log_softmax

LRN

localresponsenormalization

LSTM

lstm

MatMul

matmul/fullconnect

Max

eltwise(MAX)

MaxPool/AveragePool/GlobalAveragePool/GlobalMaxPool

pooling/pool1d/pool3d

MaxRoiPool

roipooling

Mean

eltwise(MEAN)

MeanVarianceNormalization

instancenormalize

Min

eltwise(MIN)

Mish

mish

Mod

mod

Mul

multiply

Neg

neg

NonZero

nonzero

OneHot

onehot

Or

logical_or

Pad

pad

Pow

pow

Prelu

prelu

QLinearConv

convolution/conv1d

QLinearMatMul

matmul

QuantizeLinear

quantize

Reciprocal

variable+divide

ReduceL1

abs+reducesum

ReduceL2

reducesum+multiply+sqrt

ReduceLogSum

reducesum+log

ReduceLogSumExp

exp+reducesum+log

ReduceMax

reducemax

ReduceMean

reducemean

ReduceMin

reducemin

ReduceProd

reduceprod

ReduceSum

reducesum

ReduceSumSquare

multiply+reducesum

Relu

relu

Reshape/Squeeze/Unsqueeze/Flatten

reshape

Resize

image_resize

ReverseSequence

reverse_sequence

Round

round

ScatterND

scatter_nd_update

Selu

selu

Shape

shapelayer

Sigmoid

sigmoid

Sign

sign

Silu

swish

Sin

sin

Size

size

Slice

slice/stridedslice

Softmax

softmax

Softplus

softrelu

Softsign

abs+add+divide+variable

SpaceToDepth

space2depth

Split

split/slice

Sqrt

sqrt

Squeeze

squeeze

STFT

stft

Sub

subtract

Sum

eltwise(SUM)

Tanh

tanh

Tile

tile

TopK

topk

Transpose

permute

Unsqueeze

reshape

Upsample

image_resize

Where

where

Xor

not_equal

Darknet 到 ACUITY 操作映射

Darknet 到 ACUITY 操作映射

Darknet Operation

ACUITY Operation

avgpool

pooling

batch_normalize

batchnormalize

connected

fullconnect

convolutional

convolution

depthwise_convolutional

convolution

leaky

leakyrelu

logistic

sigmoid

maxpool

pooling

mish

mish

region

region

relu

relu

reorg

reorg

route

concat/slice

scale_channels

multiply

shortcut

add/slice+add/pad+add

softmax

softmax

swish

swish

upsample

upsampling

yolo

yolo

附录 B:Acuity 支持的 AI 框架

支持的 AI 框架及导入文件格式

AI Framework

Import File Format

Caffe

.caffemodel

TensorFlow

.pb

TensorFlow Lite

.tflite

Darknet

.cfg

ONNX

.onnx

PyTorch

.pt

Keras

.h5

备注

对于从已量化的 ONNX、TensorFlow 或 TensorFlow Lite 模型转换而来的 Acuity 网络,无需再进行量化。 逐通道 量化模型 不受 NPU 支持——请确保您的模型使用 逐张量 量化。

小技巧

对于 PyTorch 框架,强烈建议先将文件导出为 .onnx 格式,以确保转换成功。

参考:ACUITY Toolkit 用户指南

Inputmeta 文件修改

量化前的关键步骤

成功导入模型后,系统会生成 <model>_inputmeta.yml 文件。您需要根据模型的特性对其进行适当的修改。因此,您需要了解自定义模型的特征,例如输入形状(input shape)、输入格式(input format)、数据归一化(data normalization)等。以下是不同模型需要修改的参数:

YOLOv4-tiny

参数

reverse_channel

false

scale

0.003921568627451

add_preproc_node

true

preproc_type

IMAGE_RGB888_PLANAR

备注

如果您使用不同的数据集重新训练模型,请相应地更新 mean/scale 值,因为 mean/scale 取决于数据集的特征和数据归一化方式。

YOLOv7-tiny(PyTorch 版本)

小技巧

请在导入模型前,先将 .pt 格式的模型转换为 .onnx 格式。

参数

reverse_channel

false

scale

0.003921568627451

add_preproc_node

true

preproc_type

IMAGE_RGB888_PLANAR

备注

如果您使用不同的数据集重新训练模型,请相应地更新 mean/scale 值,因为 mean/scale 取决于数据集的特征和数据归一化方式。

MobileFaceNet

参数

reverse_channel

false

mean

123.675, 116.28, 103.53

scale

0.003921568627451

add_preproc_node

true

preproc_type

IMAGE_RGB888_PLANAR

备注

如果您使用不同的数据集重新训练模型,请相应地更新 mean/scale 值,因为 mean/scale 取决于数据集的特征和数据归一化方式。

SCRFD

参数

reverse_channel

false

mean

127.5, 127.5, 127.5

scale

0.0078125

add_preproc_node

true

preproc_type

IMAGE_RGB888_PLANAR

备注

如果您使用不同的数据集重新训练模型,请相应地更新 mean/scale 值,因为 mean/scale 取决于数据集的特征和数据归一化方式。

YAMNet

由于该模型使用了 STFT/FFT 算子,因此无法进行量化。您可以直接进入导出步骤。

用于图像分类的 CNN 模型

小技巧

对于 TensorFlow keras .h5 模型,请勿在 .h5 文件中保存优化器数据,否则在开始导入 H5 模型时会失败。要忽略优化器数据,请在命令中添加 include_optimizer=False。例如:model.save('model.h5', include_optimizer=False)

RGB

参数

reverse_channel

false

scale

0.003921568627451

add_preproc_node

true

preproc_type

IMAGE_RGB888_PLANAR

灰度图

某些模型需要使用灰度图像数据集,例如 fer2013_cnn,由于 Acuity 工具不支持 bmp 文件,您需要以不同方式修改 yml 文件。

参数

reverse_channel

false

scale

0.003921568627451

add_preproc_node

true

preproc_type

TENSOR

备注

TENSOR 表示数据将是原生张量数据,不含任何头部信息。对于灰度图像数据集,校准使用张量文件而非 jpeg 或 bmp 文件。

MobileNetV2

参数

reverse_channel

false

mean

0, 0, 0

scale

1.0

add_preproc_node

true

preproc_type

TENSOR

备注

目前,SDK 假定 MobileNetV2 是在 PyTorch 框架下使用标准 ImageNet 归一化进行训练的,因此 mean 设置为 0。由于归一化过程将由 SDK 中的预处理函数处理,因此在模型转换时无需执行缩放,因此 scale 设置为 1。

Acuity 许可证

版权声明

©2021 Realtek Semiconductor Corp. All rights reserved. No part of this document may be reproduced, transmitted, transcribed, stored in a retrieval system, or translated into any language in any form or by any means without the written permission of Realtek Semiconductor Corp.

免责声明

Please Read Carefully:

Realtek Semiconductor Corp., (Realtek) reserves the right to make corrections, enhancements, improvements and other changes to its products and services. Buyers should obtain the latest relevant information before placing orders and should verify that such information is current and complete.

Reproduction of significant portions in Realtek data sheets is permissible only if reproduction is without alteration and is accompanied by all associated warranties, conditions, limitations, and notices. Realtek is not responsible or liable for such reproduced documentation. Information of third parties may be subject to additional restrictions.

Buyers and others who are developing systems that incorporate Realtek products (collectively, "Customers") understand and agree that Customers remain responsible for using their independent analysis, evaluation and judgment in designing their applications and that Customers have full and exclusive responsibility to assure the safety of Customers' applications and compliance of their applications (and of all Realtek products used in or for Customers' applications) with all applicable regulations, laws and other applicable requirements. Designer represents that, with respect to their applications, Customer has all the necessary expertise to create and implement safeguards that (1) anticipate dangerous consequences of failures, (2) monitor failures and their consequences, and (3) lessen the likelihood of failures that might cause harm and take appropriate actions. Customer agrees that prior to using or distributing any applications that include Realtek products, Customer will thoroughly test such applications and the functionality of such Realtek products as used in such applications.

Realtek's provision of technical, application or other design advice, quality characterization, reliability data or other services or information, including, but not limited to, reference designs and materials relating to evaluation kits, (collectively, "Resources") are intended to assist designers who are developing applications that incorporate Realtek products; by downloading, accessing or using Realtek's Resources in any way, Customer (individually or, if Customer is acting on behalf of a company, Customer's company) agrees to use any particular Realtek Resources solely for this purpose and subject to the terms of this Notice.

Realtek's provision of Realtek Resources does not expand or otherwise alter Realtek's applicable published warranties or warranty disclaimers for Realtek's products, and no additional obligations or liabilities arise from Realtek providing such Realtek Resources. Realtek reserves the right to make corrections, enhancements, improvements and other changes to its Realtek Resources. Realtek has not conducted any testing other than that specifically described in the published documentation for a particular Realtek Resource.

Customer is authorized to use, copy and modify any individual Realtek Resource only in connection with the development of applications that include the Realtek product(s) identified in such Realtek Resource. No other license, express or implied, by estoppel or otherwise to any other Realtek intellectual property right, and no license to any technology or intellectual property right of Realtek or any third party is granted herein, including but not limited to any patent right, copyright, mask work right, or other intellectual property right relating to any combination, machine, or process in which Realtek products or services are used. Information regarding or referencing third-party products or services does not constitute a license to use such products or services, or a warranty or endorsement thereof. Use of Realtek Resources may require a license from a third party under the patents or other intellectual property of the third party, or a license from Realtek under the patents or other Realtek's intellectual property.

Realtek's Resources are provided "as is" and with all faults. Realtek disclaims all other warranties or representations, express or implied, regarding resources or use thereof, including but not limited to accuracy or completeness, title, any epidemic failure warranty and any implied warranties of merchantability, fitness for a particular purpose, and non-infringement of any third-party intellectual property rights. Realtek shall not be liable for and shall not defend or indemnify Customer against any claim, including but not limited to any infringement claim that related to or is based on any combination of products even if described in Realtek Resources or otherwise. In no event shall Realtek be liable for any actual, direct, special, collateral, indirect, punitive, incidental, consequential or exemplary damages in connection with or arising out of Realtek's Resources or use thereof, and regardless of whether Realtek has been advised of the possibility of such damages. Realtek is not responsible for any failure to meet such industry standard requirements.

Where Realtek specifically promotes products as facilitating functional safety or as compliant with industry functional safety standards, such products are intended to help enable customers to design and create their own applications that meet applicable functional safety standards and requirements. Using products in an application does not by itself establish any safety features in the application. Customers must ensure compliance with safety-related requirements and standards applicable to their applications. Designer may not use any Realtek products in life-critical medical equipment unless authorized officers of the parties have executed a special contract specifically governing such use. Life-critical medical equipment is medical equipment where failure of such equipment would cause serious bodily injury or death. Such equipment includes, without limitation, all medical devices identified by the U.S.FDA as Class III devices and equivalent classifications outside the U.S. Customers agree that it has the necessary expertise to select the product with the appropriate qualification designation for their applications and that proper product selection is at Customers' own risk. Customers are solely responsible for compliance with all legal and regulatory requirements in connection with such selection.

Customer will fully indemnify Realtek and its representatives against any damages, costs, losses, and/or liabilities arising out of Designer's non-compliance with the terms and provisions of this Notice.

商标声明

Realtek is a trademark of Realtek Semiconductor Corporation. Other names mentioned in this document are trademarks/registered trademarks of their respective owners.

使用本文档

Though every effort has been made to ensure that this document is current and accurate, more information may have become available subsequent to the production of this guide.