Amazon KVS WebRTC
概述
Amazon Kinesis Video Streams (KVS) WebRTC 是一项全托管功能,可通过托管云基础设施在 Web 浏览器、移动应用程序和联网 IoT 设备之间实现实时双向媒体流传输。
本指南介绍如何在 AmebaPro2 上配置并运行 KVS WebRTC 示例(kvs_webrtc_mmf)。
下载源代码
进入库目录:
cd project/realtek_amebapro2_v0_example/src/amazon_kvs/lib_amazon
克隆以下 KVS WebRTC 相关仓库:
amazon-kinesis-video-streams-webrtc-sdk-c
git clone -b webrtc-on-freertos-wss-1220-R https://github.com/ambiot-mini/amazon-kinesis-video-streams-webrtc-sdk-c.git
cisco/libsrtp
git clone -b webrtc-on-freertos https://github.com/ambiot-mini/libsrtp.git
tatsuhiro-t/wslay
git clone https://github.com/ambiot-mini/wslay.git
sctplab/usrsctp
git clone -b webrtc-on-freertos https://github.com/ambiot-mini/usrsctp.git
nodejs/llhttp
git clone -b release/v6.0.6 https://github.com/nodejs/llhttp.git
设置 mbedtls 版本
KVS WebRTC 项目需要使用 mbedtls-2.16.6。在 project/realtek_amebapro2_v0_example/GCC-RELEASE/config.cmake 中设置版本:
set(mbedtls "mbedtls-2.16.6")
修改 lwipopts.h
在 component/lwip/api/lwipopts.h 中启用 IPv6 支持:
#define LWIP_IPV6 1
配置示例
在
component/example/kvs_webrtc_mmf/sample_config_webrtc.h中配置 AWS 密钥和信道名称:/* Enter your AWS KVS key here */ #define KVS_WEBRTC_ACCESS_KEY "xxxxxxxxxx" #define KVS_WEBRTC_SECRET_KEY "xxxxxxxxxx" /* Setting your signaling channel name */ #define KVS_WEBRTC_CHANNEL_NAME "xxxxxxxxxx"
在
component/example/kvs_webrtc_mmf/example_kvs_webrtc_mmf.c中配置视频参数:#define V1_RESOLUTION VIDEO_HD #define V1_FPS 30 #define V1_GOP 30 #define V1_BPS 1024*1024
准备证书
将证书文件放置于 SD 卡(component/example/kvs_webrtc_mmf/certs/cert.pem),并在 sample_config_webrtc.h 中设置路径:
/* Cert path */
#define KVS_WEBRTC_ROOT_CA_PATH "sd:/cert.pem"
选择摄像头传感器
确认摄像头传感器型号,并在 <AmebaPro2_SDK>/project/realtek_amebapro2_v0_example/inc/sensor.h 中进行定义:
#define USE_SENSOR SENSOR_GC2053
使用 AWS IoT 凭证(可选)
使用 IAM 用户密钥(AK/SK)进行测试简便直接,但不建议用于生产环境。如需使用 AWS IoT Thing 凭证进行更安全的管理,请参考以下资源:
编译项目
执行以下命令编译
kvs_webrtc_mmf示例固件:cd project/realtek_amebapro2_v0_example/GCC-RELEASE mkdir build cd build cmake .. -G"Unix Makefiles" -DCMAKE_TOOLCHAIN_FILE=../toolchain.cmake -DEXAMPLE=kvs_webrtc_mmf cmake --build . --target flash
使用烧录工具将固件下载至 AmebaPro2 并重启。
通过串口终端使用以下指令配置 Wi-Fi 连接:
ATW0=<WiFi_SSID>     : 设置要连接的 WiFi AP
ATW1=<WiFi_Password> : 设置 WiFi AP 密码
ATWC                 : 发起连接
若运行正常,串口终端应显示类似以下的输出:
wifi connected
wifi connected
=== KVS Example Start ===
[KVS WebRTC module]: webrtc branch name = webrtc-on-freertos-wss-0323-R
[KVS WebRTC module]: webrtc commit hash = c5f1ee6763ede84a1b33e75665dbfdc9b1e69237
[KVS WebRTC module]: waiting get epoch timer
...
[WebRTC] Starting
initializing the app with channel(webrtc_iot_thing)
Signaling client state changed to 9 - 'Connected'
The bootup time of webrtc is 5367 ms
wss ping ==>
<== wss pong
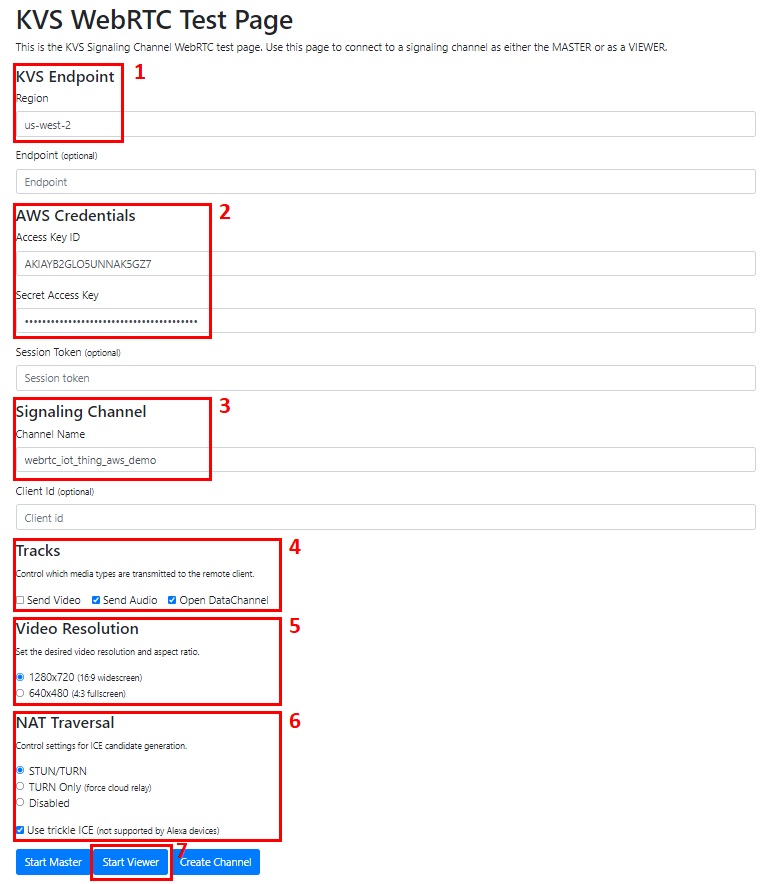
验证结果
使用 KVS WebRTC 测试页面 验证运行结果。测试页面配置如下图所示: